Contents
Overview
Linux Virtual Server (LVS), also known as ipvsadm allows system administrators to configure the distribution of web traffic across multiple servers within the Linux ecosystem. While LVS provides lots of benefits such as increased capacity, reliability, and scalability, there are many potential downsides to using it. These downsides include complexity, single point of failure, limited load-balancing methods, and limited support from its community.
Overall, as demand for web services increases, a fully-fledged ADC like ZEVENET is required to not only provide load-balancing solutions but also security, high availability, GSLB, and increased performance. This article will guide you on how to configure load balancing modules in ZEVENET adjacent to those in LVS.
Prerequisite
These are the basic requirements to transfer configurations from ipvsadm to ZEVENET ADC.
- An instance of ZEVENET ADC must be installed on your PC, bare-metal, virtual environment, or a cloud platform. For on-premise deployment, request an evaluation.
- You must have access to the Web graphical interface. If you don’t, follow this quick installation guide.
- You must be an active user of ipvsadm and have basic knowledge of its concepts.
- You must be able to create a virtual server in the ZEVENET load balancer. Follow this guide: Layer 4 and Layer 7 Virtual Server Configuration.
Basic Concepts
Virtual service: A virtual service is a cluster of real servers that work together to provide a response to client requests. A virtual service is the same as a Service in ZEVENET ADC. Access it through LSLB >> Edit >> Service.
Director: This is an instance of the Linux kernel running the ipvsadm load balancer. This instance is responsible for managing all processes, and is able to communicate with other instances in case of high availability. A Director is a Node/Instance when refering to ZEVENET ADC.
Real servers: Real servers are the physical servers or VPS that handle the incoming requests, processes them and provide a response back to the clients through a virtual service. These servers are called Backends when using ZEVENET ADC.
Virtual server: A virtual server is a logical entity that contains one or a group of virtual services. It is the point of entry for incoming traffic and is responsible for distributing the traffic to a cluster of Backends or real servers. A virtual server is the same as a Farm when using ZEVENET load balancer.
High availability: High availability refers to the ability of a system to continue operating without interruption, even if one or more of its components fail. One must install and configure the keepalived package on their system to enable high availability. ZEVENET uses a cluster of node-pairs that work together in a master/backup relation.
Ipvs-scheduler: These are sets of load balancing algorithms supported within the LVS load balancer. ZEVENET comes with lots of inbuilt load balancing schedulers that you can set up through its GUI.
Example configurations: SNAT mode
Source NAT (SNAT) is a type of Network Address Translation that allows a network device, such as a firewall, switch, router, or load balancer to translate the source IP address of a backend server within an outbound packet’s header from private to a public IP address. This NAT is used in many situations to allow devices on a private network to communicate with the internet while not limiting any benefits. Some of these benefits include:
- Enhanced security: Source NAT hides the IP address of backend servers within an outbound packet, making it difficult for attackers to identify any of the devices within a private network.
- Enhanced Performance: By distributing traffic across multiple backend servers, source NAT helps improve the performance of a network by reducing loads on a single server.
- Increased scalability: By allowing multiple backend servers and other local devices to share a single external IP address, Source NAT enables data center consolidation while not spending lots on public IPs.
In this section, we will make SNAT configurations with LVS and demonstrate similar configurations using ZEVENET ADC.
Ipvsadm configurations
Real servers:
>>192.168.88.150:5060
>>192.168.88.151:5060
Virtual service:
>>192.168.88.190:5060
- To use SNAT mode in ipvsadm, run the command ”sudo nano /etc/sysctl.conf”.
- Uncomment the line with “net.ipv4,ip_forward=1” to enable ip forwarding.
- Run the command sysctl -p for the changes to take effect.
- Run the command ipvsadm -C
- Add a service by running the command ipvsadm -A -t 192.168.88.190:5060 -s rr
- Add two real server:
Take note of the following flags. -C enables the user to clear the whole table incase of a fresh start. -A enables one to add a service to ipvsadm load balancer. -a enables the user to add real servers to a created service within the load balancer.
-t flags means a tcp connection, -s represents the scheduling algorithm and rr represents the round robin algorithm.
 ipvsadm -a -t 192.168.88.190:5060 -r 192.168.88.150:5060 -m
 ipvsadm -a -t 192.168.88.190:5060 -r 192.168.88.151:5060 -m
To use SNAT mode, append the -m flag at the end of the commands when adding a real server to a virtual service. The -m flags represents masquerading which is essentially SNAT mode.
Note that in SNAT mode, the client source IP address is not modified.
Confirm the establishment of the virtual servers on the list table using sudo ipvsadm -l

ZEVENET configurations
To use SNAT mode in ZEVENET load balancer:
- Go to LSLB on the menu.
- Click on the Farms sub menu.
- Click on the Pencil Icon of an L4xNAT profile you created earlier on. If you did not, follow this guide: Layer 4 and Layer 7 Virtual Server Configuration.
- Within the Global settings, click the Advanced button.
- Change NAT Type to NAT.
- Click the Apply button to save the configurations.
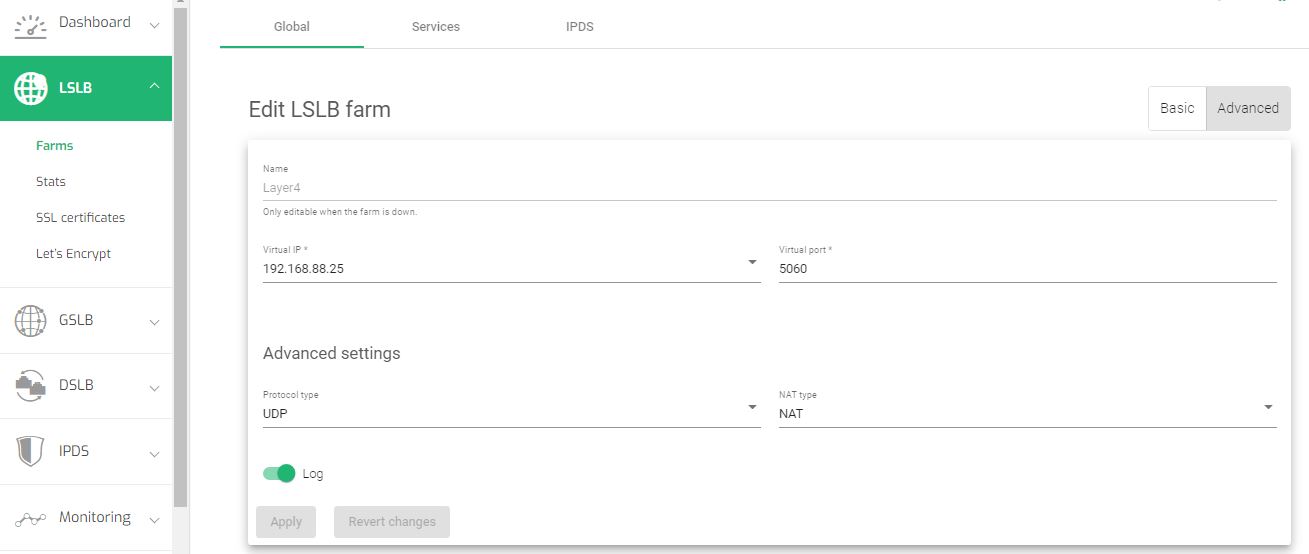
Note: By default, the load balancer operates in NAT which represents Source NAT on ZEVENET Load balancer.
To learn more about Layer 4 configurations and SNAT mode in ZEVENET ADC, read L4xNAT configurations.
Example configurations: DSR mode
Direct Server Return refers to a configuration in which the load balancer sends client requests to backend servers within a service, but the Backends respond directly to the clients, bypassing the load balancer.
In a DSR configuration, the load balancer acts as a traffic distributor, sending client requests to the appropriate backend servers, but it does not act as a traffic proxy. Instead, the servers send their replies directly back to the clients.
These are the few reasons one would consider using DSR over SNAT in a load balancer.
- Improved performance: Bypassing the load balancer on the return path can improve the performance of the system, as the load balancer does not need to process and forward the replies from the servers.
- Simplified architecture: Using Direct Server Return can simplify the architecture of the system, as it eliminates the need for the load balancer to act as a reverse proxy.
- Improved security: In some cases, Direct Server Return can improve security by allowing the servers to send replies directly to the clients, rather than routing the replies through the load balancer. This can make it more difficult for attackers to intercept or tamper with the replies.
In this section, we will make DSR configurations with LVS and demonstrate similar configurations using ZEVENET ADC.
Ipvsadm configurations
Real servers:
>>192.168.88.150:5060
>>192.168.88.151:5060
Virtual server:
>192.168.88.190:5060
- To use DR mode in ipvsadm, run the command ”sudo nano /etc/sysctl.conf”.
- Uncomment the line with “net.ipv4,ip_forward=1” to enable ip forwarding.
- Answering an Announcing arp calls is unnecessary in DR mode. Add these lines to the config file to block arp requests.
- 5. Run the command sysctl -p for the changes to take effect.
- Add a service by running the command
ipvsadm -A -t 192.168.88.190:5060 -s rr
-t flags means a tcp connection, -s represents the scheduling algorithm and rr represents the round robin algorithm.
- 7. Add two real server
- Configure a loop interface using the ip address of the service.
- Confirm the establishment of the virtual servers on the list table using
sudo ipvsadm -lcn
net.ipv4.conf.all.arp_ignore=1
net.ipv4.conf.all.arp_announce=2
 ipvsadm -a -t 192.168.88.190:5060 -r 192.168.88.150:5060 -g
 ipvsadm -a -t 192.168.88.190:5060 -r 192.168.88.151:5060 -g
To use DR mode, append the -g flag to each real server configuration.
ifconfig lo:0 192.168.88.190 netmask 255.255.255.255
ZEVENET configurations
To Enable DSR mode in ZEVENET ADC:
- Go to LSLB on the web panel menu.
- Click on Farms.
- Click on the Pencil icon on the L4xNAT profile you wish to edit. If you have not created one yet, read this guide: Layer 4 and Layer 7 Virtual server configurations.
- Within the Global settings, click on the Advanced Tab.
- 5. Change the NAT type to DSR.
- Click the Apply button to save the configurations.
- Within the ZEVENET command line interface, enable a loopback interface for the Farm. Use this command and the associated VIP.
- Disable invalid ARP responses to the backends.
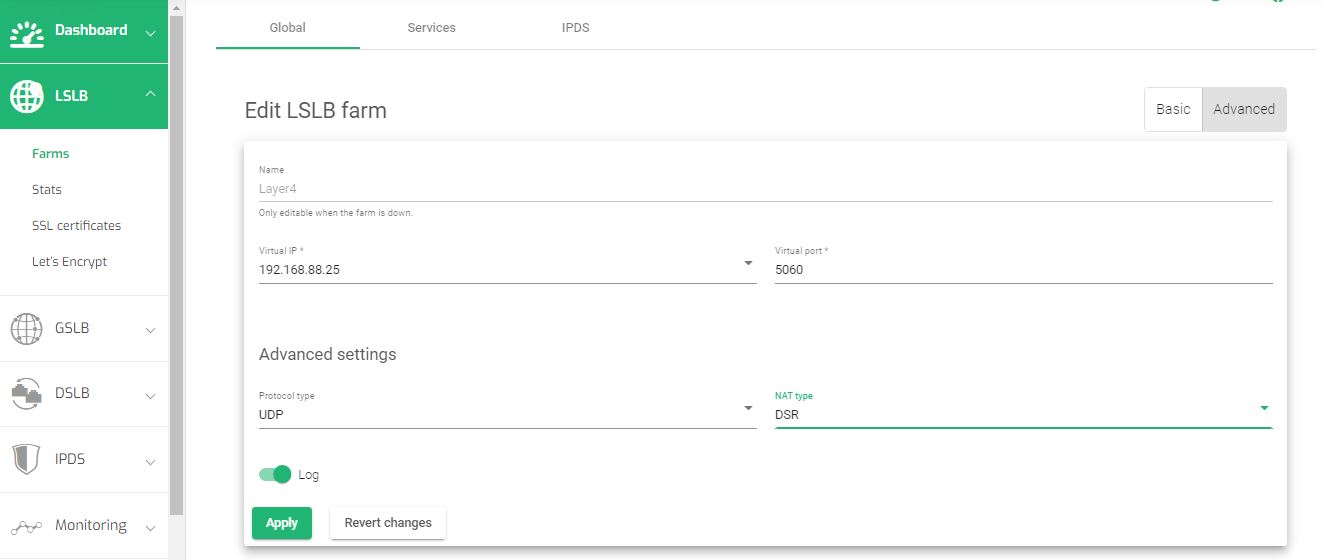
# ifconfig lo:0 192.168.88.190 netmask 255.255.255.255 -arp up
# echo 1 > /proc/sys/net/ipv4/conf/all/arp_ignore
# echo 2 > /proc/sys/net/ipv4/conf/all/arp_announce
To learn more about Layer 4 configurations and DSR mode in ZEVENET ADC, read L4xNAT configurations
Additional Resources
Using the Let’s encrypt program to autogenerate an SSL certificate.
Datalink/Uplink load balancing With ZEVENET ADC.
DNS load balancing with ZEVENET ADC.
Web application protection from DDoS attacks.
Application, Health and Network Monitoring in ZEVENET ADC.
Configuring SSL certificates for the load balancer.
Web Application Firewall configuration.