Contents
Overview
Load balancing across multiple instances of an application is a great way to improve performance by reducing overload and latency, and increasing delivery by caching static resources.
Though Nginx serves a great purpose at web serving, the platform has lots of complexities. As traffic increases, it gets harder to load balance layer 4 and layer 7 traffic without sacrificing security. For this reason, you need a load balancer with more advanced features that offers control over a business application through an easy-to-access UI.
In this article, we will discuss how to transfer Nginx load balancer configurations to ZEVENET ADC.
Prerequisites
To follow this guide, ensure you meet the following benchmarks.
- An instance of ZEVENET appliance must be installed on your workstation or a cloud platform. Request an evaluation if you don’t have an instance installed yet.
- You must have access to the web panel. If you don’t, follow this quick installation guide.
- Nginx is a piece of cake to you, but you aren’t satisfied with it’s load balancing capabilities. So, you need ZEVENET to step in.
- A virtual server is essential for distributing traffic to backend servers. If you haven’t created one, follow this guide about creating a layer 4 and Layer 7 virtual server(Farm)
Basic concepts
upstream: The upstream directive defines a cluster of servers hosting a web application. Usually, upstream is defined inside the http context. In ZEVENET ADC, the Services section contains a backend sub section for managing host servers.
listen: The listen option defines what port Nginx will listen to for incoming traffic from the web. ZEVENET uses a Virtual port to listen for incoming traffic through a Farm.
location: The location context allows you to give instructions about the directories to retrieve data from HTML files.
proxy_pass: This directive is used when specifying the location of proxied servers. Usually, the location is the value assigned to the upstream directive. A similar concept in ZEVENET is a Farm. This is where you define an IP address and port that are connected to a service containing backend servers.
server: This directive specifies a server hosting an application using its IP address in ipv4 or ipv6 formats. The server block is where you define the location directive, the listener, and the include directive. You can define a server in ZEVENET through the Backend section.
ssl_ciphers and ssl_protocols: The ssl_ciphers and ssl_protocol directives are used when limiting connection to the strongest or the most recent SSL/TLS versions. Some of these protocols include TLSV1 and TLSV2. The default cipher with nginx is HIGH:!aNULL:!MD5. To use ciphers and customize SSL protocols in ZEVENET, you must use the HTTPS listener. Access the HTTPS parameters within the global settings of that Farm.
Example configurations: Enabling Sticky sessions
Session persistence, also known as sticky sessions, is a technique used in load balancing to ensure that requests from a client are sent to the same server in a cluster for the duration of a session. This is often used to maintain state or to ensure that resources, such as files or data, are available to the client throughout the session. There are several ways to implement session persistence, including using cookies or IP address affinity. The method used depends on the specific requirements of the application and the load balancing architecture.
Nginx configurations
Nginx mainly have two methods of enabling session persistence, i.e. using the hash_ip load balancing method and the use of sticky cookies.
Hash_ip: The hash_ip load balancing method acquires the destination and source IP addresses and uses them to form a unique identity for an established connection.
upstream backendServers {
	hash_ip;
	server 192.168.0.112;
	server 192.168.0.115;
}
sticky cookie: You can also use sticky cookies by defining a sticky cookie option inside the upstream context.
upstream backendServers {
	server 192.168.0.112;
	server 192.168.0.116;
	sticky cookie zensessionid expires=2h domain=.example.com path="/";
}
zensessionid uniquely identifies a cookie and its associated server. From the configuration above, the cookie expires in 2 hours.
ZEVENET configurations
To enable cookie persistence when using ZEVENET load balancer:
- Go to LSLB > Farms and Click the Edit Icon on an http farm.
- Navigate to the Services Tab.
- Scroll till you reach the persistence section.
- To enable persistence using the Client’s IP address, select persistence IP: client address.
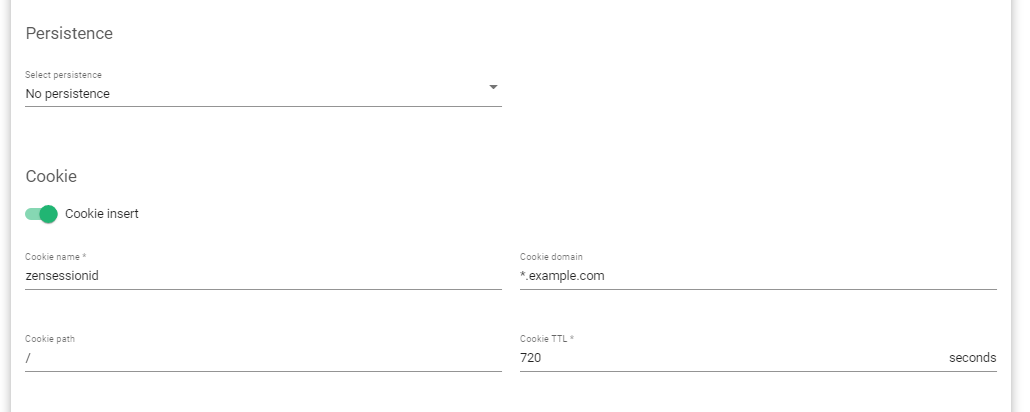
- To enable session persistence using a cookie, Ignore step 4 and leave the Persistence field at No persistence.
- Toggle on the cookie insert button and fill in the name, domain, path, and Time to Live(TTL) in Seconds.
- Update the settings by clicking the Apply button.
Example configurations: creating redirect rules
Redirect rules are used to automatically redirect a web page to another web page. This is often used when a website has changed its structure or content, or when a page has been moved to a new location. Redirect rules can be used to ensure that users and search engines are directed to the correct page, and to prevent broken links. There are several types of redirects that can be used, including 301 redirects, 302 redirects, and meta refresh redirects. The type of redirect used depends on the specific needs of the website and the reason for the redirect.
Nginx configurations
To create a redirect rule, we declare a return directive inside the server or location contexts. The return directive is used when you want to redirect users from one url to another, or from an unsecured channel to a secure server.
Nginx redirect rules follow the following syntax.
return ( 301 | 302 | 303 | 307 ) redirect-url;
Here is a sample configuration when redirecting users from an unsecured http to a secured https location.
server {
# Redirect users to HTTPS
listen      80;
server_name test.zevenet.com www.test.zevenet.com;
return      301 https://www.test.zevenet.com$request_uri;
}
The $request_uri option ensures that all http traffic on the same domain redirects to the secure https even if the path changes.
ZEVENET configurations
To achieve a similar result with ZEVENET ADC.
- Ensure you have two Farms running, both HTTP and https. Refer to this article on how to create layer 4 and layer load farms
- Go to LSLB >> Farms and click the Edit icon on an https farm.
- Locate the Services tab and open any of the configured services to edit them. If there is none, click the New service button and create one.
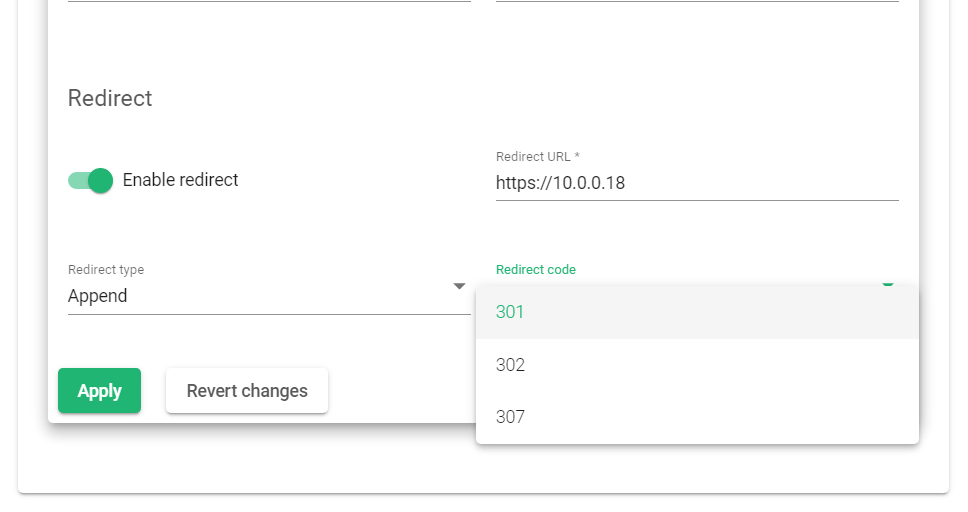
- Scroll till you reach the Redirect section and toggle on Enable redirect.
- Select the redirect type Append, redirect code 301 and write the full url of where to redirect. In this example, let’s use http://10.0.0.18
- Update the configurations by clicking the Apply button.
Also watch:
Example configurations: rewriting header rules
HTTP headers are essential for hosts and clients to share additional information besides querying requests. These headers enable clients to access resources in their preferred languages and access web pages optimized for their devices. Web servers may use this information to optimize the type of information to serve clients using cookie headers.
Unfortunately, using many response headers might reveal lots of sensitive information that hackers might use for exploit attempts. So, it is essential to remove untrusted headers or modify some content. This helps prevent malicious attacks like cross-site scripting by providing X-XSS-Protection.
Nginx configurations
Nginx provides 2 directives for modifying and adding headers. These include add_header and more_set_headers. Use these location headers inside the location block.
Example configuration using add_header in nginx.
location / {
	...
	add_header Server “serverName”;
	...
}
more_set_headers isn’t natively installed in Nginx, so, users usually install this plugin manually before compiling nginx.
Example configuration using more_set_headers.
location /{
        ...
	more_set_headers Server “serverName”;
        ...
}
ZEVENET configurations
- First, go to LSLB>>Farms and select an HTTP farm whose rules you’d like to set.
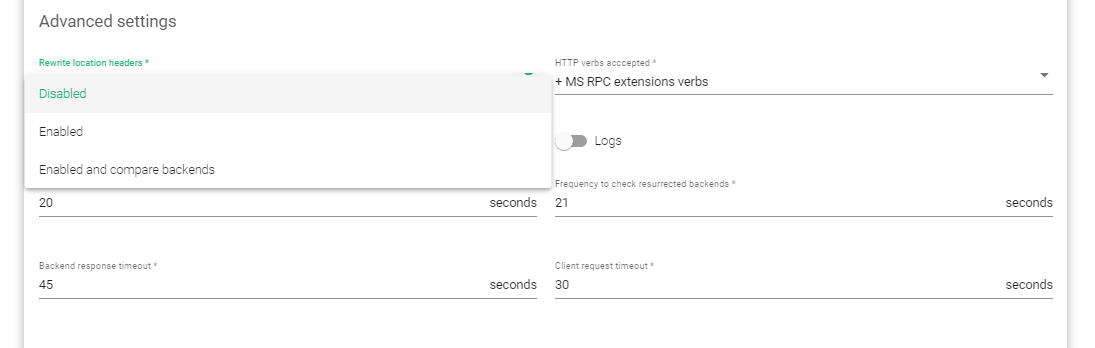
- Under Global settings, click on the Advanced settings tab.
- Within the Advanced settings, Select the Enable option within the rewrite location headers rule.
- Update the configurations by clicking the Apply button.
- Scroll to the headers section and click the Create rule button.
- Within the Type drop-down option, choose one that suits your application. In this example, we will use Response: add header.
- Enter the header whose value you want to modify. For this example, we will change the value of Server header.
- Save the configurations by clicking the Apply button.
- Restart the farm for the configurations to take effect.

Additional Resources
Using the Let’s encrypt program to autogenerate an SSL certificate.
Datalink/Uplink load balancing With ZEVENET ADC.
DNS load balancing with ZEVENET ADC.
Protection from DDoS attacks.
Application, Health and Network Monitoring in ZEVENET ADC.
Web Application Firewall configuration.
Configuring SSL certificates for the load balancer.