Contents
Overview
Application delivery is imperative to all companies whose interest is maintaining long-term performance, reliability, security, and efficiency. ZEVENET ADC’s performance and high speed delivery helps ensure the distribution of traffic across various backend servers or data centers is fast and efficient, boosting client-server communication.
This article will explain various concepts used in Citrix Netscaler. Later, we will use these configurations to describe how to set up a high-availability network and create a virtual service that receives traffic from the web and distributes it to a cluster of servers in ZEVENET ADC.
For an in-depth comparison between Citrix Netscaler and ZEVENET ADC, read this article: Citrix Netscaler and ZEVENET Comparison
Prerequisites
To follow this guide, ensure the following conditions are met.
- An instance of ZEVENET ADC must be installed on your workstation, bare metal, virtual environment, or a cloud platform. For on-premise deployment, request an evaluation.
- Must have access to the Web graphical interface. If you don’t, follow this quick installation guide.
- Must be familiar with the Netscaler platform and knowledgeable about its concepts.
- A virtual server is essential when distributing traffic to backend servers. Follow this guide: Layer 4 and Layer 7 Virtual Server Configuration
Basic concepts
Virtual Servers: A Virtual Server in Citrix Netscaler receives all incoming traffic from external networks. This interface has a virtual IPADDRESS and Port that listen for incoming traffic from the web. A Virtual Server in Citrix Netscaler is the same as a Farm when using ZEVENET’s load balancer.
Service Groups: Service Groups separate different types of resources of the same application accessed through the same domain. One may host an SMTP, RDP, or SIP service on the same domain, whose resources are separated by different service groups. A service group is the same as a Service in ZEVENET ADC.
Monitors: Monitors track the health of nodes serving an application by sending probe signals and listening for echoes. These signals check whether a backend server and its service are healthy. ZEVENET ADC uses a set of inbuilt plugins called Farmguardian for health monitoring.
Servers: Servers are backend computers that host and serve an application within a local network. These hosts process all requests from the web and send back responses requested by the clients. Servers are called Backends in the ZEVENET load balancer.
DNS: This module is used when load-balancing traffic between data centers in different geographies. The module used for global load balancing in ZEVENET ADC is called GSLB.
Security: This option provides high security for a web application when using Citrix Netscaler. A few of its features include an HTTP DoS policy, content inspection policies, and an SSL Forward Proxy policy. ZEVENET uses the IPDS module that provides security at all layers. The module includes the RBL, Blacklist, WAF policies, and DoS protection.
High Availability: High Availability is imperative when there is a need to maintain accessibility at all moments without clients experiencing downtime. We maintain the high availability of an application through failovers. ZEVENET uses the Cluster settings to provide the utmost reliability, preventing downtime incase of component failure.
Reporting: Reporting is a set of monitoring graphs about resource usage by the load balancer, traffic statistics, and the active throughput of the load balancer. ZEVENET usages Monitoring graphs, stats, and Logs to help end users track resource usage over a specified timeframe.
Example configurations: Highly Availability
Regarding risk management, a high availability setup offers a backup for disaster recovery in case of power outages/surges, catastrophic breakdown of nodes, or path disconnection. A downtime of an hour within a year can lead to tremendous losses for a digital company. It is essential that one chooses the right ADC partner to ensure high uptime.
A highly available system requires at least two identical nodes with the same configurations, one being a master and the other(s) as the backup(s). Only the master node owns the floating IP address through which the traffic flows, and when the master goes down or in maintenance mode, one of the backups will pick up, preventing IP conflicts.
Let us configure a highly available system in Citrix Netscaler and demonstrate similar implementations in ZEVENET ADC.
Netscaler configurations
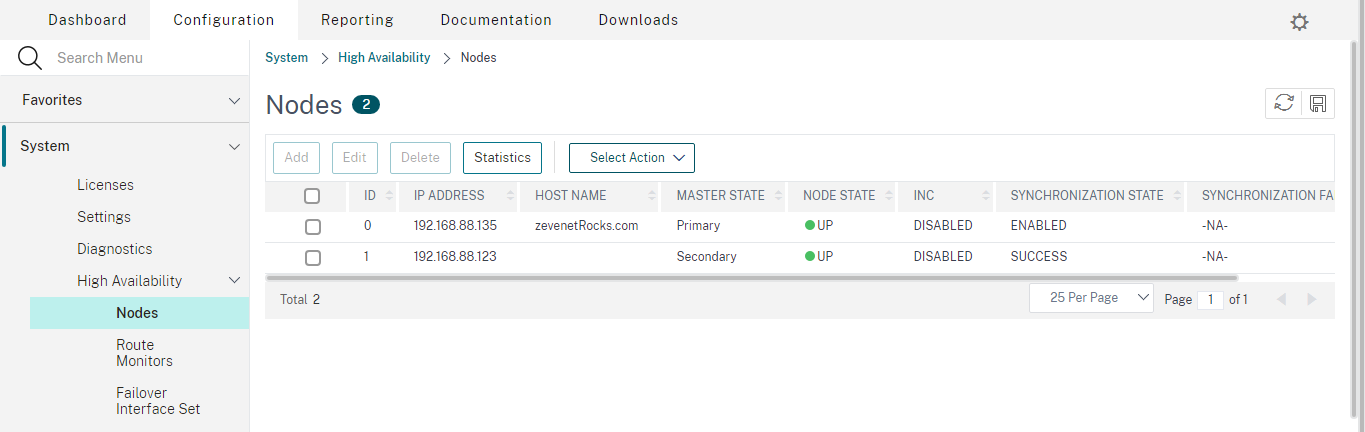
- On the menu, click System.
- Click the High Availability drop-down menu.
- Click on the Nodes option.
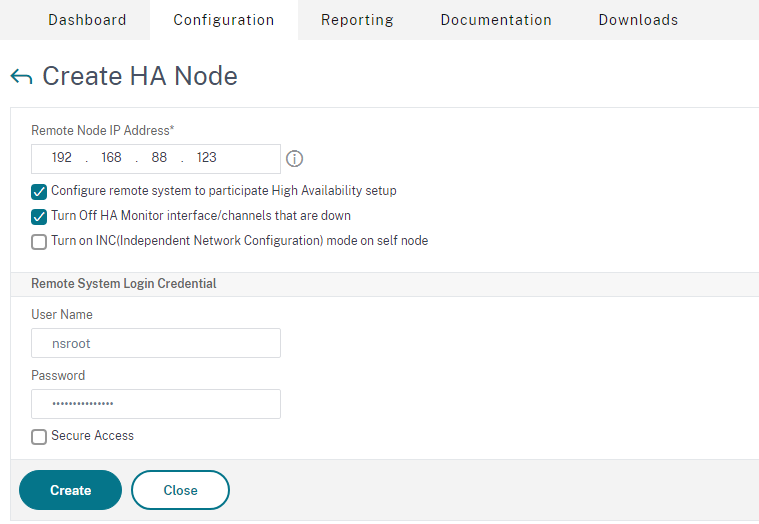
- Click on the Add button below the Nodes Label
- Enter the Remote Node IP address of the other active instance.
- Enter the User name and Password of the remote instance.
- Click the Create button.
- Click the Save button at the top right of the table to save the configurations.
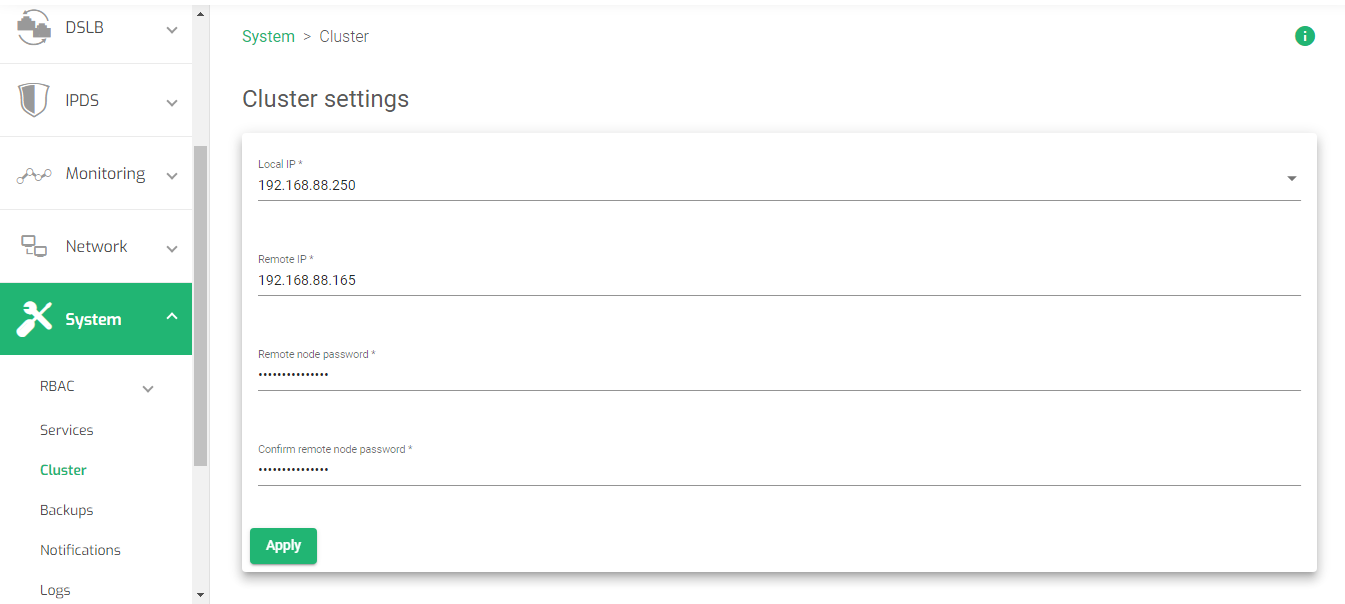
- On the Side menu, click System.
- Click the Cluster option.
- Select the Local IP of the current instance.
- Enter the Remote IP of the other instance.
- Enter the Remote Node Password.
- Confirm the Remote Node Password.
- Click the Apply button to save the configurations
- Within the cluster configurations, hover over the remote instance and click the Pencil icon.
- Within the cluster settings, change the Failback from Disabled to the local node.
- Click the Apply button.
- Create either a layer 4 or layer 7 farm and share the configurations on both nodes.
- Start the Farms on both nodes.
- Make a continuous ping on the VIP of the farm.
- Click the Stop button on the Farm of the Master node. You will observe that the pinging still continues even when the farm on the master node is down.
- On the web panel menu, click the DSLB option.
- Click the Farms sub-menu.
- Click the Create farm button.
- Enter a name that Identifies a farm.
- Enter an unused virtual IP that will be bound to a Farm.
- Click the Apply button to save the configurations.
- Click the Services tab.
- Select the Load balancing scheduler. These schedulers are categorized by weight and priority.
- Click the Apply button to save the settings.
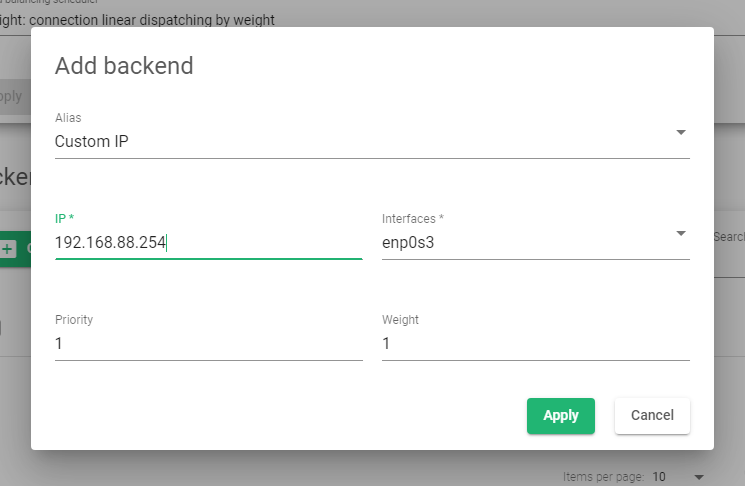
- In the backend section, click the Create Backend button.
- Leave the Alias field as Custom IP.
- Enter the Default gateway or router’s IP address as the IP address.
- Select the appropriate Interface of the selected gateway.
- Assign the priority and weight as 1 for each.
- Click the Apply button to save the settings.
- Repeat from 11 to create another backend pointing to a different router with a different gateway.
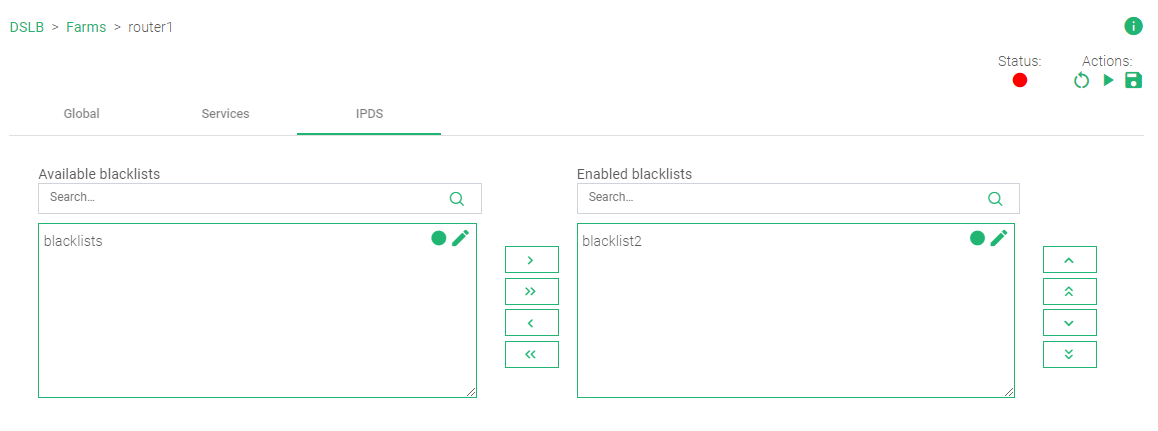
- Click the IPDS tab.
- Click on a rule you want to use in the Available blacklist box.
- Click the green greater-than arrow to shift a rule from the Available blacklist box to the Enabled blacklist box.
- Under the Actions section in the top right section of the page, click the Green play button to enable the Farm. The status color will change from Red to Green
To test if the configuration is working properly, perform a continuous ping on the shared IPADDRESS between both appliances. After that, shut down on the Master node. The ping should continue with less to no interruption.
To follow a similar, straightforward setup, follow the configurations below.
ZEVENET configurations
Note: To test the configurations.
For more details, read System | Cluster
You may also watch
Uplink load balancing
Uplink load balancing distributes outbound traffic across different routers or internet service providers in a way that provides the most reliable route from the load balancer.
With server load balancing, we distribute this traffic across a farm of servers, while with uplink load balancing, we take the reverse direction by load balancing across various Gateways(routers). ZEVENET provides the DSLB module specifically for this task.
In this section, we will discuss how to configure the DSLB Farm with ZEVENET. Uplink load balancing adds reliability and speed to a High Availability configuration on a load balancer. One may not get this feature when using Citrix Netscaler.
ZEVENET configurations

For more details about DSLB, read DSLB | Farms | Update
Additional Resources
Web Application Firewall configuration.
Configuring SSL certificates for the load balancer.
Using the Let’s encrypt program to autogenerate an SSL certificate.
Datalink/Uplink load balancing With ZEVENET ADC.
Protection from DDoS attacks.