Contents
Overview
The (AWS) Elastic Load Balancer (ELB) distributes web traffic across multiple EC2 instances, Elastic Container Service (ECS), and IP addresses. ELB also has the ability to balance traffic across different Availability Zones to ensure high availability. However, there are several limitations to using AWS‘s ELB, and these include:
- Limited Load balancing methods. By default, ELB only uses the Round robin algorithm, and it has limited content-switching capabilities.
- Since the ELB is designed to manage traffic from the Internet to the instances in a Virtual Private Cloud(VPC), it is not suitable for load balancing between on-premises resources.
In this article, we will discuss how one can replace his load balancing services with a better alternative, ZEVENET ADC. To have a detailed comparison between AWS ELB and ZEVENET, refer to this article AWS and ZEVENET comparison.
Prerequisites
Ensure you meet these requirements before attempting to transfer configurations from AWS ELB to ZEVENET‘s fully featured ADC.
- A ZEVENET ADC node must be installed on your PC, bare-metal, virtual environment, or one must have an active ZVNcloud account. Request an evaluation for on-premise deployment.
- One must have access to the Web graphical interface. If you don’t, follow this quick Installation guide.
- One must be an active user of AWS ELB and familiar with the concepts we will discuss in the section below.
- One must be able to create a virtual server in the ZEVENET load balancer. Here is a quick guide: Layer 4 and Layer 7 Virtual Server Configuration.
Note
ZEVENET has a template in the AWS marketplace. The deployment of ZEVENET on AWS is seamless and should occur with a few clicks.
Basic Concepts
Listener: A listener checks for layer 7 inbound traffic and forwards it to the necessary target group. Usually, a listener will be configured to check for HTTP or HTTPS traffic on ports 80 or 443 respectively. The main Layer 7 listeners used by ZEVENET ADC are HTTP and HTTPS.
Target Group: A target group is a cluster of EC2 instances working together to provide a service. All these instances within a target group must have the same application code that processes requests from the clients. A target group is the same as a Service when using ZEVENET ADC.
Health Checks: Health checks monitor the operation and responsiveness of a service on each EC2 instance. When the service or an EC2 instance goes down, health checks will notice the unresponsiveness, and the load balancer will redirect the traffic to healthy instances. ZEVENET uses a set of plugins called Farmguardian to monitor the health status of Backend servers and their services.
Load balancer Types: AWS ELB provides three types of load balancers. These include Application, Network and Classic load balancers. The classic load balancer is getting deprecated, leaving only the Network and Application load balancers for use. ZEVENET ADC Layer 7 load balancers have an HTTP profile while the Network load balancers have an L4xNAT profile.
Security group: A security group is a set of firewall rules that monitor and control inbound and outbound traffic. ZEVENET ADC has an inbuilt IPDS module with policies set to filter any bad traffic to the load balancer, and also blocking all attempts to unauthorized access. You may create firewall rules by accessing the WAF option within the IPDS module.
ACM: The ACM service enables an admin to deploy and manage SSL/TLS certificates for use within internal connected resources on AWS. To manage internal SSL certificates within the ZEVENET load balancer, Access them via LSLB >> SSL certificates. Or you can create a custom self signed SSL certificate through the Let’s Encrypt program embedded on the ZEVENET load balancer.
EC2 Instances or Targets: These are downstream Linux virtual servers that host the application code that processes requests received from the web. These virtual servers are called Backends when using ZEVENET ADC.
Example Configurations: SSL certificates
To encrypt data transmitted between clients and the load balancer, an SSL certificate must be installed to keep the communication between hosts secure. Sensitive information such as login credentials and credit card numbers must be transmitted over a secure transport layer.
In this section, we will discuss the installation SSL certificates on ZEVENET ADC with reference to AWS ACM.
Configuring a self-signed SSL cert for use on AWS
One would follow these steps to install an SSL certificate on the ELB.
- To generate a CSR for your EC2 instances, you will need access to the Linux console of that instance.
- After you have connected to the EC2 instance, navigate to the directory: /etc/pki/tls/private/
- Generate a new private key, 2048-bit RSA using the following command: sudo openssl genrsa -out custom.key
- Generate a certificate providing the previous generate private key using the command: openssl req -new -x509 -nodes -sha1 -days 365 -extensions v3_ca -custom.key -out custom.crt
- Fill in the necessary details required by the SSL certificate.
- Country: Enter 2 ISO country codes.
- State/Province: Enter the province where your company is located.
- City: Enter the city name where you’re located.
- Common name: Enter a Fully Qualified Domain Name FQDN, for example www.zevenet.com
- passphrase or password: You may ignore creating a password for this example. Meanwhile, the certificate generated will be in the *.pem file format.
- Compile both certificates into a PKCS12 bundle using the command:openssl pkcs12 -inkey custom.key -in custom.crt -export -out custom.p12
- Assuming AWS CLI is already installed, One usually has to upload the generated certificate (custom.crt) and the private key (custom.key) to AWS Certificate Manager using the command: aws acm import-certificate — certificate file://custom.crt — private-key file://custom.key — region us-east-2
- This certificate will now be available in the creation Wizard under “Choose a certificate from ACM (recommended)” option.
Configuring a self-signed SSL certificate for use on ZEVENET ADC
- To generate a custom SSL certificate for your ZEVENET ADC instance, locate the following directory using the appliance’s command line.
- Generate a private key without a passphrase using the command:
- Generate a Certificate Sign Request (CSR) for the private key using the command:
- Fill in the necessary details.
- Name: A descriptive name for identifying the CSR.
- Country: The ISO code of the country where you are located.
- Common Name: A Fully Qualified Domain Name. (FQDN), e.g. www.example.com
- Division: You department, and that could be health, IT or security.
- Locality: The city where you are located.
- State: The state where your organization is located.
- Organization: The legal name for your organization, e.g ZEVENET SL.
- Email address: Enter your email address. Not a must that it should be one for the domain name.
- Generate a Self Signed Certificate using both the private key and the CSR certificate. For this example, the self signed certificate will have a lifetime of 1 year, and the output format will be in .PEM. Use the following command.
- This certificate will be available for use within the LSLB >> SSL certificates section.
cd /usr/local/zevenet/config/certificates
openssl genrsa -out custom.key 2048
openssl req -new -key custom.key -out custom.csr
openssl x509 -in custom.csr -outform PEM -out custom.pem -req -signkey custom.key -days 365
To learn more about SSL certificates on ZEVENET ADC, refer to these resources:
Example configurations: Web Application Firewall
As a security feature, A WAF protects a web application by filtering and blocking malicious traffic. A WAF is typically deployed infront of a load balancer and is designed to protect web applications from various malicious attacks such as cross-site scripting (XSS), SQL injection, and other attacks, including those in OWASP’s top 10.
By inspecting incoming HTTP traffic and analyzing it against a set of rules or a security policy, the WAF will block all the traffic deemed insecure. ZEVENET ADC offers more advanced security features like IP blacklisting, an RBL policy, DoS protection, etc.
In this section, we will describe how to protect against SQL injection in AWS and simulate similar configurations with ZEVENET ADC.
AWS configurations
To enable SQL injection protection, you must have at least one or 2 EC2 instances placed behind an Elastic load balancer. These EC2 instances must have the web application you would like to protect.
- Within AWS’s web console, search for WAF and shield, and click the link that shows up.
- Click on the Web ACL menu item.
- Select the region your traffic will come from, for example Europe(Frankfurt).
- Click the Create web ACL button.
- Under Add rules and rule groups, click on the Add rules drop down arrow.
- Select Add managed rule groups. You will find more managed rule groups, including Bot control, Amazon IP reputation list, SQL databases, etc.
- Select SQL database by enabling the toggle button Add to web ACL.
- Scroll down and click the Add rule button.
- Within the Default Action for rules that don’t match, leave the option as Allow.
- Click the Next button.
- Within the Set Rule priority section, use this section to add priority to a rule, and then click the button, Next.
- Within the Configure metrics section, there is nothing to change, so click button, Next.
- Within the Review and create web ACL section, click the Create web ACL button.
- After successfully creating a Web ACL, click on the ACL you just created.
- Click on the Tab with Associated AWS resources.
- Add the application load balancer that you want to protect. After adding the resources, your rule will be set to block any injection to the sql database.
ZEVENET configurations
To Enable SQL injection protection, you need to create a WAF Ruleset first.
- Go to IPDS on the side menu, and click to expand it.
- Click on the WAF option to expand it.
- Click on the Rulesets option.
- Click on the Create WAF ruleset button.
- Assign a Name that easily Identifies this ruleset.
- Leave the Copy ruleset field as –No ruleset–.
- Click the Apply button to save the changes.
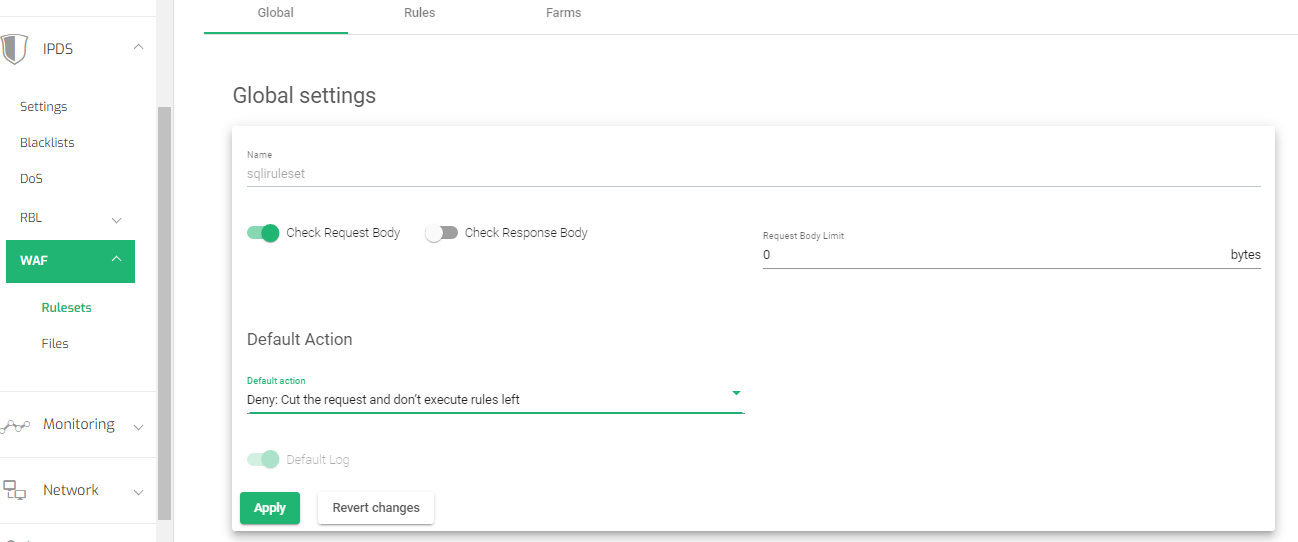
- Within the global settings, toggle on the Check request body option.
- Change the Default Action to Deny: Cut the request and don’t execute rules left
- Click the Apply button to save the changes.
Setting Rules
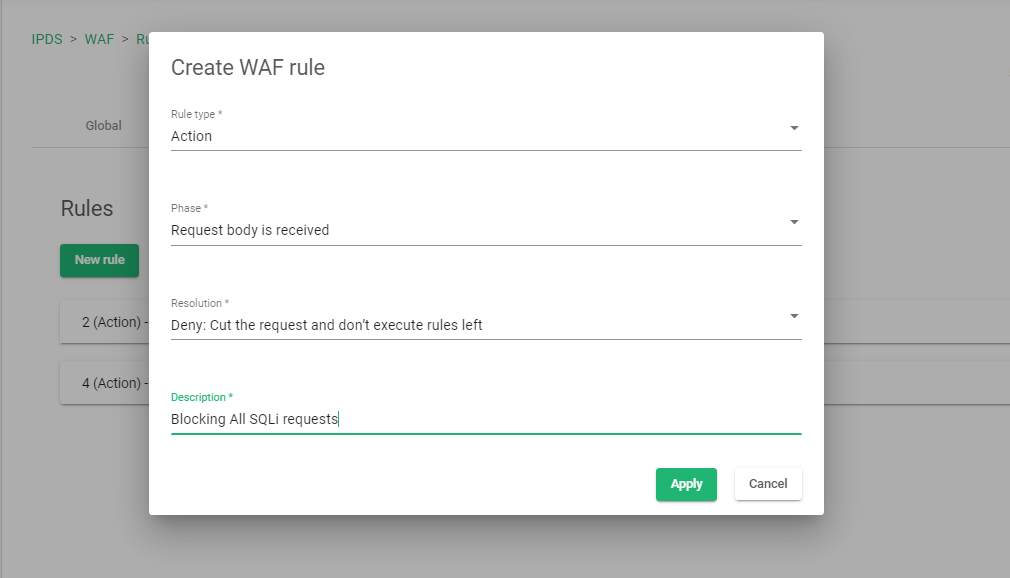
- Click on the Rules tab to add new rules.
- Click on the New rule button.
- Select the Rule type as Action.
- Select the Phase as Request body received.
- Select the Resolution as Deny: Cut the request and don’t execute rules left.
- Add a description to the rule to easily identify what the rule is all about
- Click the Apply button to save the changes.
Adding conditions
- Click on the Newly created rule to add conditions. Start by clicking on the Create condition button.
- Within the Variables field, select REQUEST_BODY and click the Add variable button.
- Within the Transformation field, select the option, none.
- Within the Operator section, select detectSQLi
- Click the Apply button to create the new condition.

Enabling Rules to a Farm
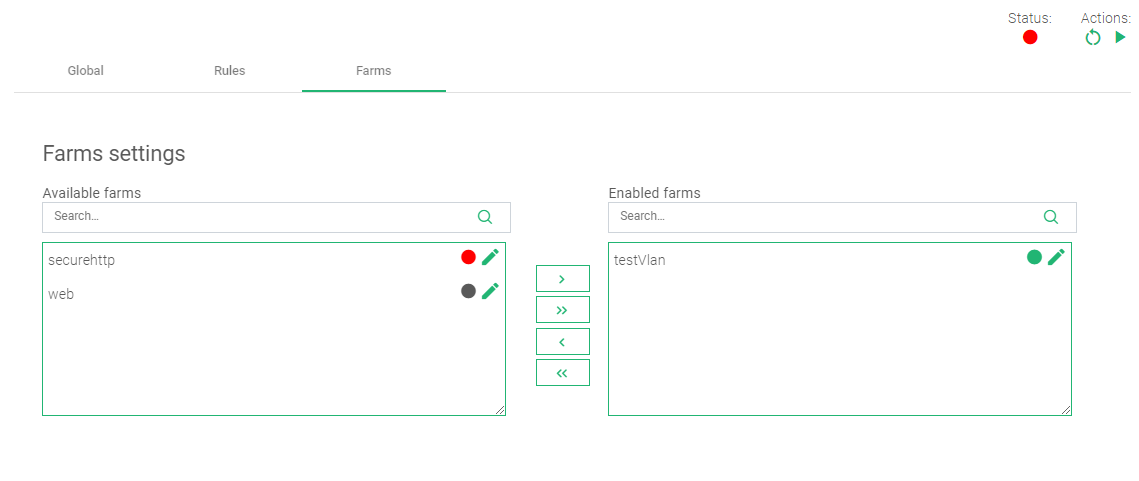
- Click on the Farms tab to add this rule to a target virtual server(Farm) on the load balancer.
- Within the Farm settings, drag and drop the selected farm from Available farms to Enabled farms.
- In the top right corner, there are Actions. Click the Green play button to start the Rule. At this moment, the WAF rule will block any sql injection embedded within the request body, mostly through search or login forms.
For more resources about the WAF, refer to these articles:
Additional Resources
Using the Let’s encrypt program to autogenerate an SSL certificate.
Datalink/Uplink load balancing With ZEVENET ADC.
DNS load balancing with ZEVENET ADC.
Protection from DDoS attacks.
Application, Health and Network Monitoring in ZEVENET ADC.