Contents
Overview
FortiADC is an application delivery controller developed by Fortinet. It aims to provide application security, traffic management, and availability of applications running on servers. However, ZEVENET has an upper hand in cloud deployment and availability. One may create a cloud account through ZVNcloud, or deploy a node directly from AWS or Microsoft Azure marketplace.
If you require a more flexible ADC with Next-generation security features, Layer 4 and 7 load balancing, Global load balancing, Link load balancing, etc., hold on tight. In this article, we will discuss FortiADC concepts and use those concepts to make similar configurations in ZEVENET ADC.
Prerequisites
Here are the prerequisites before migrating from FortiADC to ZEVENET ADc.
- An instance of ZEVENET ADC must be installed on your workstation, bare metal, virtual environment, or with ZVNcloud. For on-premise deployment, request an evaluation.
- Must have access to the Web graphical interface. If you don’t, follow this quick installation guide.
- Must be familiar with FortiADC and knowledgeable about its concepts.
- You must be able to create a virtual server with ZEVENET. Follow this guide: Layer 4 and Layer 7 Virtual Server Configuration.
Basic Concepts
Link load balancing: Link load balancing refers to distributing network traffic across multiple WAN connections or ISPs to optimize network performance and increase reliability. Reliability comes about by using uplinks to different ISPs for redundancy. If one ISP goes down, failover to the available service occurs. ZEVENET provides an inbuilt Uplink failover system for Link load balancing through DSLB.
Global load balancing: Global load balancing refers to distributing network traffic across multiple servers or resources in different data centers located in various geolocations to provide a better user experience for clients in those regions. ZEVENET has a robust solution for Load balancing across data centers using the GSLB module.
High availability: High availability is the ability of a system, application, or service to remain operational and accessible to users with minimal downtime. One may achieve high availability through building failover mechanisms, which allow the system to automatically switch to a backup or secondary resource in the event of a failure. One may achieve HA through a Cluster in ZEVENET ADC.
Server Load balancing: Refers to load balancing incoming web traffic within a private local network. ZEVENET provides the LSLB module for load balancing, inspecting, and controlling local traffic.
Server pools: A server pool is a group of real servers configured to work together to provide a specific service or application. One may configure a server pool in ZEVENET ADC by creating a Service.
Logging and Reporting: Logging and reporting provide the ability to track and analyze the performance of a load balancer and the servers in a pool, including information such as incoming traffic, resource usage, and errors. ZEVENET provides a Logging system through System >> Logs. For reporting, one may access System >> Notifications. The notifications include emails and alerts.
Security: All web-based applications need security systems to monitor and filter incoming traffic to a load balancer to eliminate malicious traffic or allow access to a specified geolocation. One may achieve this functionality through the IPDS module when using ZEVENET. This module provides WAF, DoS protection, an RBL, and Blacklists.
Real servers: Real servers are the physical or virtual servers that are part of a server pool and handle the processing and delivery of requests. These servers are responsible for running the applications or services provided to clients. Real servers are the same as Backends in ZEVENET ADC.
Virtual server: A virtual server is a front-facing interface with a listener, IP, and Port for receiving web traffic and then distributing that traffic to an appropriate Server pool or Service. ZEVENET provides similar functionality through a Farm.
Health Checks: These are commands that monitor the availability of Backends and the services they are providing. They achieve this by running ICMP or custom HTTP commands for tracking service availability. ZEVENET provides both preloaded Health mechanisms and a way to make custom health checks through Farmguardian.
Example configurations: Link load balancing
When host servers get loaded with processes and requests, an outbound strategy that distributes this traffic through multiple WANs must be utilized to respond to these requests fast, preventing a network bottleneck and slowed performance. This outbound strategy calls for uplink load balancing. Cost-wise, one may reduce the cost of internet bandwidth by using multiple low-cost internet links rather than one high-cost link.
Both Zevenet and Fortinet offer Link load balancing. Zevenet’s link load balancer is part of an ADC package and comes through the DSLB module.
We will configure Active-Active Uplink load balancing with Zevenet ADC basing on FortiGate configurations.
Fortinet configurations
These Fortinet configurations will act as our base when migrating Uplink configurations from Fortinet to ZEVENET. The assumption is that you’re already familiar with them, so it will be easier to follow through.
Add Gateway Links
- Click Link load balance >> Link Group >> Gateway.
- Enter a Name to identify a router, for example WAN1, WAN2, ISP1 or ISP2.
- Enter the router’s IP address.
- Optionally Enable health checks.
- Set the Inbound Bandwidth.
- Set the Outbound bandwidth.
- Set Inbound Spillover Threshold.
- Set Outbound Spillover Threshold.
- Click the Save button.
Add a Link Group
- Click Link Load Balance >> Link Group.
- Enter a Name to Identify the Group.
- Enter Address Type as IPV4.
- For Active-Active configurations, choose Route Method: Weighted Round Robin.
- Enable Proximity Route.
Add Link Member
- Within the Link Member section, click Create New.
- Enter a Name to Identify a member.
- Select a Gateway link for the first link.
- Assign a weight of 1 and click the save button.
- Repeat the procedure to add a 2nd Link member.
- Click the Save button to also save the Link Group.
Add a Link Policy
- Click Link Load Balance >> Link Policy.
- Select the Link Group previously created as the Default Link Group.
- Click the Save button.
- Click the Create New to add a New policy.
- Select an Ingress Interface.
- Select the Source Type as Address and Source as ANY.
- Select Destination Type as Service and choose ALL.
- Select Group Type as Link Group and use the group previously created.
- Click the Save button.
ZEVENET configurations
In this section, we will configure uplink load balancing with ZEVENET ADC. The assumption is that you have at least 2 routers from different ISPs where you want to redirect your outbound traffic. This will depend on whether you want an active-active or Active passive connection.
Instructions:
Create Alias Names
- Click Network >> Aliases >> Create IP alias.
- Enter the IP address of the First Router.
- Enter a Name that easily identifies it.
- Click the Apply button.
- Repeat the process to add an Alias Name for the 2nd Router.
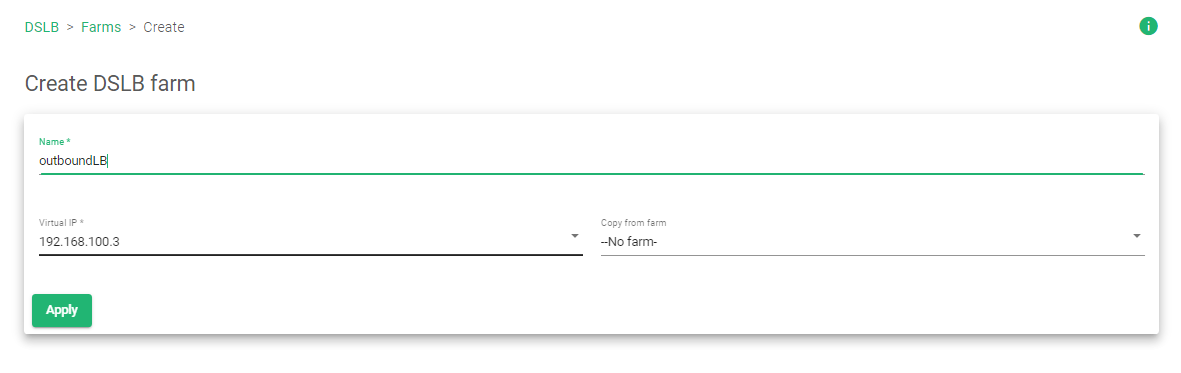
Create a DSLB Farm
- Click DSLB >> Farms >> Create Farm.
- Enter a Name to easily identify this farm.
- Select the virtual IP address. This IP address will act as the gateway for your load balancer.
- Click the Apply button to save the configurations.
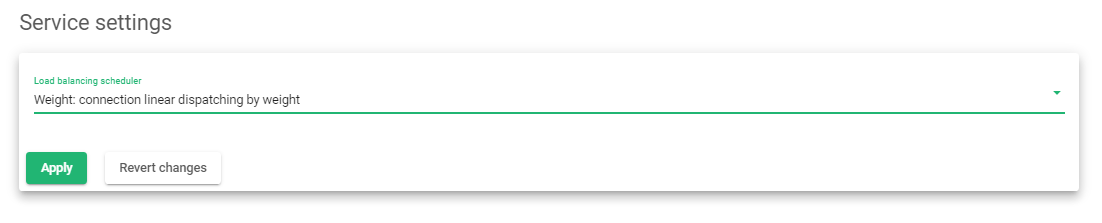
Create a Service
- Click on the Services Tab.
- For Active-Passive configurations, Choose the load balancer scheduler as Priority: connections always to the most prio available. For this configuration, we will configure an Active-Active setup. We will use Weight: connection linear dispatching by weight.
- Click the Apply button to save the configurations.
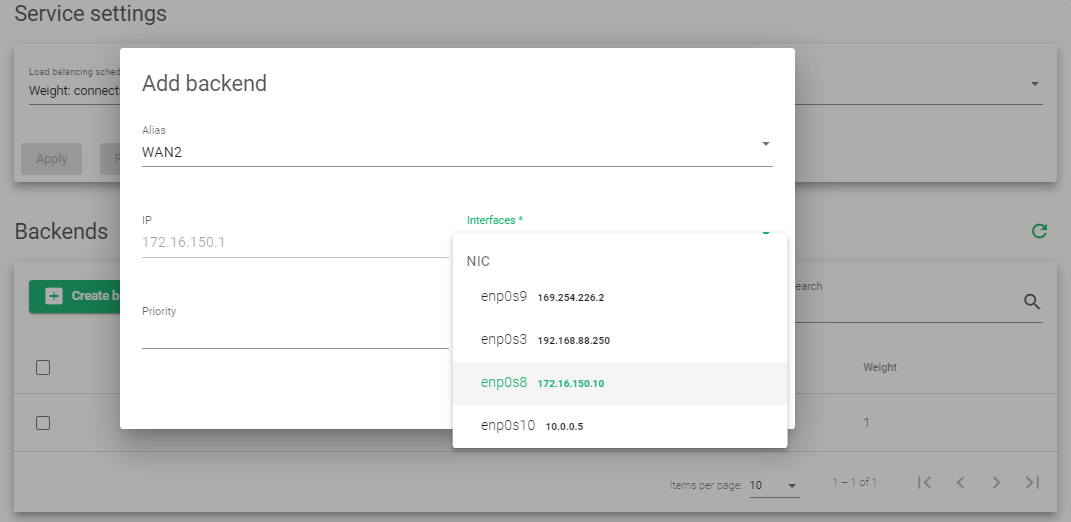
Add Backends
- Within the Backends section, click the Create backend button.
- Within the Alias Section, Select the Alias Name of the First ISP or First Router.
- Select the Interface of the First router.
- Click the Apply button.
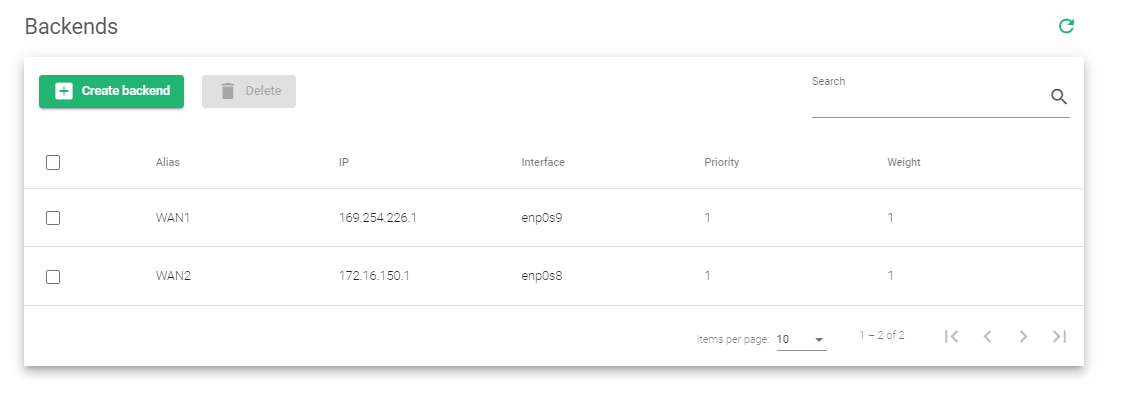
- Repeat the process to add the 2nd router. The default Priority and Weight is 1.
- Within the top right corner, locate Actions and click the Green play button to activate the farm.
For more resources, architecture and design about Uplink load balancing with ZEVENET, Read: Quick Start Guide For Uplinks Load Balancing.
Example configurations: Security (WAAP)/Configurations
A WAAP is a security system that provides Web application and API protection from cyber threats. WAAPs use advanced technologies like automation and machine learning to detect and block malicious traffic, including SQL injection, cross-site scripting, and other common attacks. A WAAP has features like application-layer firewalls, DoS protection, and Intrusion prevention. These advanced features provide a more robust and comprehensive security solution. ZEVENET Implements a WAAP through the IPDS module.
We will describe Fortinet security configurations with Fortigate and how to implement similar functionality in ZEVENET. For this example, we will focus on a WAF.
Fortinet configurations
These are the Fortinet configurations we will base to create ZEVENET WAF configurations. To Access these configurations, install a separate product, FortiGate that you will link to your FortiADC.
Instructions
- Click System >> Settings.
- Scroll till the Inspection mode section, change from Flow-based to Proxy, and click the Apply button.
- After changing the inspection mode, click Security Policies >> Web Application Firewall.
- Within the Signatures table, enable all forms of WAF protection by clicking the Toggle button. These include SQL Injection, Generic attacks, Trojans, Known exploits, Bad robot, etc.
- Within the Constraints table, enable constraints to limit Content length, Header length, Total URL parameter Length, etc.
- Scroll down and Enforce HTTP Method Policy.
- Assign a VIP you want to protect by clicking Policy & Objects >> Virtual IPs.
- Assign a Name for the VIP.
- Select the Interface on which your ADC VIP has been configured.
- Enter an External IP Address/Range
- Enter a Mapped IP Address/Range
- Click the OK button to save the configurations.
- Create an IPV4 policy by clicking Policy & Objects >> IPV4 Policy.
- Assign the IPV4 policy a Name.
- Add an Incoming and an Outgoing interface.
- Besides the Source label, select All.
- Besides Destination, select the VIP Address you created.
- Within the Security profiles, toggle on the Web Application Firewall option.
- Within the Logging Options, toggle on Log Allowed Traffic for All Sessions.
- Click the OK button.
ZEVENET configurations
ZEVENET IPDS not only has WAAP capabilities but its Web Application Firewall has Next-Gen WAF capabilities. The IPDS module offers DoS protection, a Web Application Firewall with robust features, an RBL, and a Blacklist policy.
We will focus on setting up a WAF to protect against the OWASP vulnerabilities in ZEVENET ADC. By default, ZEVENET comes with inbuilt rules. Some of these rules include REQUEST-903-9003-NEXTCLOUD-EXCLUSION-RULES, REQUEST-903-9002-WORDPRESS-EXCLUSION-RULES, REQUEST-931-APPLICATION-ATTACK-RFI, etc.
In this section, we will make a custom ruleset.
Instructions
Create Ruleset
- Click IPDS >> WAF >> Rulesets.
- Click the Create WAF Ruleset button.
- Assign a Name to Identify the ruleset.
- In the Copy Ruleset field, you may choose from the drop-down list. For this demonstration, we will use –No Ruleset–
- You may assign the Default Action as Deny: Cut the request and don’t execute rules left.
- Click the Apply button.
Add a rule
- After creating a ruleset, we must apply a rule to this ruleset. Click the Rules tab.
- Click the New rule button.
- There are 3 Rule types, we will choose Action.
- Choose the Phase: Request body is received.
- Within the Resolutions field, choose Deny: Cut the request and don’t execute rules left and finally add a Description for the rule.
- Click the Apply button to save the configurations.
Add Conditions
- Click on the Rule you just Created and scroll to the Conditions section.
- The conditions section is where we specify what type of attack to protect against. Click the Create conditions button.
- Within the Variable field, Select methods or paths an attack would likely use to access your services. In this example, we will add REQUEST_URI and REQUEST_BODY.
- Within the Operator section, choose a rule you wish to protect against. Some of the rules are verifyCreditCard, verifySSN, validateUTF8Encoding, detectXXS, detectSQLi, etc. For this example, we will use verifyCreditCard.
- For this Operator, add a regular expression in PCRE format. Assuming we are validating Visa Cards, we will use the regular expression
^4[0-9]{12}(?:[0-9]{3})?$within the Operating field. Note that some Operators do not require the Operating parameter.
- Click the Apply button to create the condition.
- In the top right corner at the Action section, click the Green play button to activate the rule.
With this rule in place, you can now add it to the Farm you would like to protect.
To learn more about ZEVENET WAF, read IPDS | WAF | Update
Additional Resources
Configuring SSL certificates for the load balancer.
Using the Let’s encrypt program to autogenerate an SSL certificate.
DNS load balancing with ZEVENET ADC.
Protection from DDoS attacks.
Application, Health and Network Monitoring in ZEVENET ADC.