Contents
Overview
As web applications scale, the need for a reliable Delivery controller is paramount. Deploying ZEVENET ADC ensures that one is able to monitor the entire network both on and off-premise. High-speed delivery of an application is essential if a company website is a lead generation machine. When using F5’s Big IP, you’ve most certainly got frustrated about the delivery speeds and how complex it is to navigate the user interface.
If you’re looking for an alternative, look no further than ZEVENET ADC. In this article, we will discuss the basic concepts in F5’s BIG IP and what they translate to when using ZEVENET ADC.
Prerequisites
To follow this guide, you must:
- Have an active instance of ZEVENET ADC on your workstation or a cloud platform. If an instance is not installed, request an evaluation.
- Be familiar with F5 Big-IP concepts, especially the LTM module.
- Have access to ZEVENET web panel. If you don’t, follow this quick installation guide.
- Have knowledge about creating a Virtual server in ZEVENET ADC. Follow this guide: Layer 4 and layer 7 virtual server configuration.
Basic concepts
Node: A node in F5’s Big-IP is a server that hosts an application and processes the traffic sent to it by the load balancer. ZEVENET uses the term Backend to mean a node or a host server.
Health Monitors: The health of nodes needs regular monitoring within a specified interval. The Health Monitors option checks whether a backend server is up or down and reports that information to system admins. It also monitors whether a specific service is functioning as expected or not. ZEVENET uses a set of plugins called Farmguardian.
Pool: A pool is a cluster of nodes serving the same application through known ports like 25 for SMTP, 80 for HTTP, or 443 for HTTPS. A pool is the same as a Service when using an instance of ZEVENET load balancer.
Connection Limit: This limit refers to the maximum number of connections a single backend server can hold. ZEVENET uses the term Max. Conns to define a limit of concurrent connection a host server holds.
Ratio: Use ratio when some nodes have more resources and higher potential than others in the same node list. ZEVENET uses the metric of Weights to distribute more traffic to backend servers with more resources.
Pool Member: A member refers to an active node in a pool delivering a service through a known port. A node cannot be a pool member if it does not have a port. All ZEVENET Backends are Pool members since you define them with separate backend ports.
Destination Address/Mask: The destination address refers to a virtual IP (VIP). This IP address will listen for all incoming web traffic and distribute it equally to the pool members. ZEVENET uses the term Virtual IP for a destination address.
Service port: Service port refers to a port of a virtual server that listens for incoming traffic and forwards it to a suitable service. ZEVENET uses the term Virtual Port for a service port.
Virtual server: A virtual server is a device where all web traffic or packets from external networks is forwarded. A virtual server in ZEVENET is called a Farm.
LTM: The LTM (Local Traffic Manager) is a module that manages the traffic of a local network. ZEVENET uses an LSLB module for managing the traffic of a local network.
AFM: The AFM (Advanced Firewall Manager) is a layer 7 security feature. ZEVENET uses the WAF package for monitoring the security of a layer 7 application.
ASM: The ASM (Advanced Security Manager) is a module that monitors the overall security of a load balancer. ZEVENET uses the IPDS module. This module includes blacklist rules, RBL, a WAF, and DoS protection.
SSL Profile Option: The SSL profile option is a set of additional settings you add to a secure service like HTTPS or FTPS. With ZEVENET ADC, use the HTTPS Parameters to change the versions of TLS/SSL protocols. An admin may also change the ciphers using the HTTPS Parameters.
LTM HTTP Policy: The LTM policy offers conditional redirection based on client headers or behavior. ZEVENET ADC uses Header rules instead of LTM HTTP Policy.
Example configuration: Conditional Redirection
Redirect rules are instructions that determine how a web server should respond when a user requests a specific URL. The action might be to forward traffic to a different URL if the resources from that link have been shifted. The common use for url redirects include, forwarding logged out users to a login page, redirecting users from unsecured HTTP to HTTPS, redirecting users to a new domain, etc. Redirect rules have status codes associated.
301 status code will inform the browser that the page they were looking for was permanently transferred.
302 and 307 status codes will inform the browser that the page they were looking for was temporarily transferred. As of late, status code 307 is prefered.
In this section, we will describe F5’s LTM redirect policies and how to use these policies to make simpler configurations with ZEVENET to achieve a similar result. For test purposes, we will redirect traffic from www.zenlb.net to www.zevenet.com. Ensure you have your own test environment.
BIG-IP configurations
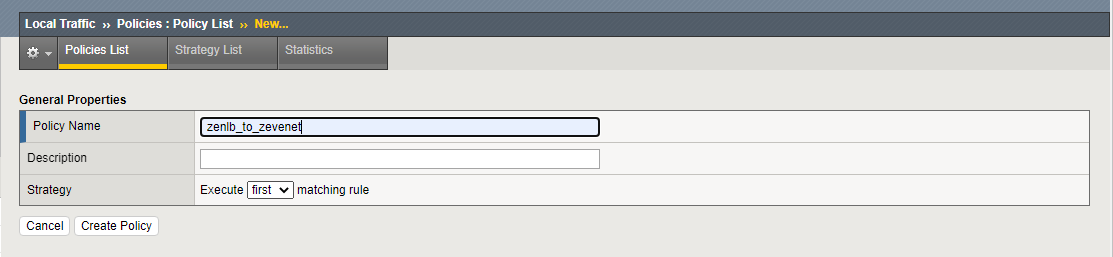
- Click Local Traffic >> Policies >> Policy List.
- Click the Create button.
- Enter a Name to identify the policy. A description for the policy is optional.
- Click the Create Policy button.
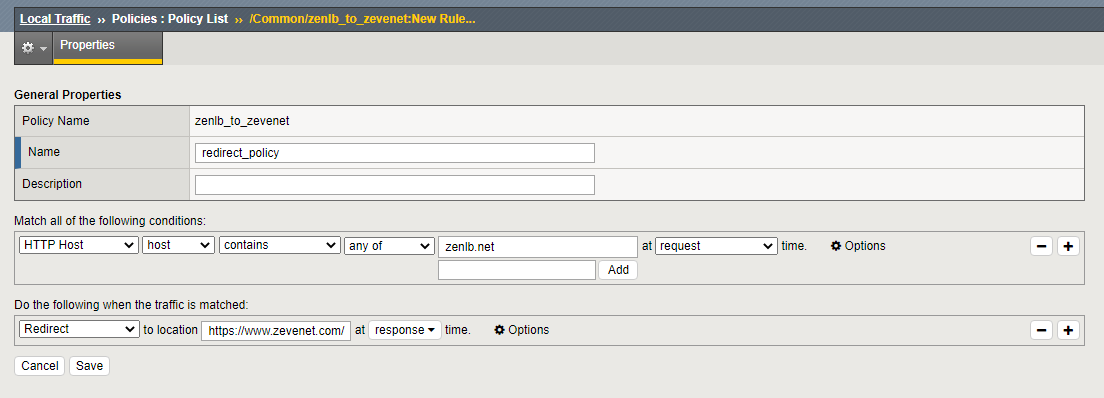
- Within the General properties section, assign a Name.
- Within the policy Rules section, click the Create button.
- Besides the Match all of the following conditions field, click the + button.
- Within the first field, select HTTP host, 2nd field, select host, 3rd field, select contains, 4th field, select any of, 5th field, add zenlb.net, 6th field, select request.
- Within the Do the following when the traffic is matched section, click the + button.
- Within the first field, select Redirect, 2nd field, enter the url you want to redirect to, and in the 3rd field, select response.
- Click the Save button to save the rule.
- Within the policy section, click the Save and Publish Policy drop down option.
- After creating these rules, one must add them to a virtual server receiving zenlb.net traffic. Assuming you have already configured a Virtual server with LTM.
- Click Local Traffic >> Virtual Servers >> Virtual Server List.
- Click on the virtual server you configured.
- Click on the Resources Tab.
- Under the Policies section, click the Manage button.
- Shift the policy from the Available to the Enabled box.
- Click the Finish button to enable the redirect rule on that virtual server.
ZEVENET configurations
- Click on LSLB >> Farms.
- Click on a Layer 7 Farm with either an HTTP or HTTPS listener that you already configured.
- Click on the Services tab.
- Click on the Service you configured earlier on. If you didn’t, refer to this article: Layer 4 and Layer 7 virtual server configurations.
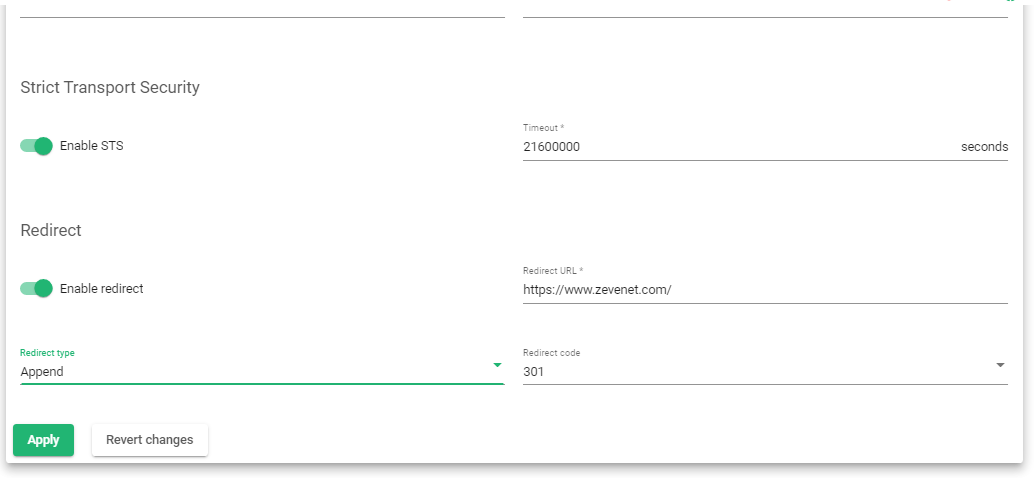
- Scroll and click on the Enable redirect toggle button.
- Enter the URL you want to redirect to, and for this example, it will be https://www.zevenet.com. The assumption is that the Farm is already configured to server zenlb.net
- Select the Redirect code, for this example, we will select 301.
- Select the Redirect type as Append.
- Click the Apply button to save the configurations.
In the browser, enter the test URL, the path will be changed to the other path you configured. To learn more about URL redirection in ZEVENET, Watch this video below.
Example configuration: DNS load balancing
GSLB enables distributing network traffic across multiple servers in different geographic locations to ensure high availability, performance, and scalability of services. The goal is to redirect client requests to the closest, most available server, while reducing latency and improving service availability.
In this section, we will discuss how one may use Big-IP DNS to set up a GSLB Farm with ZEVENET.
BIG-IP configurations
One is expected to have at least 2 nodes for managing 2 data centers and Wide-IPs. For this example, we will consider one node, but the configurations apply to the other.
Configure listeners.
- Click on DNS >> Delivery Listeners >> Listener List.
- Click the Create button in the section that shows up.
- Enter a suitable Name, for example dns_listener.
- Within the Type section, select Host and enter the host IP Address in IPV4.
- Scroll till the bottom of the page and click the Finish button.
Configure Your data centers.
- Click on DNS >> GSLB >> Data Centers >> Data Center List
- Click the Create button.
- Enter a suitable Data Center Name, for example AU_datacenter
- Click the Repeat button to create another data center.
- Give it a suitable Name too, for example East_coast_datacenter.
- Click the Finish button to add the Data centers.
Configure Servers
- Click on DNS >> GSLB >> Servers >> Server List.
- Click the Create button.
- Enter a suitable Name to identify a server.
- Within the Data Center field, select a data center from your list.
- Scroll and click the Add button within the Devices section.
- Enter the Device Name and its Address in IPV4 format.
- Click the Add button followed by the OK button.
- Scroll and click the Repeat button to add another server.
- When done with the configurations, click the Finish button.
Configure a Virtual Server
To configure a Virtual server in DNS, we will assume you have already configured an application virtual server within the Local traffic manager.
- Click on DNS >> GSLB >> Servers >> Server List.
- Click on the Server that was created within the previous section.
- Click on the Virtual Servers tab.
- Within the Name field, select from the List of LTM virtual servers you already created.
- Enter an IP address of this virtual server.
- Select Service Port 80 and enable the Health Monitor for HTTP.
- Click the Finish button.
Create A pool
- Click on DNS >> GSLB >> Pool >> Pool List.
- Enter a Name that easily Identifies the pool.
- Select the Type as A.
- Add the previous virtual server within the Member List section.
- You may select the load balancing Method as Round Robin.
- Click the Finish button.
Configure Wide IP.
- Click on DNS >> GSLB >> Wide IPs >> Wide IP List.
- Click the Create button.
- Within General protections, enter the Name as a domain, e.g www.zenlb.com
- Select the record Type as A.
- Within the Pools section, select a Pool you just created in the previous section and link it.
- Select a load balancing method as Round robin.
- Click the Add button to add to the pool list.
- Click the Finish button.
One may allow some time, and test DNS resolution using nslookup.
ZEVENET configurations
To configure GSLB in ZEVENET, you are expected to have at least 2 nodes deployed in 2 geographical regions for purposes of high availability and fast data center recovery. For example, one could be deployed in Boston, US and the other in a different city of a different country like Sydney, AU.
In this example, we will configure a GSLB Farm for one instance, acting as our primary Name server, ns1.example-domain.com. Use the same settings when configuring a secondary Name server, ns2.example-domain.com.
Add a GSLB Farm
- Click GSLB >> Farms >> Create Farm button
- Enter a Name for that farm, for example, ns1-melbourne.
- Select a virtual Ip Address from one of the configured Virtual Interfaces.
- Enter the Port number 53.
- Save the configurations by clicking the Apply button.
Add a service
- Click the Services Tab.
- Click the New Service button to add a service.
- Enter the service Name in the form.
- Select any of the load balancing algorithms, whether Priority or Round robin.
- Click the Apply button to create a service.
- Click the service you just created to open it.
- Enter the Default TCP port health check.
- Select the health check for your backends within the Farmguardian section..
- Click the Apply button to save the configurations.
Add data centers.
- Click the Edit button when you hover of the IP 127.0.0.1.
- In the Alias field, leave the field as Custom IP.
- Enter the IP address of the Data center you want to send traffic.
- Repeat the process to add other data centers.
Add DNS zones.
- Click the Zones tab.
- Click the New zone button.
- Enter a domain or subdomain you intend to use.
- Click on the domain you just created to edit it. The default name server is ns1. This acts as the Start of Authority(SOA), and the Resources section adds more DNS records.
- To add a DNS Record for identifying the name servers, click the Create resource button.
- Enter a Name that identifies a record.
- Add the TTL value in seconds.
- Select the Type of the record.
- Within the Data field, enter the value for the record.
- Click the Apply button to save the configurations.
- Restart the Farm for the DNS load balancer to work.
For more details about GSLB load balancing, read this guide: How GSLB Works
You may also watch:
Additional Resources
Using the Let’s encrypt program to autogenerate an SSL certificate.
Datalink/Uplink load balancing With ZEVENET ADC.
Web application protection from DDoS attacks.
Application, Health and Network Monitoring in ZEVENET ADC.
Configuring SSL certificates for the load balancer.
Web Application Firewall configuration.