Global Settings for DSLB Farms
The global settings able to be configured in a DSLB farm are described below.

Name. It’s the descriptive identification field. In order to change this value, you’ve to stop the farm in the first place. Ensure that the new farm name isn’t already in use or it won’t be possible to configure it.
Virtual IP. This is the virtual IP address to which the farm will be bound and from which it will be accepting incoming connections. Ensure that the new virtual IP is not in use.
Notice the Right Upper Corner buttons:
![]()
![]()
These icons will let you restart (the small curved arrows) or start/stop the farm (the green triangle or square).
Services for DSLB Farms
The service created for uplinks load balancing provides the following options to be configured in order to manage the data path and connections behavior.
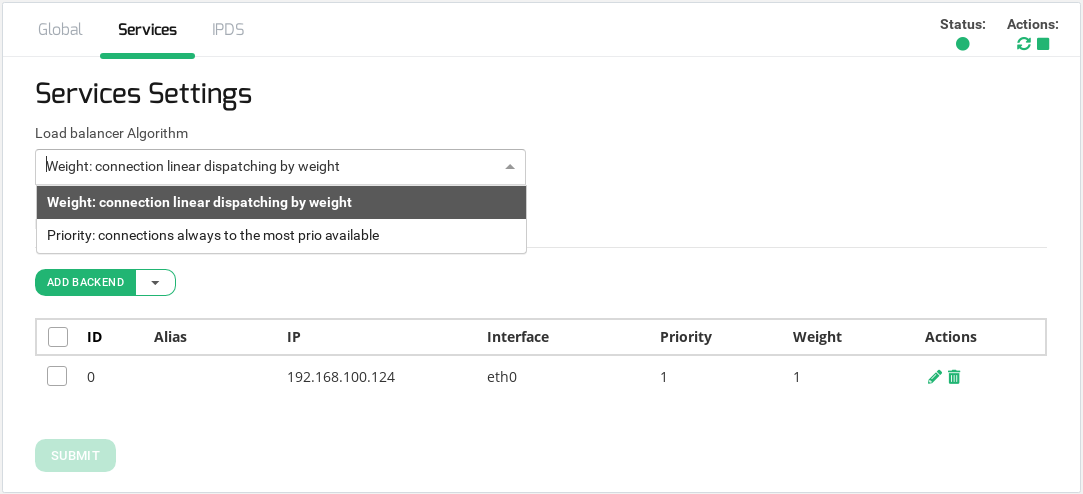
Load balancing Algorithm. This field specifies the load balancing algorithm to be used in order to determine the router to be used as backend. By default, weight algorithm will be the default selected algorithm.
- Weight: connection linear dispatching by weight. Balance connections depending on the weight value that has been assigned to every backend. The requests are delivered using a probabilistic algorithm using the weight defined.
- Priority: connections always to the most prio available. Balance all connections to the same highest priority server. If the first server is down, the connections will switch to the next most priority server. With this algorithm, you can build an active-passive cluster service with the real servers.
In regards to the Backends section, the DSLB farm profile allows to configure the following real servers properties:
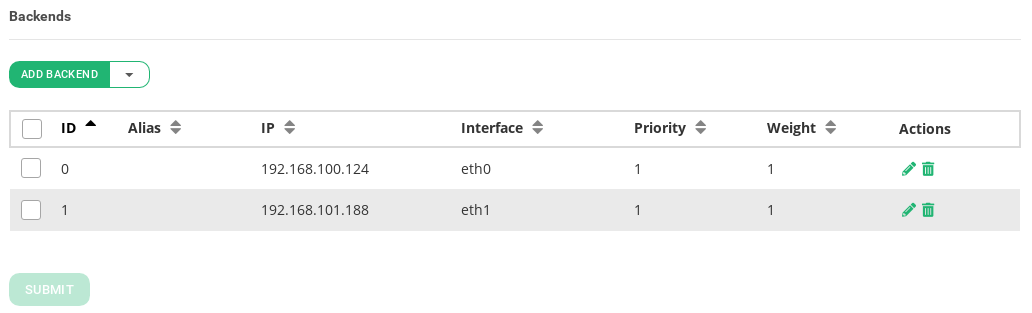
ID. It’s the index that references the backend in the farm configuration.
Alias. The backend alias if it has any alias configured.
IP. The IP address of the given backend, in the case of DSLB will be the routers IP addresses.
Interface. It’s the physical network interface which directly connects to the router.
Priority. It’s the priority value for the current real server which is only useful if the Priority Algorithm is enabled. The priority value must be any value between 1 and 9, less value indicates more priority to the current real server. By default, a priority value of 1 will be set.
Weight. It’s the weight value for the current real server which is only useful if the Weight Algorithm is enabled. More weight value indicates more connections delivered to that backend. By default, a weight value of 1 will be set. The values range available are from 1 to 9.
Actions. The available actions per backend are:
- Edit. Modify a certain value of the real server.
- Delete. Delete the given real server of the virtual service.
It can also be done some actions to one or more than one backend:
- Add Backend. Open the add backend form to add a new real server into the farm.
- Delete. Delete the given real server of the virtual service.
IPDS
This section let you enable IPDS rules. The list shows different types of protection and a select box to enable them. For further information please go to the IPDS >> Blacklists rules, IPDS >> DoS rules or IPDS >> RBL rules specific documentation.
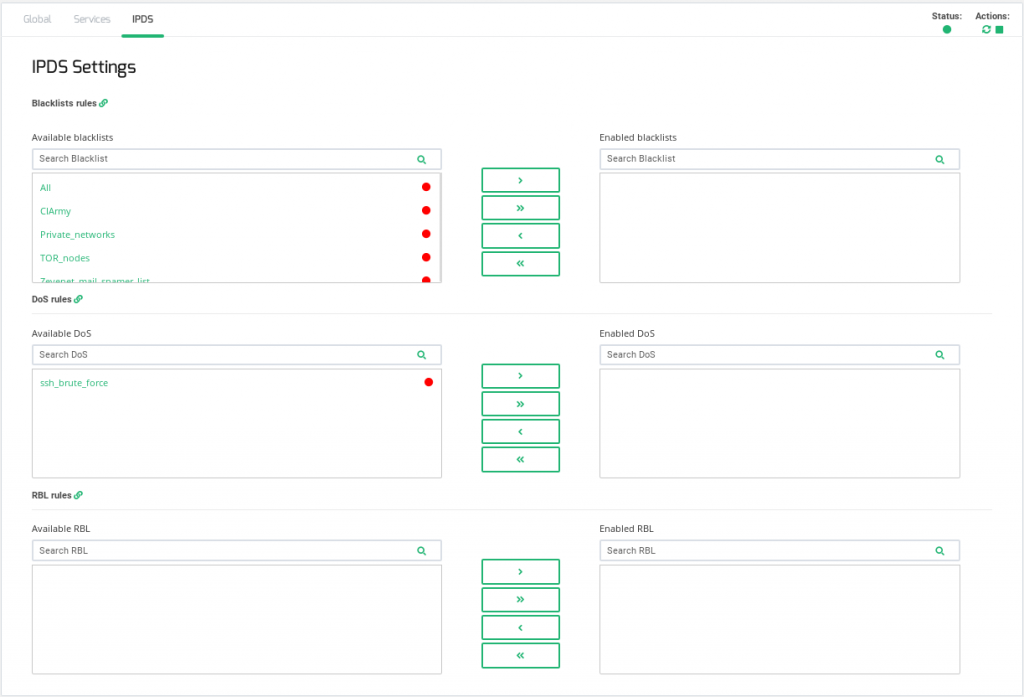
For each of the three types of IPDS rules, Blacklist, DoS and RBL, there are two tables, Available and enabled and a chain icon which redirects to its IPDS section. Under Available table it can be seen all the available rules of the same kind, that can be applied to the farm. Under the enabled table, it can be seen each rule of the same type applied to the farm, there is also a status ball for each rule which tells if the rule is stopped in red or running in green.
Each rule can be accessed clicking on its name which will allow you to change rules parameters or even start/stop the rule. It is not possible to create a new rule under this farm view, you should do it through the IPDS section.
You can add one rule, clicking on the desired rule and then on the right single arrow, or more than one, keeping shift key pressed and selecting the rules that you want to add, then you will need to click on the right single arrow. You can also add all available blacklists by clicking on the right double arrow.
To delete one or more rule, select them and click on the left arrow or click on the double arrow to remove all.