On this section you can configure the cluster service and check the cluster service status. During the cluster process configuration you don’t have to access to the second node, as the configuration will be replicated automatically.
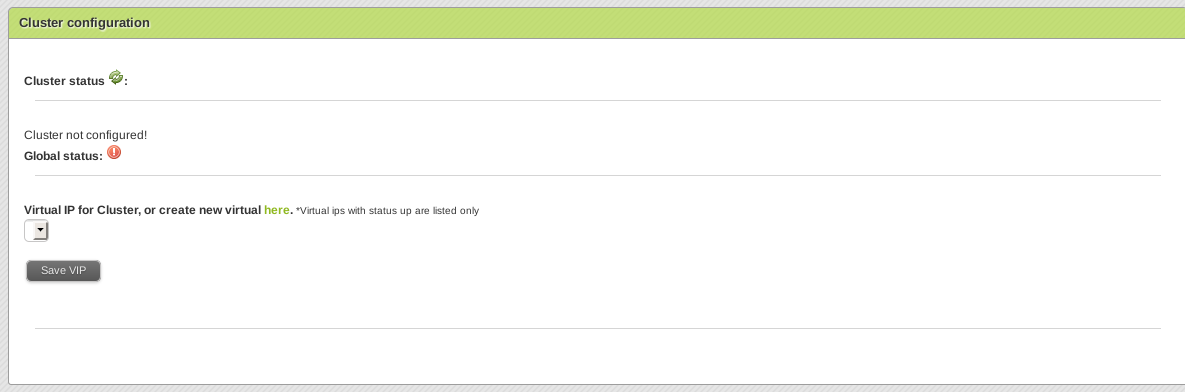
Cluster status. It’s a global view of cluster elements, you can reload the check here 
Virtual IP for Cluster, or create new virtual here. Select a virtual ip that will be used for the cluster service, if you didn’t configure one, please go to Settings::Interface and configure one, this virtual interface is only needed to be configured on the first node that you are configuring the cluster service.

Local hostname and Remote Hostname. Once a virtual interface is selected the hostnames and IP address information about the cluster nodes are needed.
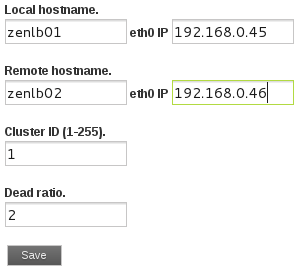
Cluster ID and Dead Ratio. With the cluster components we have to set the cluster ID. If you have more than one cluster in your network, you will choose diferents ID for every one. The dead ratio is the max time that the slave node is waiting for the response of the master node with every check. If that time is exceeded, the slave node will promote to master.
Press the Save button to save the changes. At this point, it’s needed that the physical IP for both nodes are configured over the same physical interface that the “virtual IP Cluster” on the last step (for example, eth0).
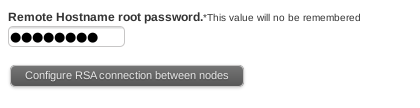
Remote Hostname root password. Enter the second node root password, this information won’t be memorized, it’s only needed to configure the RSA comunication over the both nodes.
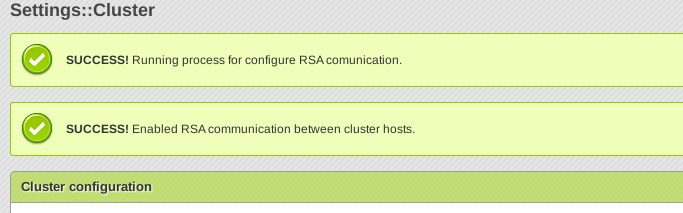
Once the Configure RSA Connection between nodes is pressed the communication process is executed and if everything is right you’ll see messages as shown below.
Pressing the Test RSA connection button will check that the RSA communication from the current node to the remote node is working fine.

A message like the following will appear if everything is right.

Select the cluster type. Through this combo you can choose the behaviour of the cluster service.

–Disable cluster on all hosts–:The cluster service will be stopped and disabled on both nodes. Only use this option if you need to stop the cluster service to make changes or disable the cluster service.
node1 master and node2 backup automatic failback: If node1 is detected as down the node2 will take over the load balancing service. When node1 is restored the service will automatically switch back to node1. You should choose this option when node1 is a more powerful server than node2.
node1 or node2 can be masters: anyone can be master, there is no automatic failback when one node is recovered. If you have two very similar servers for node1 and node2 that can both handle the full load of your traffic then you can use this option.
In order to connect two Zen Load Balancer servers over cross over cable for cluster communication you have to check this option:

Now press  to save the changes.
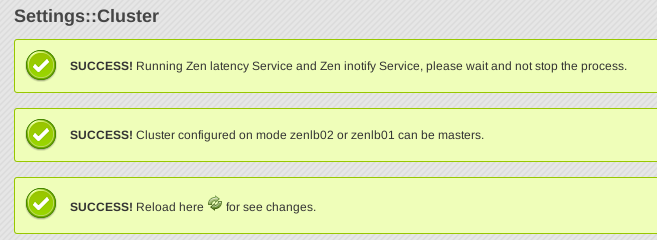
The cluster service is going to start on both nodes and at the end of the process these messages will appear.
Processes are going to be launched on background to configure the cluster, at this point you can press the refresh icon  to update the cluster status view.
If the cluster is configured and working fine you can see a similar view like this:
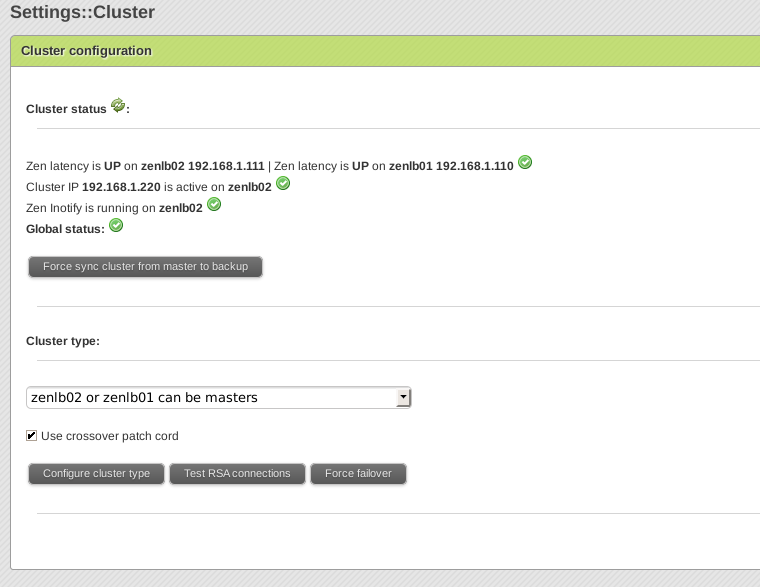
On this view will be shown the cluster services and the status that we describe on the next lines:
Zen latency. Is a launcher of UCARP service, this service has to be running on both cluster nodes, and check that the communication between nodes is OK.
Cluster IP. This IP is UP only on the master node and configured but DOWN on the backup node.
Zen inotify. This service has to be running only on the master node and will send to the backup node all the configuration and changes of networking and farms.
Over the cluster configured view you can:
Reload the check for testing that the cluster service are working like a charm.

Force cluster sync from master to backup. This manual force is useful after a cluster service recovery.

Test the RSA connection. Verify that the RSA connection between nodes is working fine that it’s needed for syncronization over zen inotify service.

Force failover. Switch the cluster service node. It’s useful if you need to do some maintenance tasks on the master server or to test the cluster service. For node1 master and node2 backup automatic failback cluster type will be switched for only 30 seconds, after that, the cluster service will be switched back to node1.

Once the cluster service is configured you’ll be able to change the cluster type but the service could produce some outages.
Over the web GUI is easy to identify which is the cluster role for both nodes. On the upper side of the webpage will show this message for the master node:

And for the backup node:

Once the cluster service is running on both nodes you only have to connect to master node to apply changes for farms and interfaces, which will be automatically configured and replicated to the backup node.
SETTINGS::CHANGE PASSWORD SECTION
In this section you’ll be able to change the web admin user password.
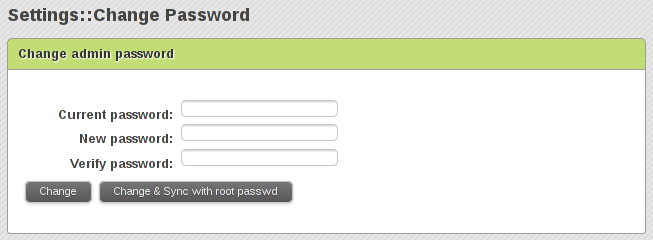
It’s necessary to insert the current password and a repeated new password. Pressing the Change button will change the admin web password. Optionally you’ll be able to sync the admin password with the root system password through the Change & Sync with root password button.