Overview
Cisco ACE was one of the most popular vendor of hardware load balancers in the market years ago. After the decision of Cisco to abandon its load balancer line, users need to find a suitable solution easy to migrate their services.
This guide describes how easy is to migrate from Cisco ACE configurations to Zevenet with simple steps using use case configuration examples.
Basic Concepts
probe: Defines health checks configured against the backends or real servers in order to determine if the application is responding correctly. In Zevenet, health checks are configured through FarmGuardian which is a health checks scheduler and could be customized for every farm.
rserver: Defines every host backend. In Zevenet, the backends are configured in a list through the web GUI section Manage >> Farms >> Edit .
serverfarm: Defines every farm, associating health checks and a list of rservers. In Zevenet, the farm creation is performed through Manage >> Farms >> New Farm and then, edit the global parameters.
class-map: Defines the listening address and port. In Zevenet, it’s defined when created the farm through Manage >> Farms >> New Farm .
policy-map: Defines the load balancing scheduler for every farm and behavior. In Zevenet, it’s configured through Manage >> Farms >> Edit .
interface: Defines the network interfaces configuration. In Zevenet, the networking configuration is in the section Settings >> Interfaces .
route: Defines the routing configuration. In Zevenet, the routing configuration is in the section Settings >> Interfaces .
Server Load Balancing Configuration Examples
This guide is followed from Cisco Application Control Engine (ACE) Configuration Examples — Server Load-Balancing Configuration Examples .
Example of a UDP Probe Load-Balancing Configuration
Cisco ACE Example of a UDP Probe Load-Balancing Configuration
Please follow he following steps to migrate to Zevenet:
1. Create a new virtual interface for the new farm. Go to the section Settings >> Interfaces and click on the icon add vlan network interface. Select 120 in the interface name and the ip address 192.168.120.114 with netmask 255.255.255.0, like is selected in the example.

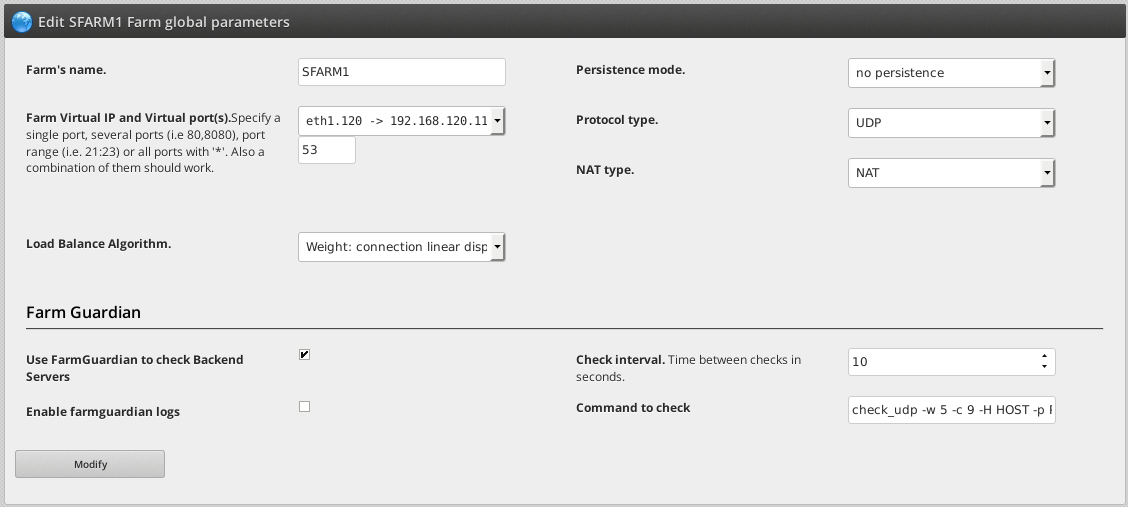
2. Go to Manage >> Farms and click the button Add new Farm. In the field Farm description name will be in our example SFARM1 and as Profile select L4xNAT. Click on the button Save & continue.
3. Select the Virtual IP the VLAN interface 120 created before and Virtual Port 53. Click on the button Save.
4. Click on the farm actions Edit the SFARM1 farm to edit the global parameters. Configure Protocol Type with UDP and enable the option Use FarmGuardian to check Backend Servers, Check interval to 10 and Command to check something like:
check_udp -w 5 -c 9 -H HOST -p PORT
Remain the HOST and PORT tokens as is, during the health check they’ll be substituted by the backends ip servers.
Press the button Modify.
5. Insert the backends servers clicking in the icon Add real server.

Example of an RDP Load-Balancing Configuration
Cisco ACE Example of an RDP Load-Balancing Configuration
Please follow he following steps to migrate to Zevenet:
1. Create a new virtual interface for the new farm. Go to the section Settings >> Interfaces and click on the icon add vlan network interface. Select 10 in the interface name and the ip address 10.6.252.19 with netmask 255.255.255.0, like is selected in the example.
2. Go to Manage >> Farms and click the button Add new Farm. In the field Farm description name will be in our example SF1 and as Profile select L4xNAT. Click on the button Save & continue.
3. Select the Virtual IP the VLAN interface 10 created before and Virtual Port 3389. Click on the button Save.
4. Click on the farm actions Edit the SF1 farm to edit the global parameters.
5. Insert the backends servers clicking in the icon Add real server like in the example: 10.6.252.245 and 10.6.252.246.
NOTE: In this example, there is no health check configured.
Examples of RADIUS Load-Balancing Configurations
Cisco ACE Examples of RADIUS Load-Balancing Configurations
Currently, RADIUS is only available to configure with IP persistence. Please follow he following steps to migrate to Zevenet:
1. Create a new virtual interface for the new farm. Go to the section Settings >> Interfaces and click on the icon add vlan network interface. Select 10 in the interface name and the ip address 12.1.1.11 with netmask 255.255.255.0, like is selected in the example.
2. Go to Manage >> Farms and click the button Add new Farm. In the field Farm description name will be in our example SF1 and as Profile select L4xNAT. Click on the button Save & continue.
3. Select the Virtual IP the VLAN interface 10 created before and Virtual Ports 1812,1813. Click on the button Save.
4. Click on the farm actions Edit the SF1 farm to edit the global parameters. Configure Protocol Type with UDP, configure IP persistence as Persistence mode and press the button Modify.
5. Insert the backends servers clicking in the icon Add real server like in the example: 10.6.252.245 and 10.6.252.246.
NOTE: In this example, there is no health check configured.
Examples of SIP Load-Balancing Configurations
Cisco ACE Examples of SIP Load-Balancing Configurations
SIP protocol could be handled both in raw TCP/UDP or inspecting the headers. Please follow he following steps to migrate to Zevenet:
1. Create a new virtual interface for the new farm. Go to the section Settings >> Interfaces and click on the icon add vlan network interface. Select 10 in the interface name and the ip address 192.168.12.15 with netmask 255.255.255.0, like is selected in the example.
2. Go to Manage >> Farms and click the button Add new Farm. In the field Farm description name will be in our example SF3 and as Profile select L4xNAT. Click on the button Save & continue.
3. Select the Virtual IP the VLAN interface 10 created before and Virtual Ports 5060. Click on the button Save.
4. Click on the farm actions Edit the SF3 farm to edit the global parameters. Configure Protocol Type with SIP and press the button Modify.
5. Insert the backends servers clicking in the icon Add real server like in the example: 10.6.252.245 and 10.6.252.246.
NOTE: In this example, there is no health check configured.
Example of an HTTP-Header Sticky Configuration
Cisco ACE Example of an HTTP-Header Sticky Configuration
Please follow he following steps to migrate to Zevenet:
1. Create a new virtual interface for the new farm. Go to the section Settings >> Interfaces and click on the icon add vlan network interface. Select 193 in the interface name and the ip address 192.168.12.15 with netmask 255.255.255.0, like is selected in the example.
2. Go to Manage >> Farms and click the button Add new Farm. In the field Farm description name will be in our example SFARM1 and as Profile select HTTP. Click on the button Save & continue.
3. Select the Virtual IP the VLAN interface 193 created before and Virtual Port 80. Click on the button Save.
4. Click on the farm actions Edit the SFARM1 farm to edit the global parameters. Add a new service called ciscosrv as an example, and press the button Add. In the service section, set the Virtual Host to .*cisco.com, enable Cookie insertion check and press the Modify button. To finish the service configuration, set the Domain field to cisco.com, set the TTL field to 720 and then press the button Modify in order to apply the changes.
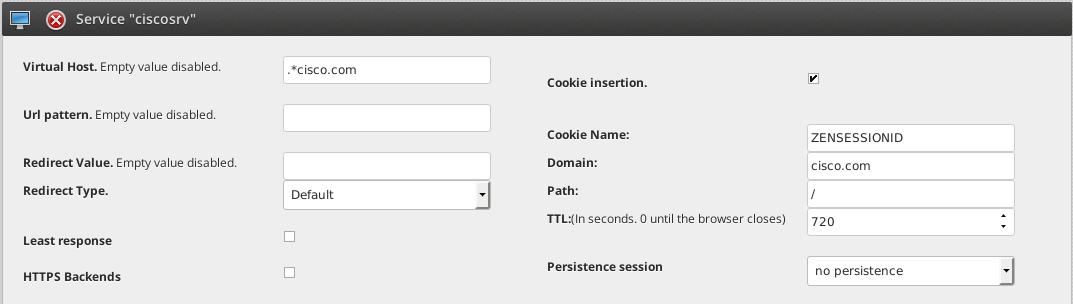
5. Insert the backends servers clicking in the icon Add real server like in the example: 192.168.12.15 and 192.168.12.16. Restart the farm in order to apply the changes.
References
http://docwiki.cisco.com/wiki/Cisco_Application_Control_Engine_%28ACE%29_Configuration_Examples