Contents
Overview
The goal of this article is to explain how to magnify the capabilities application servers such as Tomcat, Jboss or IIS by making them highly web scalable and by setting them up in high availability in order to be tolerant to failures, and how to reinforce cybersecurity.
What is high availability?
High availability is a quality of a system or component that assures a high level of operational performance, usually uptime, for a higher than normal period of time.
By setting up Application Servers in high availability, we solve the following issues:
- A single server looses efficiency when handling a large amount of requests
- Session data is preserved in case of server failure
- Updating application without discontinuing service
What is web-scale?
Applying web-scale principles to Application Servers all business processes of any size are able to grow, be optimized, be automated and effectively scalable.
What is an application server?
An application server is a software framework that provides the business logic for an application program, these means that it administers resources to create web applications and a server environment to run them.
Though this article can be used as a guide for any application server, we will explain some details about the most popular, which are:
- The Tomcat software (or also known as Apache Tomcat or Tomcat server): an open source implementation of the Java Servlet, JavaServer Pages, Java Expression Language and Java WebSocket technologies.
- JBoss or WildFly: the application server developed by Red Hat.
- IIS (Internet Information Services): The application server developed by Microsoft.
Setting up Zevenet Load Balancer
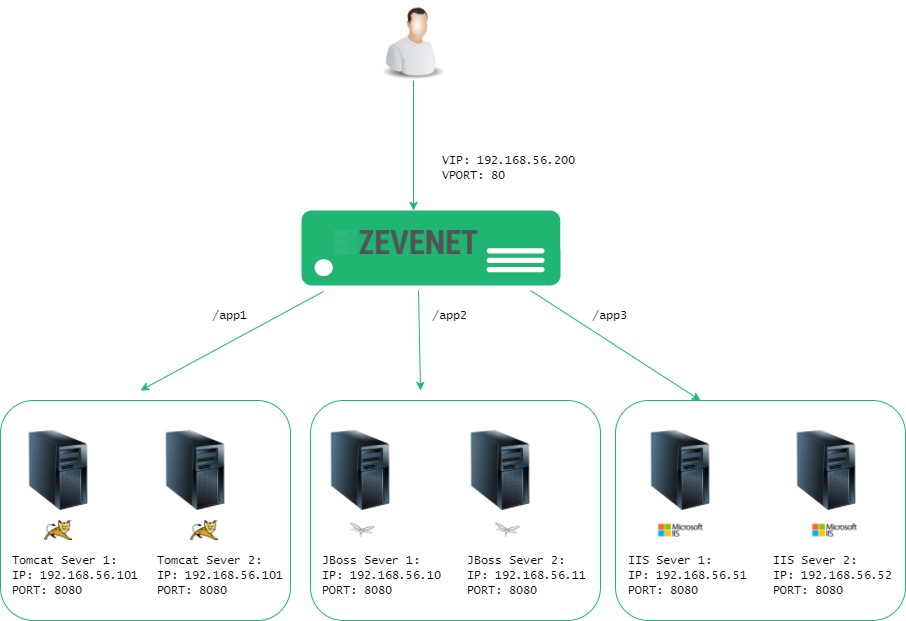
With Zevenet Load Balancer we can ensure high availability and scalability for application servers. Note that, to follow these instructions it’ll be required to install an instance of Zevenet Load Balancer and several instances of application servers. The environment we are going to describe is the following:
Step 0: Server replication
In our example we use two backends servers for each application, but we can include as much as required. It is critical to ensure consistency, so that when connecting to an application server, we always see the same and all of the data saved in the application is not lost. In order to achieve this, session replication within the servers must be set up. We call this step 0 as this must be done in the application servers.
Tomcat provides built-in in-memory session replication: DeltaManager and BackUpManager. The main difference between these two replicators, is that DeltaManager is slower, but more reliable in case of failure.
JBoss also provides a simple way to enable session replication: by marking the application as distributable in the web.xml descriptor.
Service replication for IIS can be achieved using DFSR (Distributed File System Replication).
Step 1: Create virtual IP
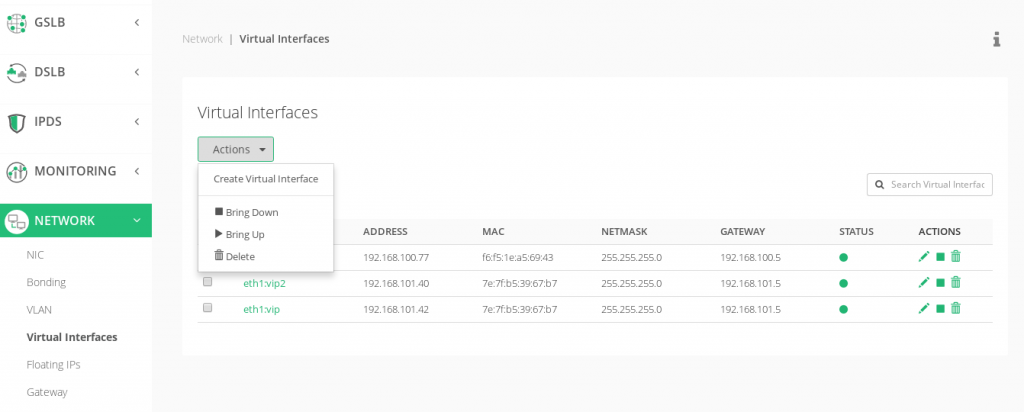
Once Zevenet Load Balancer is installed, it’s needed to create a new virtual IP, from the main menu, select Network->Virtual Interfaces->Actions->Create
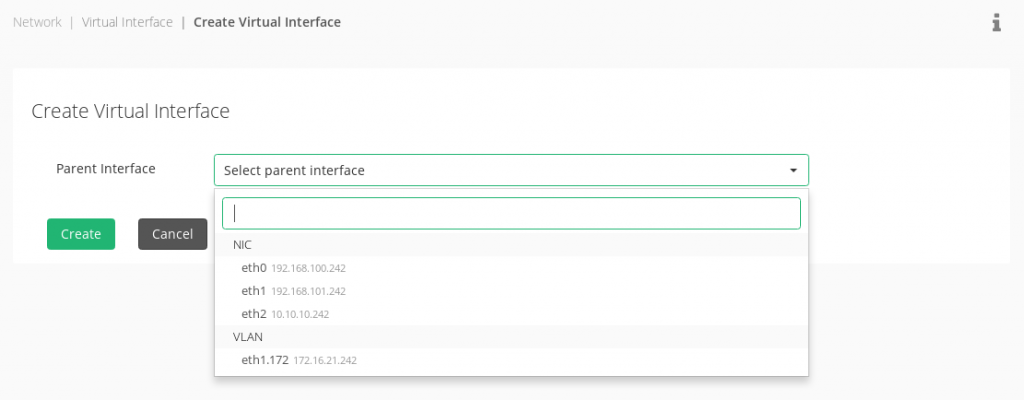
Find the physical interface where you want to create a virtual IP
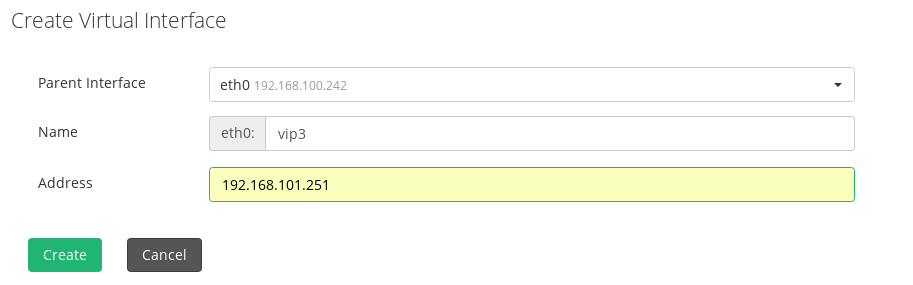
Type the name and address of your new virtual IP. Then Save it by clicking on “Create” button.
Step 2: Create http farm
A farm or cluster is a collection of computer servers that provide server functionality increasing significantly its capability. Though we are using the terms farm and cluster as synonyms, there is a slight difference between them. When talking about a cluster, redundancy is implied, but when talking about a farm, there might or might not be any redundancy. In our case, as we will have a tolerant to failure configuration, we could talk about farm or cluster as synonyms.
This way, by setting up a farm of application servers, we will increase its performance and failure tolerant, which is essential for high availability. In order to achieve this go to LSLB->Farms->Create

Select a name and HTTP as profile. We select http profile because it is the best option for web services as we can provide content switching options under the same virtual IP and port.
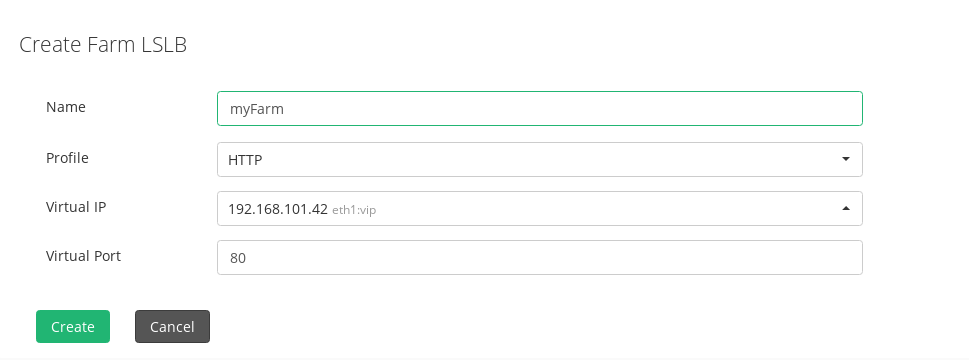
Two more options will be displayed. Select the virtual IP created on step 1 and a port (in the example we choose 80, as it’s the default for HTTP protocol) and click on the Save button.
Step 3: Add the services
The main idea is to serve different applications from different applications servers from the same Virtual IP and port. So, once the farm has been created, we have to edit it in order to add new services. In our example, we will set up three services. One for each application server. Please click on the button edit farm.
Several details of the farm can be edited, in the example we are going to set the default values and the services.
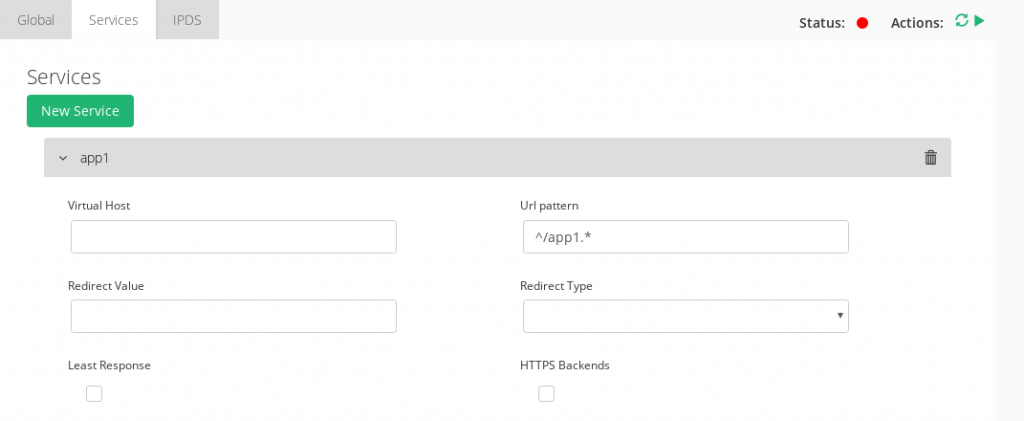
In the screenshot above we have Added a service with service name “app1”.
As we will be accessing all three services through the same farm, we need to distinguish between these services. To do this, we can set a value for URL pattern. This field allows to determine a web service according to the URL the client is requesting through a specific URL pattern. In our example, we will type ^/app1.*, ^/app2.* and ^/app3.*. Click on Modify to apply changes.
Take into account that the backend must find the address http://[VIRTUAL_IP]:[PORT]/[YOUR_SERVICE] (in our example http://192.168.56.200/app1), in order to guarantee this, the context must be set up in your application. In our examples, we will set up the context /app1 for Tomcat, /app2 for Jboss and /app3 for IIS. The Context represents a web application that runs within a particular virtual host. In the particular case of IIS, contexts are referred as applications.
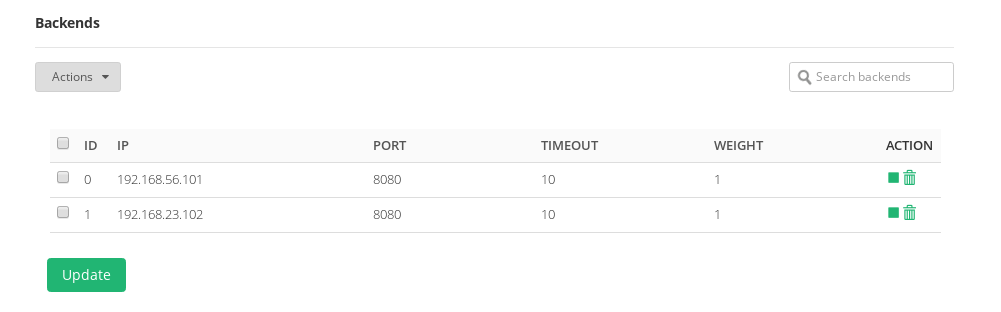
In this example, we have two backends servers per application. We select IP, port (default 8080 for Tomcat and JBoss, and 80 for IIS), timeout and weight and click on save backend button.
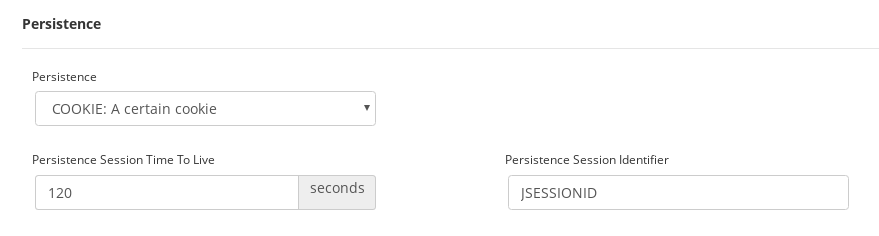
We want to avoid server commutation: if during our session we jump from one server to another, there will be efficiency, data and even communication loss. In order to avoid this the Persistence session must be configured. We will choose to maintain a session by session id, so this means that during a session, we will connect to only one server.
In the service global parameters we can now change the persistence session field to COOKIE: a certain cookie
Select JSESSIONID as persistence session identifier for Tomcat and Jboss and SessionID for IIS, then click on Update at the botton of the page.
Now, under the same farm we’ve’ to add 2 more services in the same way than app1 for app2 and app3, including the persistence cookie for JBoss (the default is called JSESSIONID) and IIS (the default cookie for ASP.NET is ASPXAUTH), respectively but you can use the cookie required by the application. Every service in the farm have their own backends that could be shared between farms or farms services.
Note that, the order of the services are important to match the correct URL pattern.
Finally, we must apply the changes by restarting the farm.
Congratulations! you have configured your application servers in high availability. You can access it by typing http://[VIRTUAL_IP]:[PORT]/[YOUR_SERVICE] (in our example http://192.168.56.200/app1, http://192.168.56.200/app2 or http://192.168.56.200/app3).
Step 4: Advanced checking
We will now set up the farm guardian in order to perform advanced health checks to the backends ensuring that they’re up, running and the correct behavior of the application, not just a TCP port check. Please locate the Farm Guardian within your Service we have set up in step 3. Click on Use FarmGuardian to check Backend Servers, you can also modify the time between check and finally, in the Command to check textbox, type the following command.
check_http -I HOST -w 10 -c 10 -t 10 -e 200 -p PORT -s '</html>'
Finally, click on Update at the botton of the page.
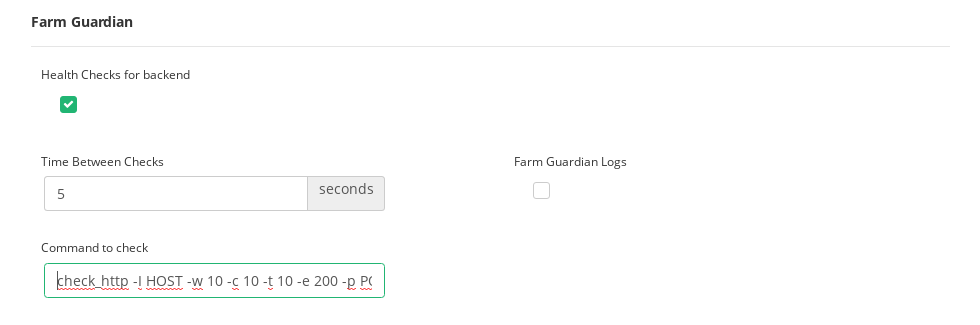
The command check_http tests HTTP connections with the specified host. In our case, we are using the following options:
-I HOST: The token HOST will be replaced by the backend IP address defined.
-w 10: response time to result in warning status: 10 seconds
-c 10: response time to critical status: 10 seconds
-t 10: 10 seconds before connection times out
-e 200: expects the string 200 in the status of the server response
-p PORT: The token PORT will be replaced by the backend port defined.
-s ‘</html>’: string to expect in content is ‘</html>’
So what this command will do is basically check that we get a 200 OK response, and that the response command contains the string ‘</html>’. We select this string because it is at the end of the response, this way we can guarantee that we get a full answer from the backends.
Step 5: High security
Secure communications can be easily set up with Zevenet Load Balancer, so the next step is to enable the HTTPS listener: On the Edit farm global parameters screen, please change the farm listener from HTTP to HTTPS and the Virtual Port to 443.
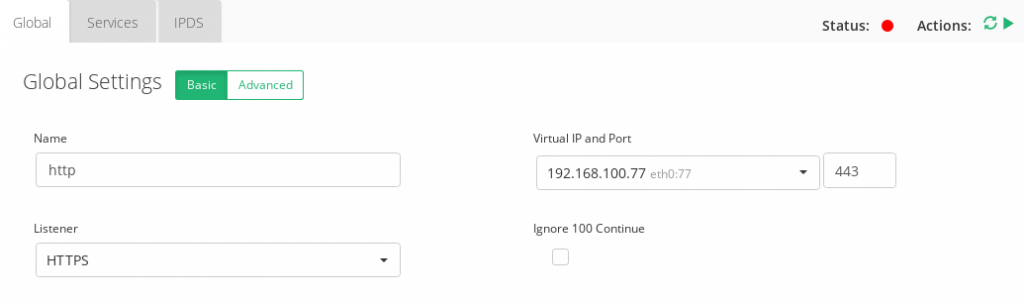
Now, the services can be accessed by typing https://[Your_virtual_ip]/[yourappservice] in your browser.
Secure communications are now running, but we can go further by configuring the HTTPS parameters: within the farm global parameters, locate the HTTPS Settings section. We can change the Ciphers to HIGH Security.
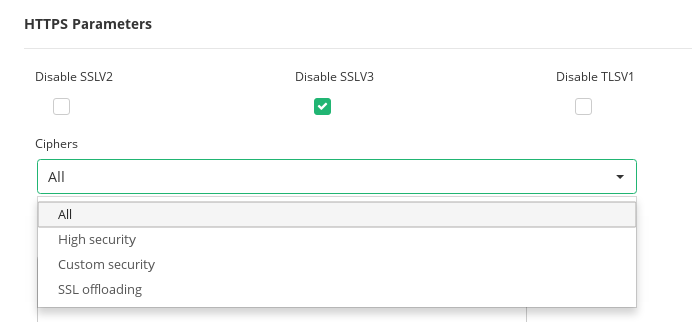
The ciphers field is used to build a list of ciphers accepted by SSL connections in order to harden the SSL connection. By selecting HIGH security, we will set by default the ciphers.
kEECDH+ECDSA+AES128:kEECDH+ECDSA+AES256:kEECDH+AES128:kEECDH+AES256:kEDH+AES128:kEDH+AES256:DES-CBC3-SHA:+SHA:!aNULL:!eNULL:!LOW:!kECDH:!DSS:!MD5:!EXP:!PSK:!SRP:!CAMELLIA:!SEED
Another option is the HTTPS certificates available: a list of certificates will be shown to be selected for the current farm (only for HTTP farms, which is our case). We can select one from the list and click on Add. Finally, click on Modify and restart the farm in order to apply changes.
For further information, please see HTTP profile farms.
HTTPS can also be enabled in your application servers, if this is the case, your must enable the option HTTPS backends.