Contents
Intro
A proxy server can be described as a server appliance or application which makes intermediation for requests from customers or clients trying to seek resources from several servers providing those ones. That explained, it means that a proxy server works on behalf of the customer or client when the service is requested, and maybe potentially hiding the real origin or source of the request to the server.
The process is that the client makes the request directly to the proxy server, instead of connecting only to a concrete server that can provide a requested resource, like files or webs, and then the proxy server evaluates that request and develops the appropriate and required network transactions. This is a way to make simpler or more controlled the complexity of the request, and besides, it provides other benefits such as security, content acceleration, or privacy. Proxies are devised to encapsulate and structure the existing distributed systems. Some of the most used web navigation proxies are Squid, Privoxy, or SwiperProxy.
Sometimes a proxy server is not enough to manage the number of concurrent users or the proxy itself is a single point of failure that needs to be addressed, then is when an ADC is totally required.
The following article describes a way of creating high availability and scalability for a navigation proxy service, in case one of the Proxy servers fails then the load balancer, implemented with ZEVENET Application Delivery Controller, will detect the failure and the proxy will be disabled of the available pool, additionally, the client will be redirected to another available navigation proxy without affecting the traffic connections.
Proxy network architecture
With the idea of making the reader understand better the configuration, we want to reach the following diagram describes the architecture.
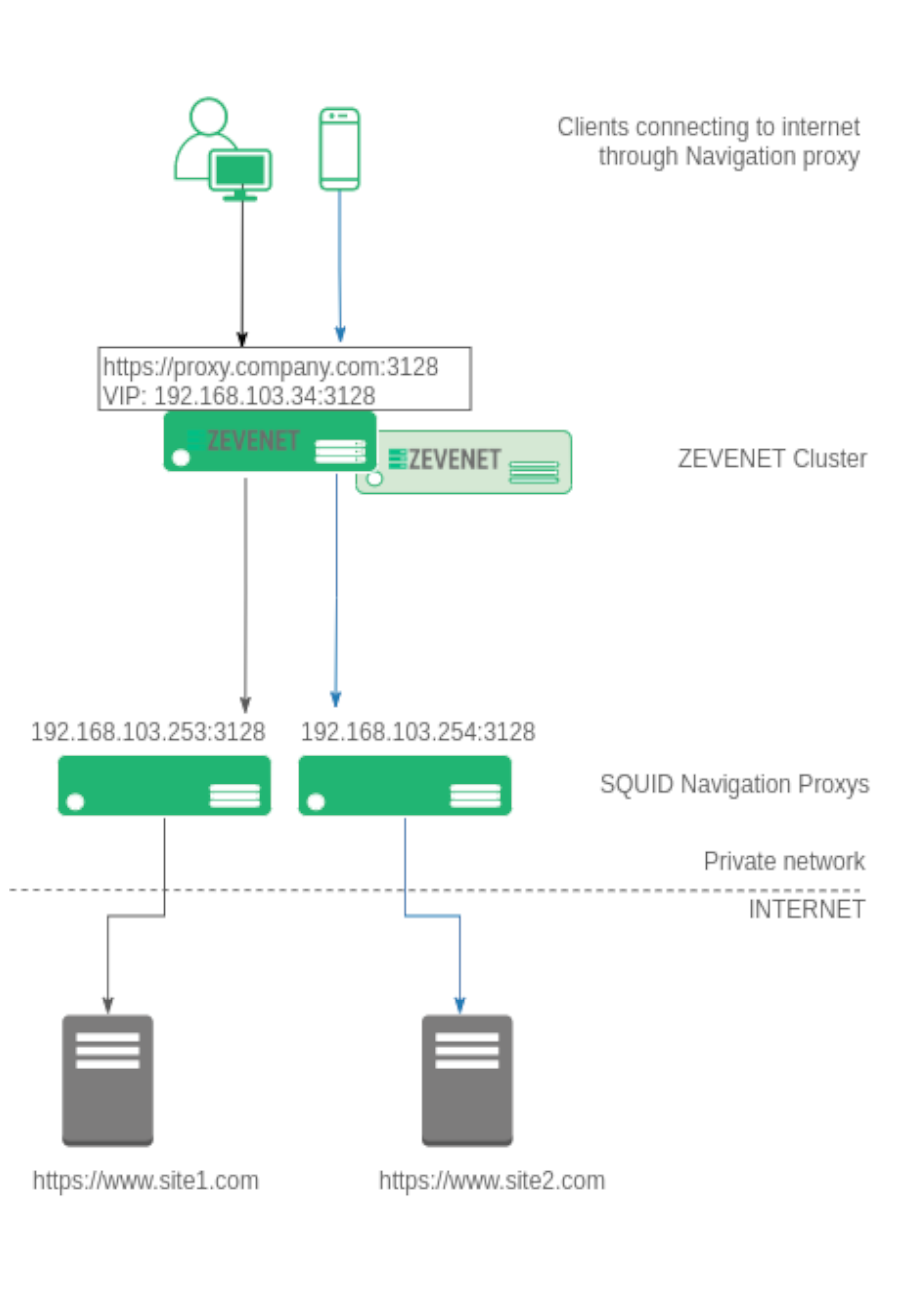
Different clients (laptops, computers, mobiles, and tablets) configure the navigation browser pointing to the corporative proxy, e.g. https://proxy.company.com:3128. All the connections from the clients to the web navigation proxy in plain HTTP or SSL will be TCP based, so this will be used to build our load balancing farm.
The IP resolution for proxy.company.com is a Virtual IP already configured in the load balancer. In the ZEVENET Application Delivery Controller, there is a farm over such Virtual IP, e.g. 192.168.103.34 and Virtual Port 3128 in NAT mode for TCP protocol.
The farm is configured with all the backends that build the navigation proxy pool, in our example 192.168.103.253 and 192.168.103.254 via TCP port 3128. As soon as the client tries to connect to the proxy configured, the ADC will receive the connection and it will be redirected to one of the available navigation proxies in the pool sharing the users between all the available backend proxy servers.
The following section describes the configuration procedure in order to create a proper configuration for load balance Navigation proxies in ZEVENET load balancer.
Firstly, create a health check for being used in the load balancing farm that we are going to create in the following lines. The goal of this new health check is to verify that the TCP port in the backend proxies is enabled.
Go to section MONITORING > Farm guardian, create a new farmguardian with name check_tcp_navigation_proxy and copy from check_tcp and do some small changes in the timeouts as shown below:

In the Command field add the flag -t 5, this is the timeout per backend in order to respond to the TCP connection from the load balancer. The Interval field is configured a value of 11, 5 seconds per backend + 1 additional second to avoid recursion. We recommend to use the following formula to set the optimal Interval value.
(number of backends * timeout seconds per backend (-t) ) + 1
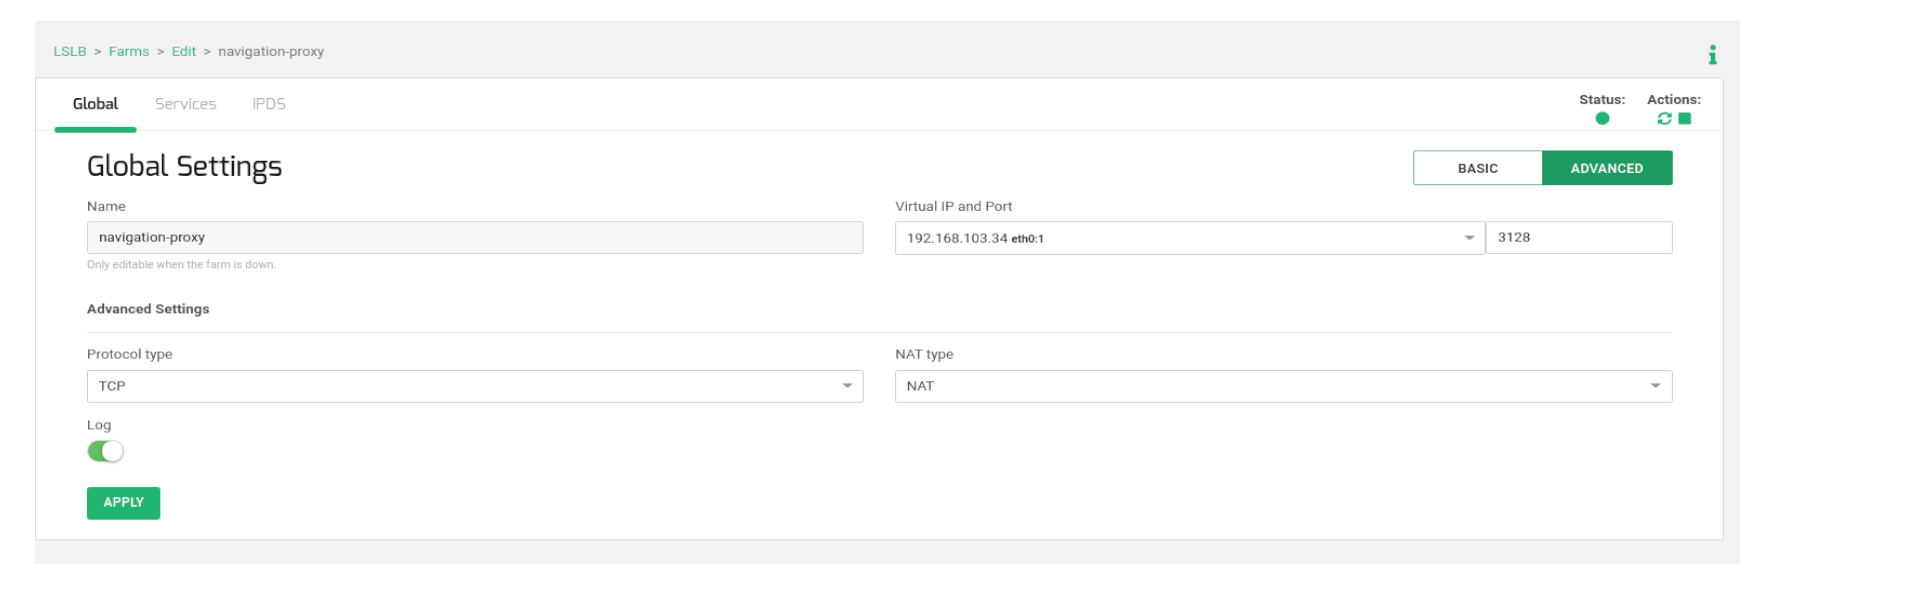
Then, create an LSLB > L4xNAT farm, e.g. with the name navigation_proxy, including the Virtual IP and Virtual Port as indicated in the previous diagram. Once it is created, go to edit in Advanced mode and ensure that Protocol Type is configured in TCP and NAT Type is configured in NAT mode.
In order to configure the virtual service behavior, go to the tab Services and configure the load balancing algorithm in Weight (by default). Please adapt this value to the most appropriate for your environment and desired behavior.
Then, in the same section, go to table Backends and add the real web navigation proxy servers that will manage user’s connections.
Finally, select the health check already created in the previous step named check_tcp_navigation_proxy in order to verify that the TCP backend port is already opened.

Now, the load-balanced virtual service can be tested before configuring the clients.
Clients configuration
Last step is to configure the proxy settings in the client’s web browser pointing to the Virtual IP and Virtual Port used in load balancer, or introduce the Virtual IP in the cooperative DNS and use a Name instead in the clients, in our example proxy.example.com is pointed to the Virtual IP 192.168.103.34).
Finally, enjoy your load-balanced web navigation proxy with high availability!