Contents
Overview
The goal of this article is to explain how to amplify the capabilities of JD Edwards by setting it up in high availability and making it massively scalable in order to be tolerant to failures, and how to reinforce cybersecurity.
What is high availability?
High availability is a quality of a system or component that assures a high level of operational performance, usually uptime, for a higher than normal period of time. By setting up JD Edwards in high availability, we solve the following issues:
A single server loses efficiency when handling a large amount of requests.
Session data is preserved in case of server failure.
Updating application without discontinuing service.
What is Oracle JD Edwards?
Oracle JD Edwards EnterpriseOne is a standard-based application suite that integrates ERP processes and even provides cellphone applications.
Enterprise resource planning (ERP) is the integrated management of core business processes, often in real-time and mediated by software and technology. These business activities can include product planning, manufacturing, purchase, production planning, finance, marketing and sales, materials management, inventory management, shipping and payment.
There’s a wide variety of services offered by JD Edwards:
For further information about services used by JD Edwards, please check Default Port Listing Used Within the VMs for JD Edwards EnterpriseOne .
Setting up Zevenet Load Balancer
To follow these instructions it’ll be required to install an instance of Zevenet Load Balancer and several instances of JD Edwards.
The environment we are going to describe is the following:
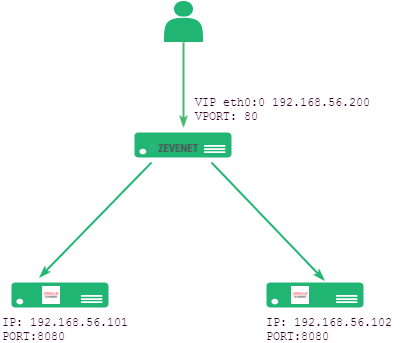
We are going to make the frontend service (WebLogic based) highly available and for these we are going to explain three different configurations:
Using an L4 farm for TCP raw connections forwarding.
Using an HTTP farm for application data forwarding.
Using an HTTPS farm for secured application data forwarding.
Please select which is more suitable for your infrastructure.
Step 0: Setting up data replication
It is critical to ensure data consistency, that is when connecting to a JD Edwards server ensures that there is no data loss. This step must be done in the JD Edwards servers layer.
In order to achieve server replication, a WebLogic server cluster must be set up. WebLogic Server clusters distribute the workload between several instances of WebLogic servers. This way, we provide extra scalability and reliability for the applications. These clusters can be implemented to make services hosted on a single machine with options to move the service to another node if there’s any failure. WebLogic provides HTTP session replication across the servers within a cluster. Moreover, WebLogic Server can also replicate HTTP session state across multiple clusters. This way we provide high availability and fault tolerance. With Zevenet Load Balancer we will boost this capability.
Step 1: Create virtual IP
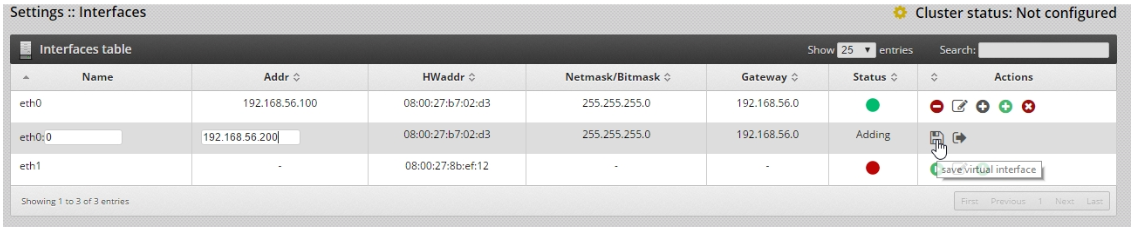
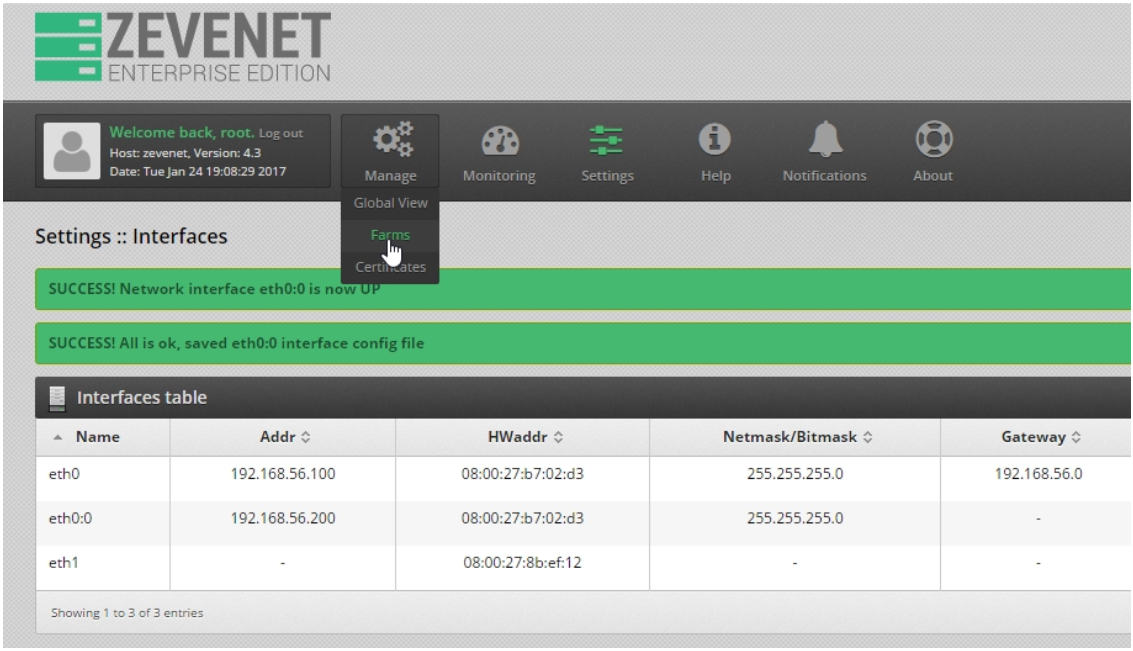
To create a new virtual IP, from the ZLB main menu, select Settings >> Interfaces .
Find the physical interface where you want to create a virtual ip and under Actions click on the button add virtual network interface:

Type the address and bitmask of your new virtual IP, it must be in the same subnet as the physical device. Save it by clicking on save virtual interface.
Configuration 1: L4 farm
Step 2: Create farm
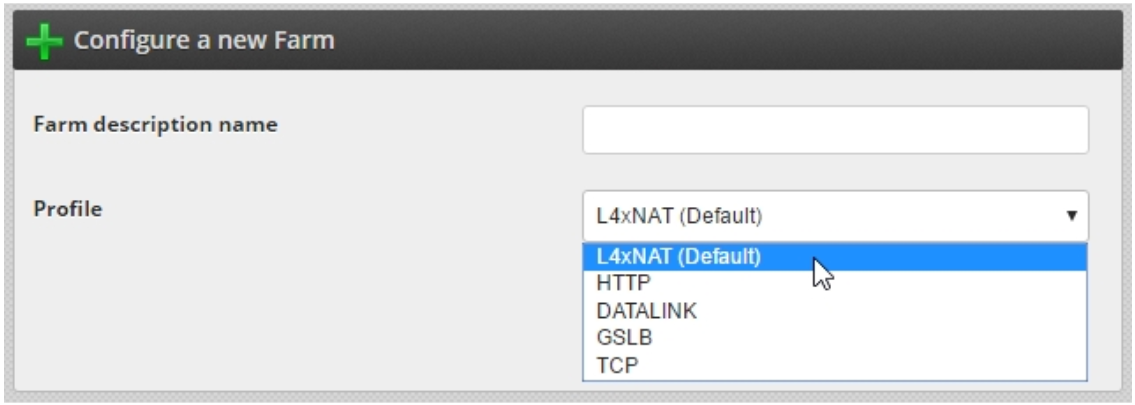
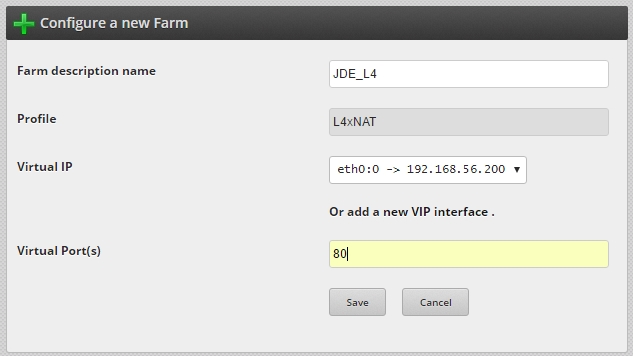
A farm is a collection of computer servers that provide server functionality increasing significantly its capability. This way, by setting up a farm of application servers, we will increase its performance, which is essential for high availability. In order to achieve this go to Manage >> Farms .
Click on Add new farm and in the new window, select a name and L4xNAT as profile. We select this profile because it is a high performance load balancing system at routing layer 4 which combines multiple load balancing methods like, for example, Source NAT and Destination NAT.
Two more options will be displayed. Select the virtual IP created on step 1 and set 80 as TCP virtual port. Once done, click on the Save button.
Step 3: Farm parameters
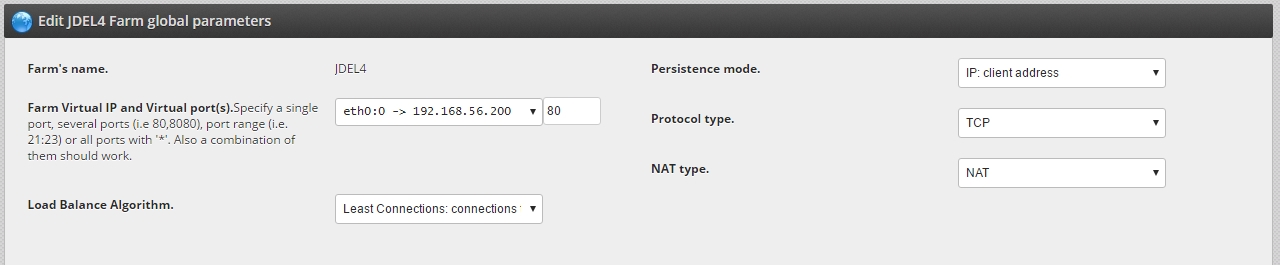
Once the farm has been created, we have to edit it in order to set up more parameters. Please locate your new farm and click on the button Edit Farm.

JD Edwards sessions can be very long, so we will recommend selecting Least connections: connections to the least open conns available as Load Balance Algorithm.
We want to avoid server commutation: if during our session we jump from one server to another, we might end up losing critical data, so we will set up the Persistence choosing IP Client address. This way, the same client will connect always to the same server.
Next parameter to be configured is the NAT type. NAT stands for Network Address Translation, and it is a method of remapping one IP address space into another. This is achieved by modifying network address information in the IP datagram packet headers while they are in transit across a traffic routing device. In simpler words, it translates the IP addresses of computers in a local network to a single IP address.
In our example we will set this parameter as NAT as well known as source NAT.
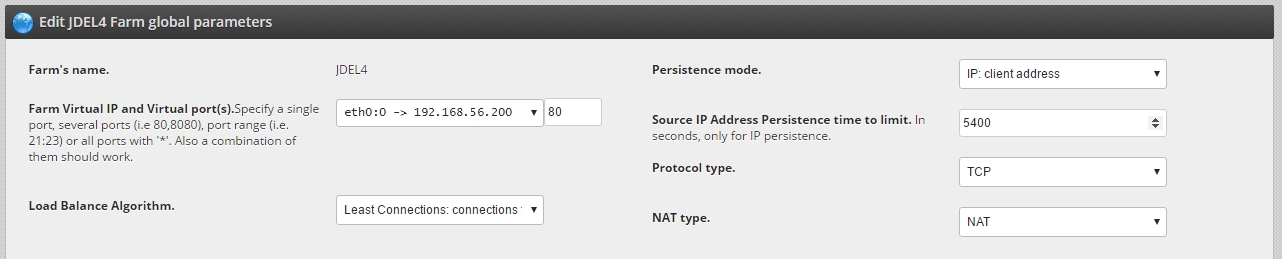
Click on Modify and a new parameter will show up: Source IP Address Persistence time to limit. Set it to 5400 seconds (90 minutes). This parameter is the time out of the persistence and we are setting it this high because, as mentioned before, JD Edwards sessions last a long time.
In this example, the Protocol type is set to TCP.
Step 4: Advanced checking
We will now set up the farm guardian in order to perform advanced health checks to the backends ensuring that they’re up, running and the print server is behaving correctly. Please locate the Farm Guardian within your Service we have set up in step 3. Click on Use FarmGuardian to check Backend Servers, you can also modify the time between checks with the option Check interval and finally, in the Command to check textbox, type the following command:
check_http -t 29 -w 29 -c 29 -H HOST -u /jde/E1Menu.maf -e 200 -p PORT
Finally, click on Modify.

The command check_http tests TCP connections with the specified host. In our case, we are using the following options:
-t 29: 29 seconds before connection times out. This parameter should be customized in regards to the response times you’ve obtained for your backends.
-w 29: response time to result in warning status, 29 seconds.
-c 29: response time to critical status, 29 seconds.
-H HOST: IP or address name, in our case, name is HOST.
-u /jde/E1Menu.maf: url to get or post: /jde/E1Menu.maf
-e 200: expecting string 200
-p PORT: port to check.
Step 5: Add the backends
This is where we will add the IP addresses of the JD Edwards servers. Locate the section Edit real IP servers configuration and click on Add real server, then type the server IP address and select 8080 as port, since it is the port for the WebLogic HTML server. Finally, we include the weight and priority parameters and click on Save real server.

Configurations 2 and 3: HTTP and HTTPS farm
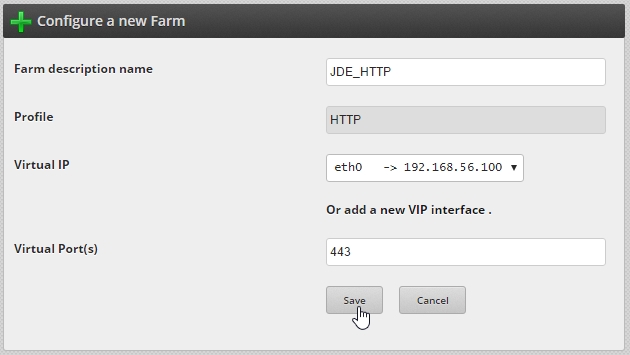
Step 2: Create farm
Here we will proceed exactly like for the L4xNAT farm. But now, select HTTP as profile, and port 80 for HTTP farm and 443 for HTTPS farm.
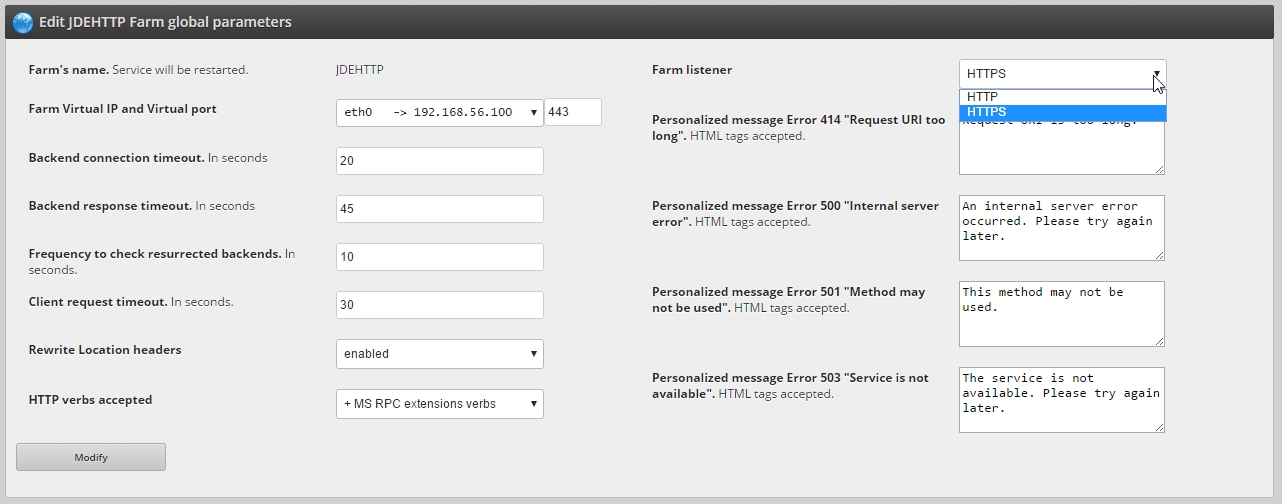
Edit the farm. Change the Farm listener to HTTPS,virtual port 443 if setting up an HTTPS farm. Leave it as HTTP, virtual port 80 for plain HTTP farm. The rest of the parameters can be the defaults. Click on Modify to apply changes.
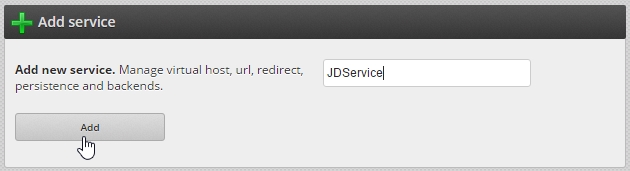
Step 3: Create service
Find the Add service section, type the service name and click on Add.
We want to avoid server commutation: if during our session we jump from one server to another, there will be efficiency, data and even communication loss. Avoiding this situations is critical, so Persistence session must be configured. We will choose to maintain a session by session id, so this means that during a session, we will connect to only one server.
In the service global parameters we can now change the persistence session field to COOKIE: a certain cookie and click on “Modify”.

Select “JSESSIONID” as persistence session identifier and click on Modify.

Finally, we must apply the changes by restarting the farm:
![]()
![]()
Step 4: Advanced checking
We will proceed here exaclty the same way as for the L4xNAT farm. As a reminder, here is the Command to check:
check_http -t 29 -w 29 -c 29 -H HOST -u /jde/E1Menu.maf -e 200 -p PORT
Step 5: Add the backends
Each backend represents a JD Edwards server, please be mindful and take into account that JD Edwards databases must be replicated, as explained at Step 0. Find the backends section and click on Add real server

In this example, we have two backends, we select IP, port (8080), timeout and weight and click on

And finally restart the farm in order to apply the changes.