Contents
FileCloud Overview
FileCloud enables a private cloud that makes your files accessible from any device from anywhere, but also synchronization across computers. It helps users share files seamlessly within or outside an organization.
Filecloud could be an important service in any organization, for that reason it provides certain capabilities to be served in an scalable architecture and set up in high availability and load balanced with enhanced security.
FileCloud Scalable Architecture
The following diagram describes the different pieces of FileCloud software and how the high availability service can be achieved:
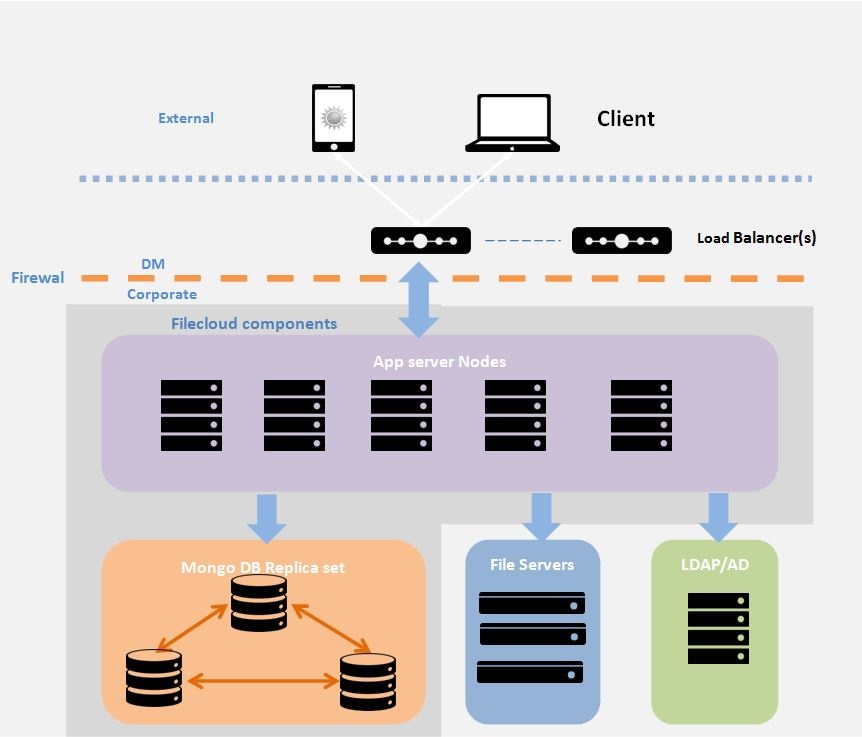
Analyzing the previous image from the official support portal, the APP server Nodes are the key for the load balancing, this app layer is offered with Apache servers so the HTTP(S) protocol is the responsible to deliver the application to the users.
FileCloud Frontend Apache server serves two different applications, one for client connections and another for the administration management.
The users application frontend is accessible through the URI /ui/core/index.html, and it looks like the following picture.

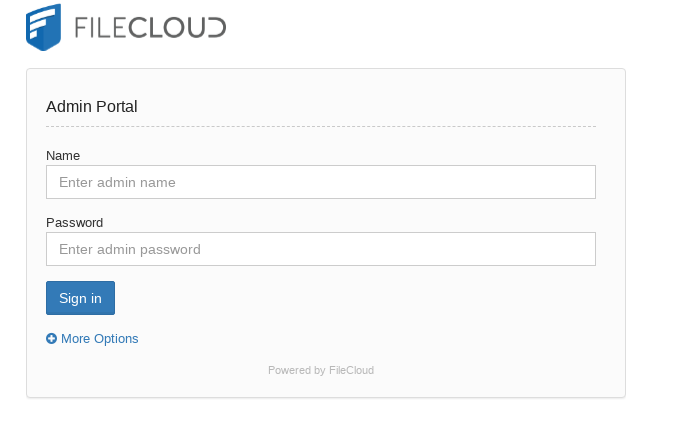
On the other hand, the administration application panel is accessible through the URI /ui/admin/index.html, and it looks like the following picture.
The first proposed configuration for FileCloud Load Balancing is based in creating a LSLB >> HTTP farm, this configuration splits the administration and the users traffic through two different services in the same farm. This way, it offers more flexibility for management purposes, for example, the access to the admin section can be disabled without affecting to the app for users.
Another configuration, much easier and more efficient than the previous one, is based in a TCP pass-through using for that a LSLB >> L4xNAT farm, all the traffic will be forwarded to the desired backends without taking in consideration which app is managed.
For both proposed configurations we will require:
1. Recommended a Zevenet Cluster configuration already set up.
2. A virtual IP with the 443 port not in use (ex, 192.168.100.100) in our example this IP resolves in DNS to filecloud.zevenet.com .
3. At least two Filecloud apache servers configured and running, those IPs need to be reachable from the load balancer itself (ex, 192.168.100.10, 192.168.100.11).
4. Ensure that Filecloud system works properly connecting from both FileCloud Apache servers.
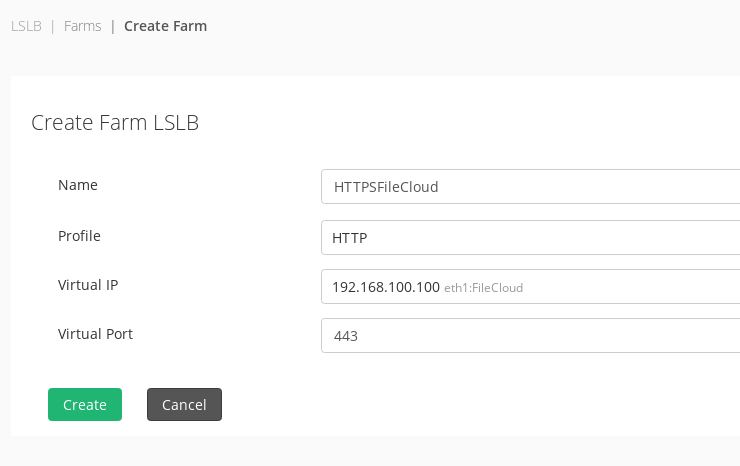
Load Balancing with HTTP farm
Once the Virtual IP 192.168.100.100 is created with the name eth1:FileCloud please proceed to create a new HTTP farm as follows:
Then, click in the advanced view and change the HTTP Listener to HTTPS, please select here the desired SSL certificate for the HTTPS profile and change Backend Response timeout to 7200 seconds (2 hours) in order to ensure that the connections are not going to be dropped if big files are being uploaded/downloaded.
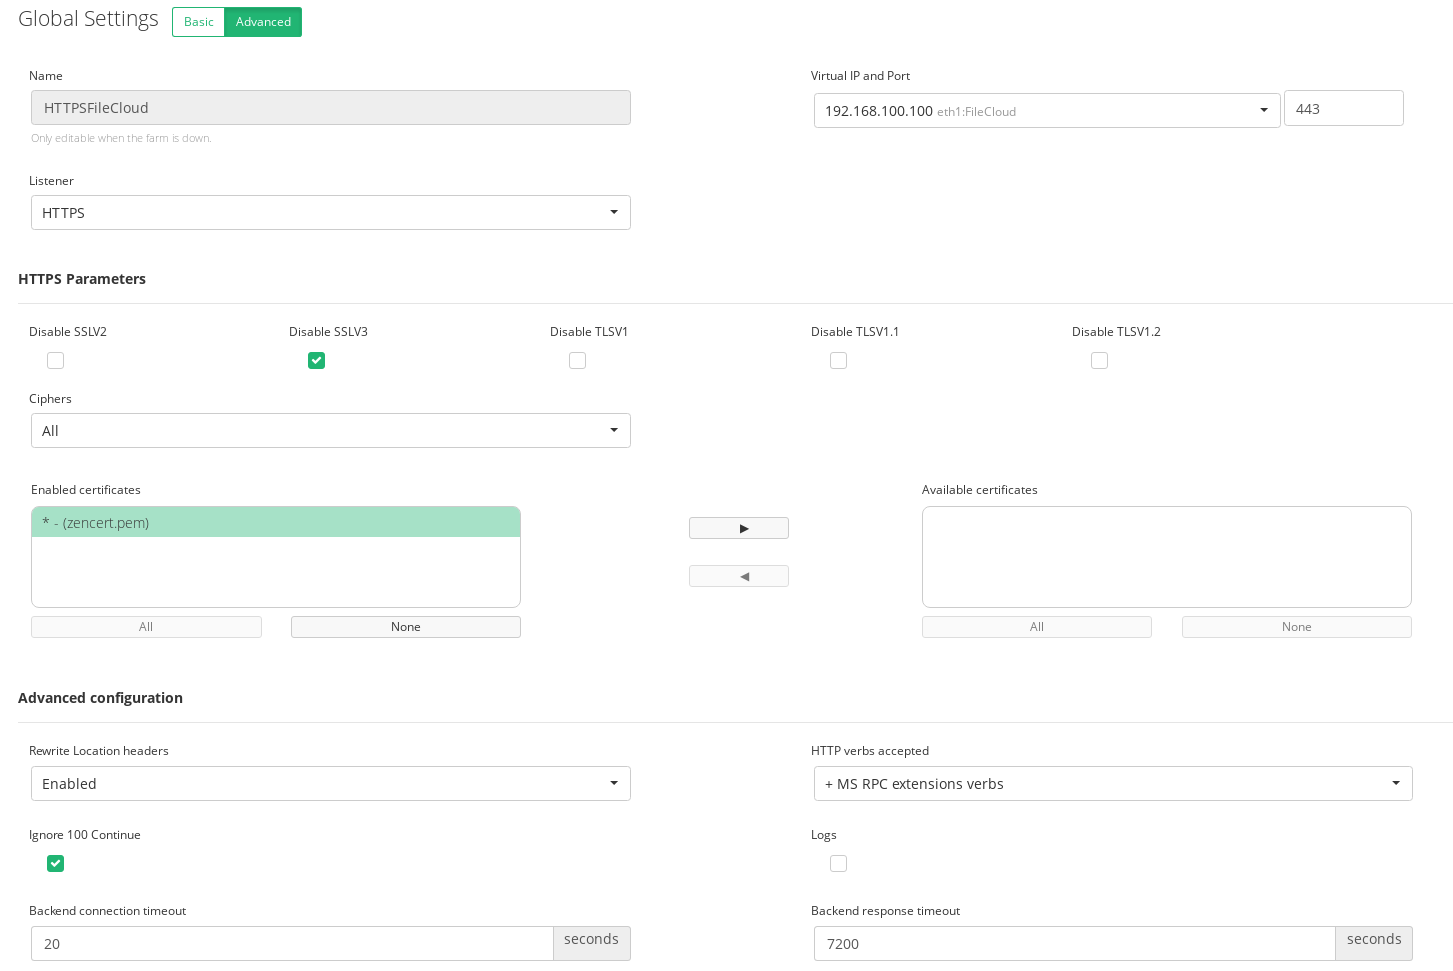
Please read this article if you need assistance creating a PEM Certificate for a SSL Farm. Following this example, the Certificate should be created for the CN = filecloud.zevenet.com.
Click on Services tab and create 3 services as follows:
Service 1: Create a service called RedirecttoMain, in order to redirect to the main login page for users setting the Url Pattern and Redirect options as it’s shown below.

Note that with the redirect option is not required to set the backends yet. The specific options are the following.
URL pattern = ^/$
Redirect = checked
Redirect = https://filecloud.zevenet.com/ui/core/index.html
Redirect Type = Permanent
Redirect Code = 301 (permanent redirect)
Service 2: Create a service called UIUsers to configure the real application servers for users.
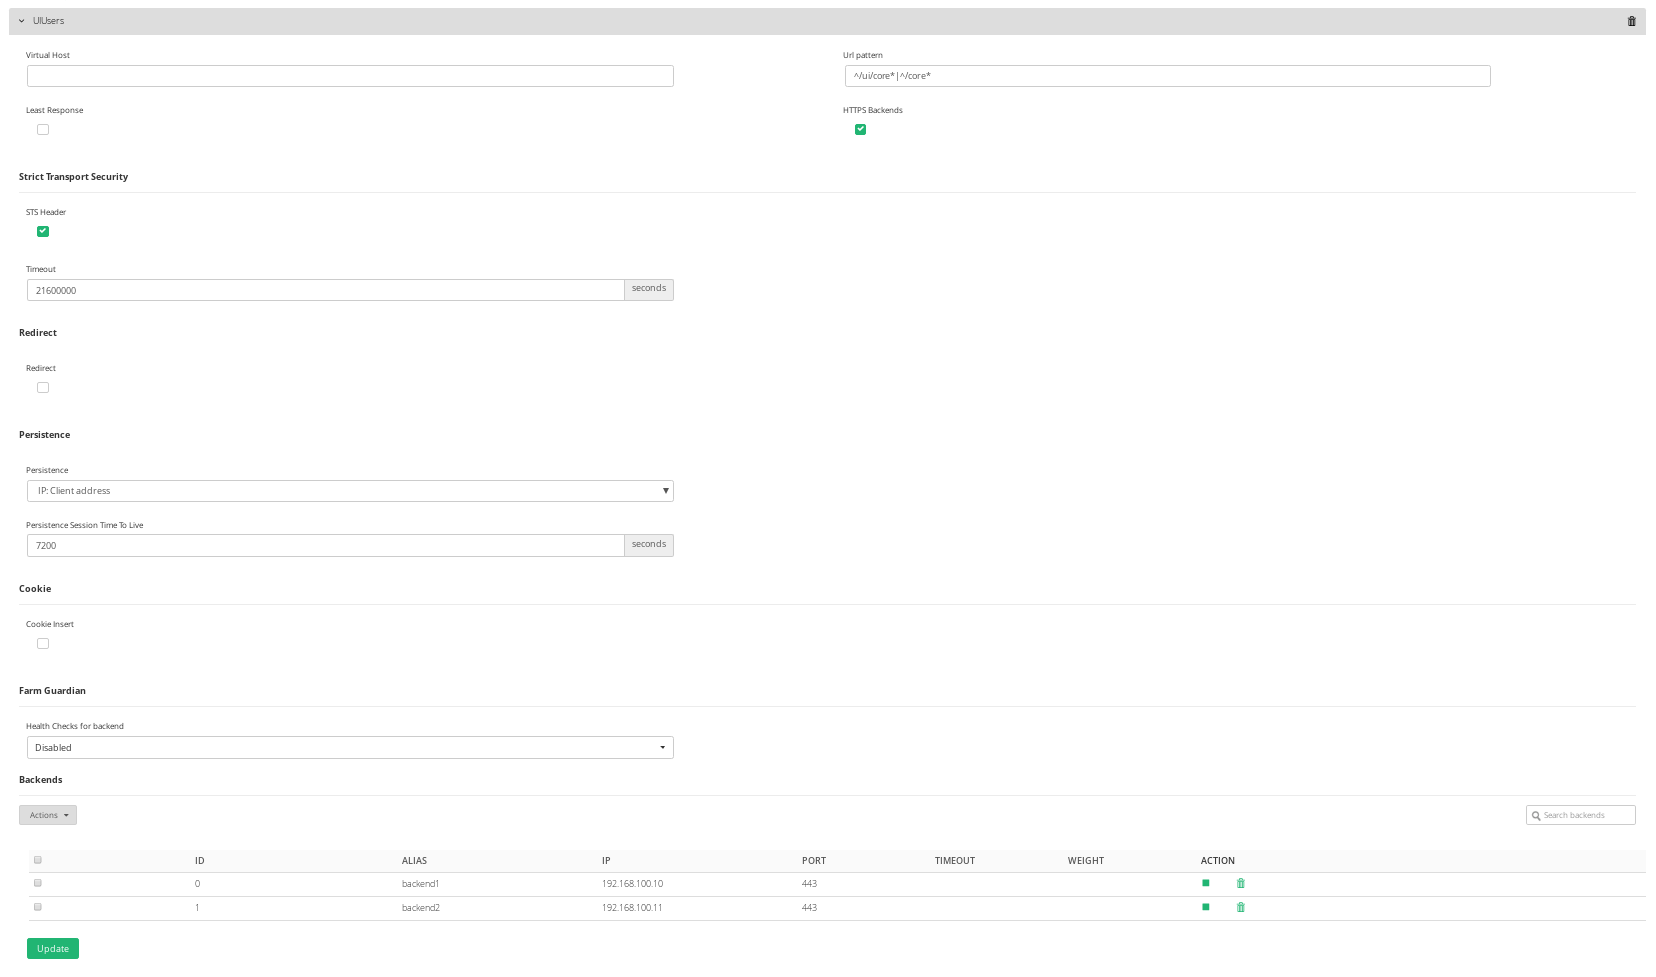
Note that in this example, the SSL traffic will be offloaded, then switched and finally encrypted again back to the backends in order to ensure the full communication is secure.
Please use the following specific options:
URL pattern = ^/ui/core*|^/core*
HTTPS Backend = checked
Persistence = IP: Client Address
Persistence Session time to live = 7200
Add FileCloud User Application Backend Servers (ex, 192.168.100.10:443 and 192.168.100.11:443)
Service 3: Create a service called UIAdmin to configure the real application servers for administration.
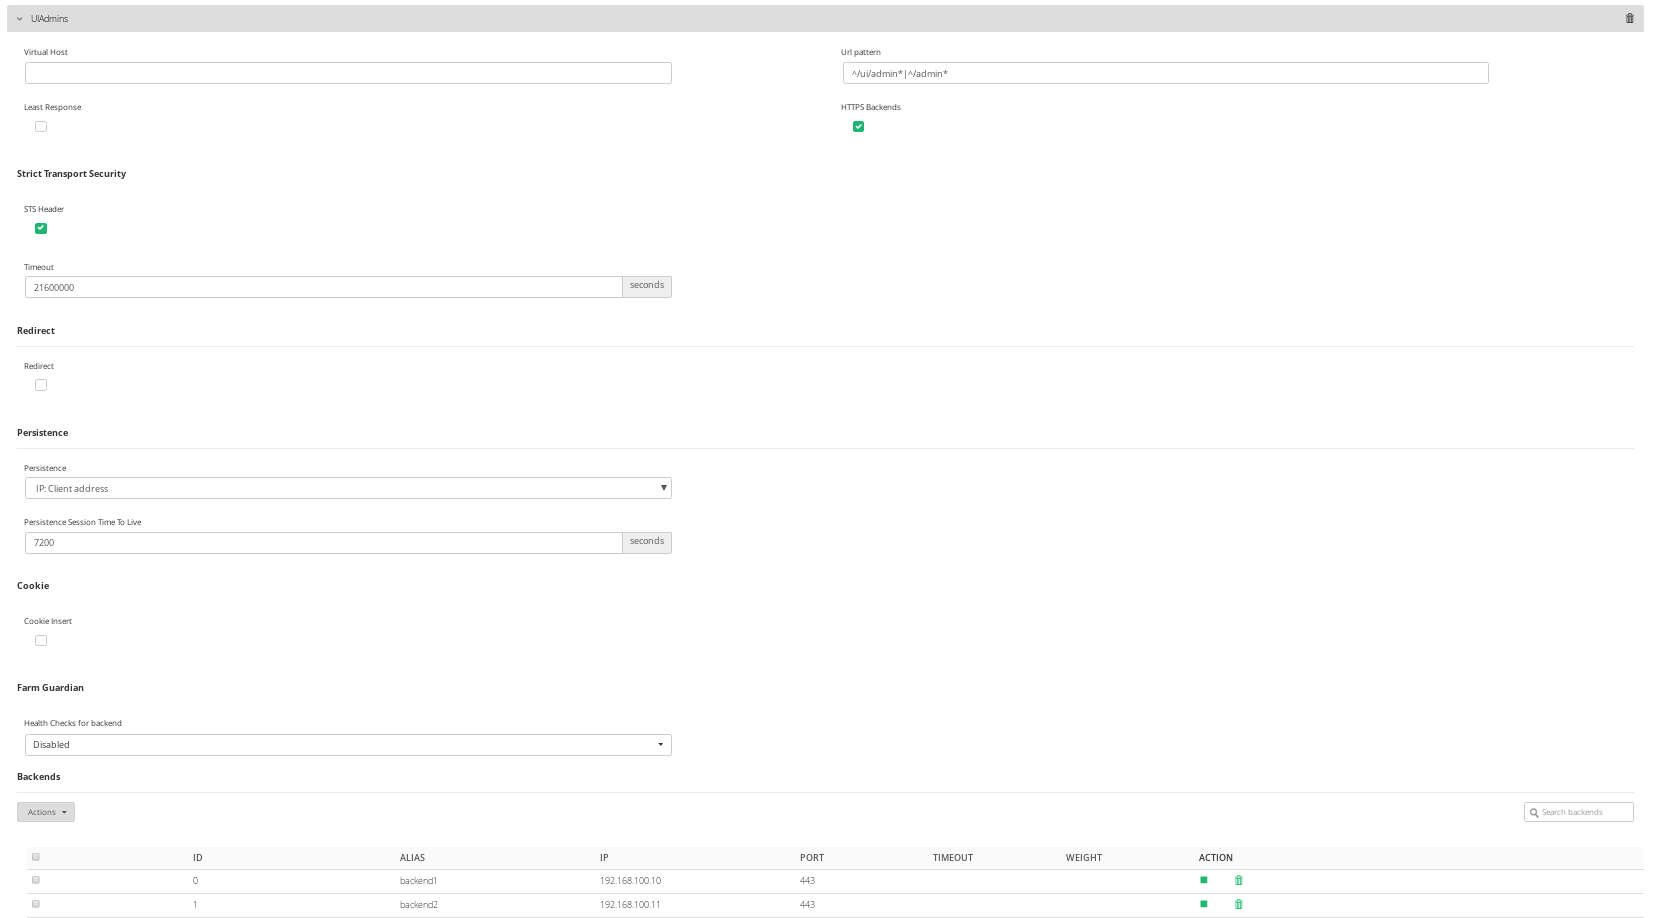
URL pattern = ^/ui/admin*|^/admin*
HTTPS Backend = checked
Persistence = IP: Client Address
Persistence Session time to live = 7200
Add FileCloud Admin Application Backend Servers (ex, 192.168.100.10:443 and 192.168.100.11:443)
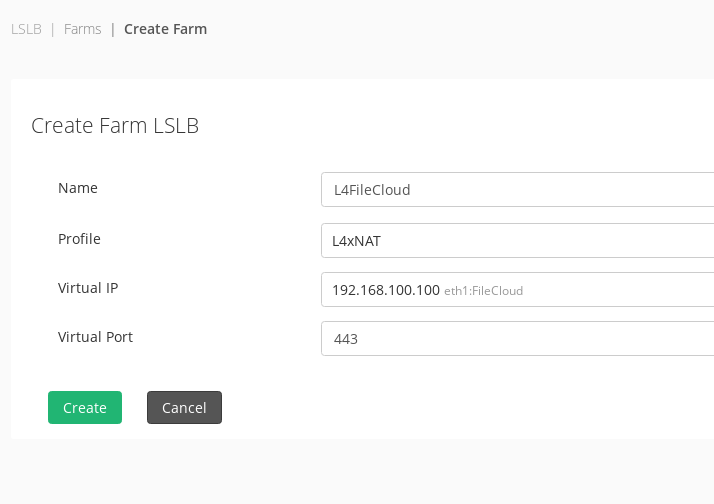
Load Balancing with L4xNAT farm
This configuration is simpler than the previous one but it is also less flexible, in order to achieve a TCP pass-through please do the following:
Once the dedicated Virtual IP has been created for the service (ex, 192.168.100.100) with the name eth1:FileCloud please proceed to create a new L4xNAT farm as follows.
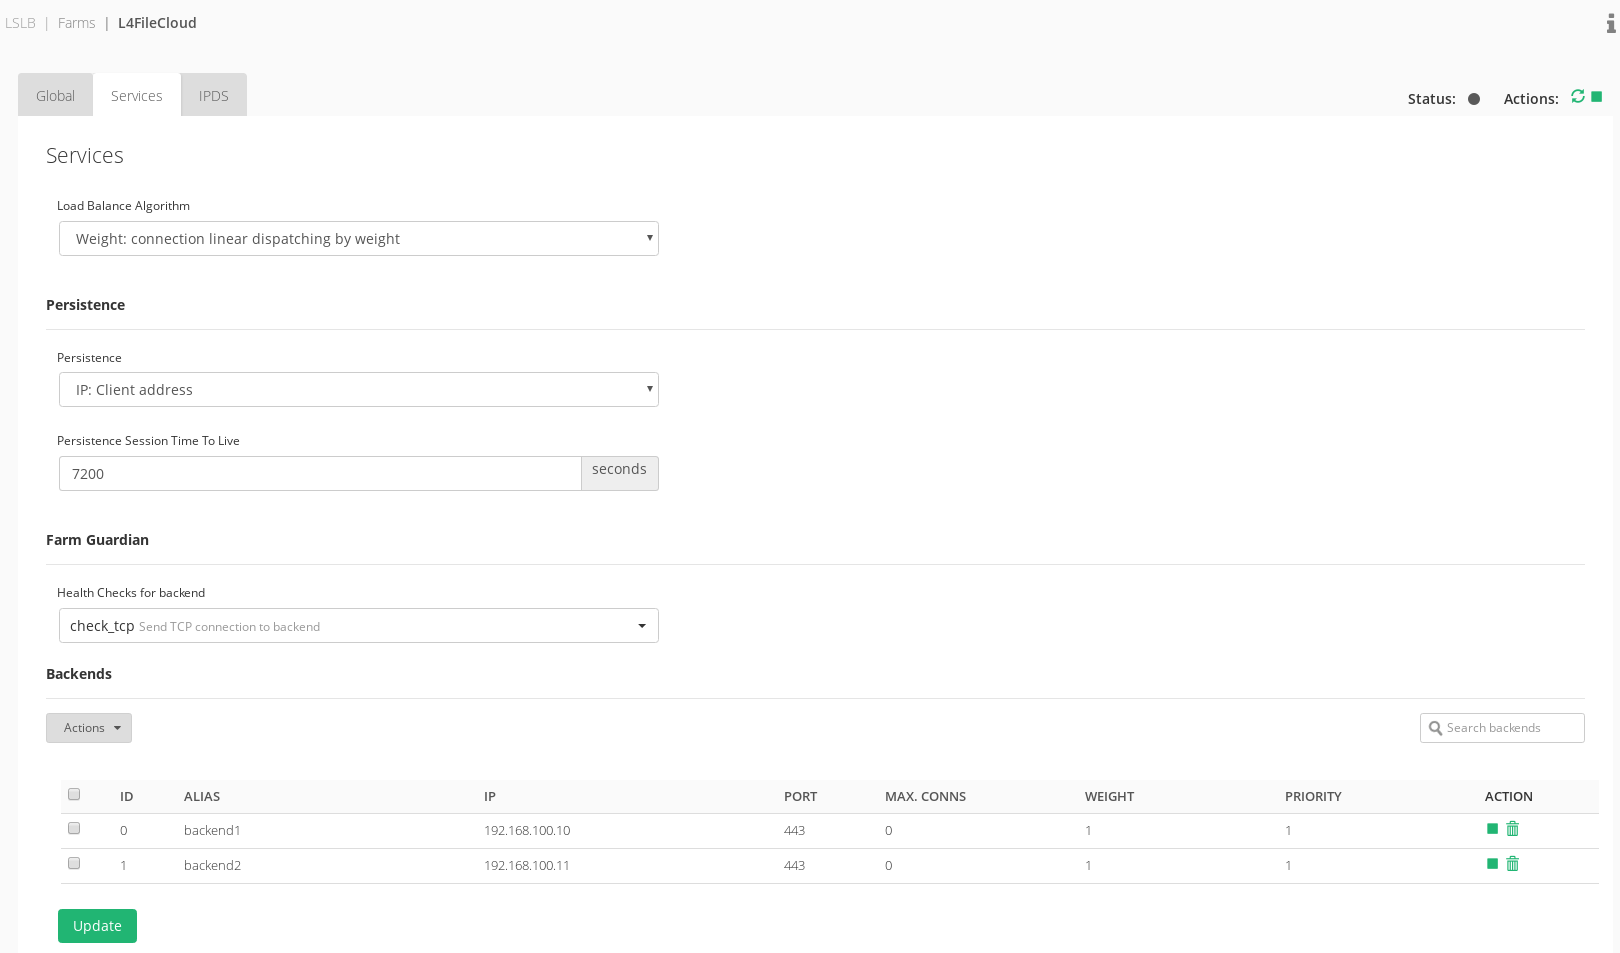
Then, go to the Services tab and select a Farm Guardian health check, ex. check_tcp.
Finally, enable persisntece session through IP with a time to live of 7200 as in the previous example configuration and add the FileCloud backends in the Backends table (ex, 192.168.100.10:443 and 192.168.100.11:443).
Check out the following screenshot with the final Service configuration:
Enjoy your file sharing with an scalable FileCloud!
Some references used in this article:
https://www.getfilecloud.com/supportdocs/display/cloud/FileCloud+High+Availability