Contents
Overview
A10 Networks is one of the Application Delivery leaders that it is struggling with the future of the Company, and hence, with the continuing support and development of their network security products.
This article will drive you on how to replace A10 Networks vThunder to ZEVENET if you’re planning to look for more modern ADC alternatives. Here, you’ll find some configuration examples and concepts used in A10 Networks and which are analogous in ZEVENET.
Basic Concepts
partition: The partitions in A10 Thunder supports Layer 3 virtualization for network and virtual service isolation, it’s similar to the namespace concept in Linux.
pool: A pool is a group of objects, in this case, a group or set of IP addresses.
service group: It defines a set of real servers or backends are defined. ZEVENET uses the term service per virtual service of farm in order to define a specific behavior inside a virtual service.
virtual server: This is the inbound virtual service definition, in ZEVENET it’s also called farm.
member: real server or backend.
Simple L4 Load Balancing Service
This example shows how a simple L4 load balancing service is setup in A10 Networks Thunder and then in ZEVENET ADC.
A10 Networks ADC Configuration
The following example configures in A10 vThunder a VLAN 8 interface in ethernet 0 and set the IP address 10.1.1.222 with its default static route.
active-partition PTEST
vlan 8
 untagged ethernet 0
 router-interface ve 8

interface ve 8
 ip address 10.1.1.222 255.255.255.0
!
ip route 0.0.0.0 /0 10.1.1.1
Then, in order to configure a simple source NAT service without transparency and losing the client IP address but hiding our network architecture, it’s required to set the following command.
ip nat pool POOL 10.1.1.110 10.1.1.119 netmask /24
Later, as our real servers are going to host a web service it will be required to create a health checker against a certain URL and gathering the HTTP 200 OK response:
health monitor SIMPLE_HTTP_CHECK
 method http url GET /status expect response-code 200
Create the real server definitions, 2 of them in this case, setting the name, IP address, and port.
slb server RSERVER1 10.1.1.50
no health-check
port 80 tcp

slb server RSERVER2 10.1.1.51
no health-check
port 80 tcp
Create the service group for TCP protocol, assigning the health check and both backends members previously created.
slb service-group SG_GROUP tcp
    health-check SIMPLE_HTTP_CHECK
    member RSERVER1:80
    member RSERVER2:80
Finally, create the virtual service with the previous definitions assigning a virtual IP address for inbound connections with a certain port and protocol, set a name, associate the source nat pool and then the service group where the outbound connections are defined.
slb virtual-server VIP_GROUP 10.1.1.100
   port 80 tcp
      name VS_HTTP_GROUP
      source-nat pool POOL
      service-group SG_GROUP
With all these configurations we can set up a simple layer 4 load balancing service for a web service with a health check.
ZEVENET ADC Configuration
In ZEVENET, this configuration can be done via web graphic interface or automate it via rest API. In the web GUI, go to the section Network > VLAN and click over the button Create VLAN. Later on, select the parent interface as the first ethernet interface eth0, set the VLAN name as 8, IP address 10.1.1.222 and netmask. Optionally, you can setup a gateway for this new interface but in any case, the static routes for it will be configured automatically. Finally, click on Create in order to apply the changes.

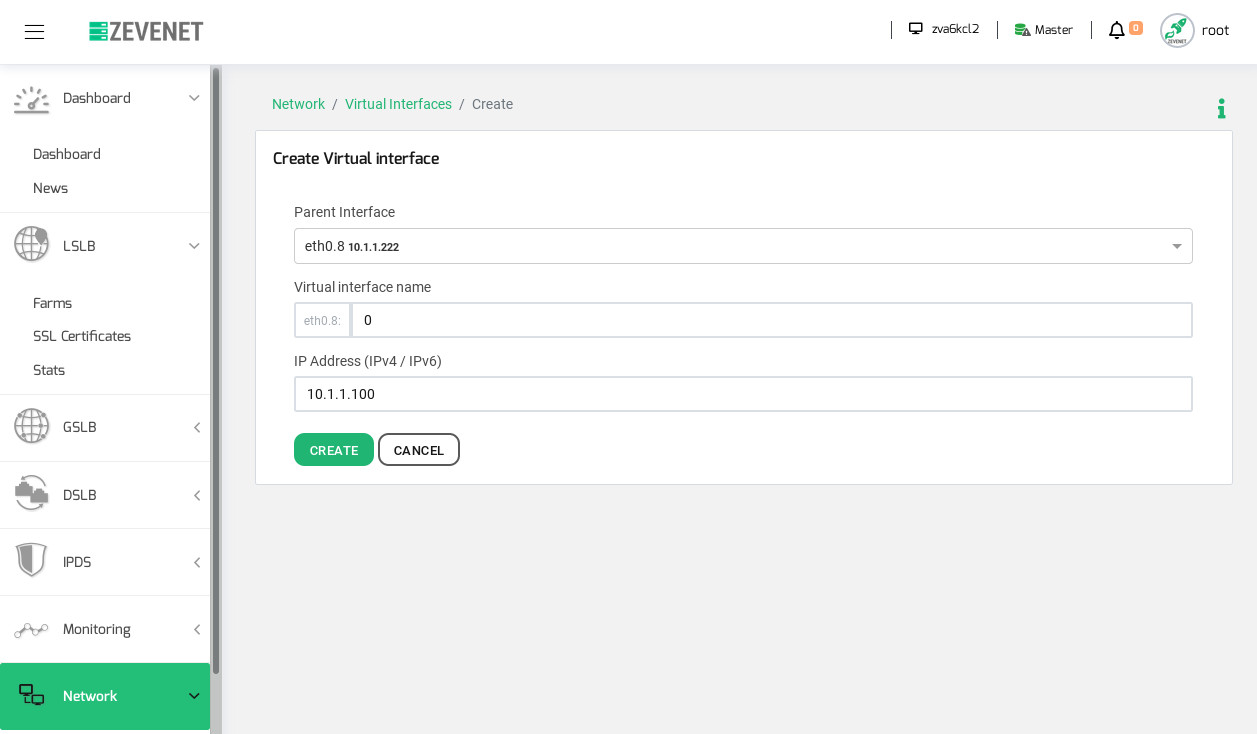
Then, go to the section Network > Virtual Interfaces in order to create the VIP from where the inbound traffic will come, and click on Create Virtual Interface to define the configuration and then apply with the button Create.
The LSLB service needs to be created with the name of the virtual service, the profile to be used in this case L4xNAT, the virtual IP created previously, the virtual port and finally, click on the Create button.

By default, the L4 local load balancing service uses the protocol TCP and source NAT but it could be modified in the future in the global settings of the farm.
Later on, it’s required to go to the just created farm VSGROUP and navigate to the Services tab. Then, add the real servers or backends in the Backends section. Optionally, we can go to the section Network > Aliases to assign backends IP addresses to names in the section Backends Aliases clicking in the button Add IP Alias.
Finally, we can assign an advanced health check with Farm Guardian and detect the HTTP 200 OK response from a backend. This checker is completely configurable with a lot of preconfigured health checks by default.

In addition, Zevenet can be completely automated using the latest rest JSON API available.
References
https://blog.michaelfmcnamara.com/tag/vthunder/
http://movingpackets.net/2016/09/27/unwrapping-device-configurations-a10/