Contents
Overview
VoIP stands for Voice Over Internet Protocol, which covers any phone calls made through the Internet but in order to make it real the SIP protocol was defined.
SIP or Session Initiation Protocol is the protocol that manages multimedia communication sessions including calls (voice and video), so we can say that SIP is one of the specific protocols that VoIP relies on.
In a media communication session, the SIP protocol is in charge of the signaling operations, such as initiation and termination of voice or video calls. The communications that SIP can establish are unicast, with two parties, or multicast, multiple parties. Through the SIP protocol, existing calls can be modified, for example, inviting another member. The SIP is designed in a way that is independent of the underlying transport layer protocol, and can be used with UDP, TCP, and SCTP (Stream Control Transmission Protocol). SIP may also work along with other protocols, which can specify the media format, and carry the media after SIP sets up the call. Routing of telephone calls is also possible from a PBX telephone system to the external network, where PBX (Private Branch Exchange) is a telephone switching system that is installed at a private organization with several internal devices.
This guide is useful for setting up popular SIP services such as Asterisk, Websphere SIP proxy, SIP Foundry, Elastix, FreeSWITCH, OpenPBX by Voicetronix, PBXInAFlash, FreePBX, OpenSIPs, Kamailio, 3CX, Office SIP Server, etc, all of them in high availability and ready to scale.
How does SIP protocol work?
Let’s suppose we have two callers, Bonnie and Clyde. Bonnie is calling Clyde. First of all, both Bonnie and Clyde’s phones have to be registered in a SIP server. The registration process between the clients and the registrar service is:
1. The softphone client sends a REGISTER message to the SIP server.
2. The SIP server responds with a 401 Unauthorized message including a header WWW-Authenticate.
3. The client then resend the REGISTER request to the SIP server including the Authorization header.
4. If the authentication is correct, the SIP server returns a 200 OK response to the client. At this stage, the client is able to receive and initiate calls.
This registration process will also be highly available through the proxy load balancer that we’re proposing in this article.
In order to understand better how a call between Bonnie and Clyde is performed, see below the steps defined in the protocol.

1. Bonnie starts a call to Clyde by sending an INVITE message
2. SIP server A passes the INVITE message to recipient SIP server B
3. Meanwhile, SIP server A replies 100 TRYING message to Bonnie
4. SIP server B passes the INVITE message to Clyde
5. Meanwhile, a 100 TRYING message to SIP Server A
6. Clyde’s device is now 180 RINGING and transmits it to SIP Server B
7. SIP Server B sends this 180 RINGING to SIP server A
8. SIP server A conveys this 180 RINGING to Bonnie
9. Clyde receives the call and sends 200 OK message
10. And conveys it 200 OK message to the SIP Server B
11. SIP server A conveys this 200 OK message to Bonnie
12. A connection is established between Bonnie and Clyde, where Bonnie sends direct ACK to Clyde, and both Bonnie and Clyde communicate with each other directly
13. Either party disconnects from the call with a BYE
14. The other party sends back the acknowledgment 200 OK
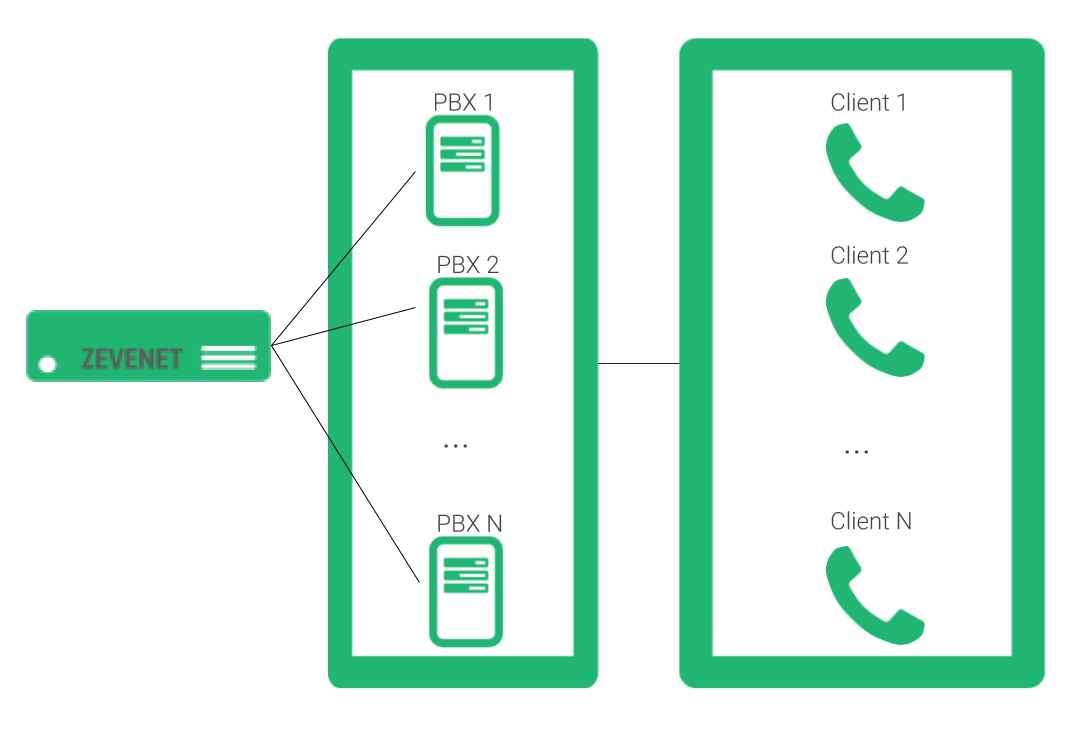
SIP load balancing environment
Knowing the SIP protocol specifics, the scenario that we want to achieve in this article is to be able to scale the SIP servers in order to be able to handle bigger numbers of softphones registered and manage higher numbers of calls. The diagram below shows the service architecture in a data center.
Let’s see below how to configure it.
SIP load balancing configuration
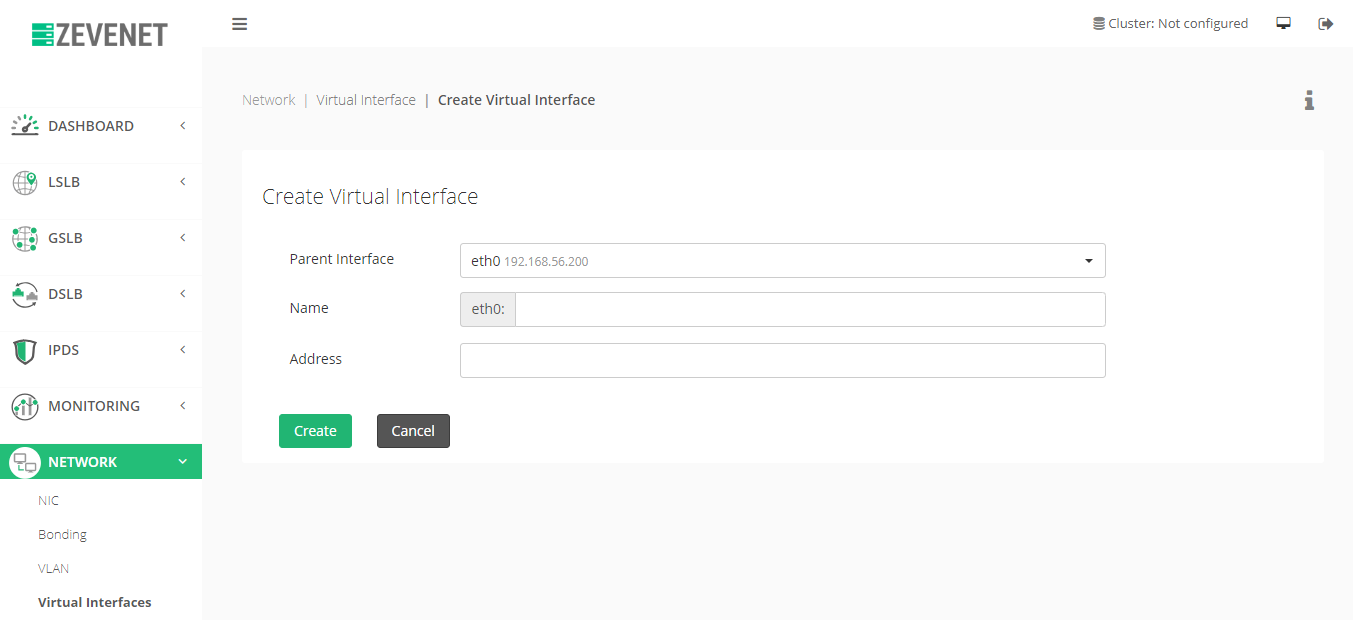
Before setting up the virtual service, we need to create a dedicated virtual IP, as this IP address will be able to receive TCP or UDP frames. To achieve that, go to Network > Virtual Interfaces. Then click on Action > Create Virtual Interface.
Next, select Parent Interface, interface Name and its IP Address:
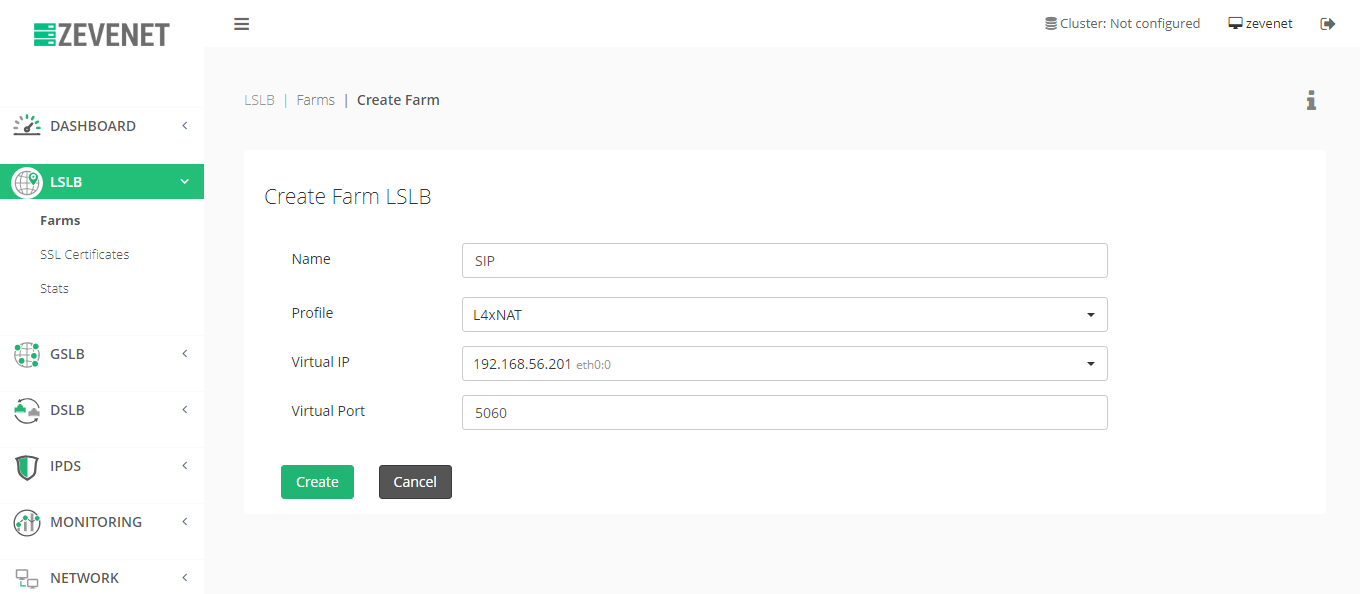
Now it is time to easily set up the SIP virtual service in the standard ports used by SIP services TCP and/or UDP 5060 or 5061. Port 5060 is commonly used for non-encrypted signaling traffic and port 5061 is typically used for traffic encrypted with TLS (Transport Layer Security).
With Zevenet Load Balancer, we achieve this configuration creating a LSLB farm profile L4xNAT with ports 5060 or 5061. In the virtual service, both encrypted and non-encrypted communications are supported at the same time if the ports are listed in the virtual service.
To do so, go to LSLB > Farms and create a new one as it’s shown below.
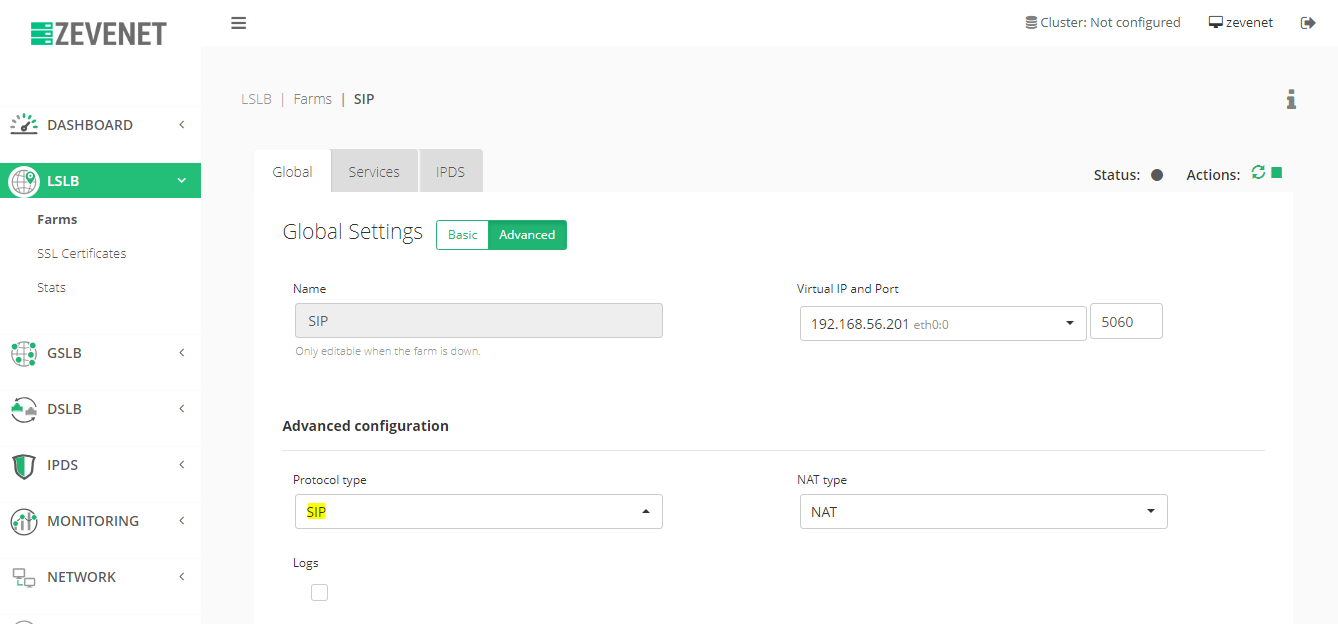
After creating, click on Advanced, select SIP as Protocol Type. At this stage, the layer 4 SIP proxy will be enabled in the current virtual service in order to load balance properly the registration and calls from the users. Also, we recommend NAT as NAT type but DNAT can be also used to get the client’s source IP. Finally, click on Update in order to apply the changes.
Finally, set up the backends, click on Services, and under the Backends section click on Action > Add backend.

Fill the IP, Port, Weight and click on the Save action in order to apply the changes.
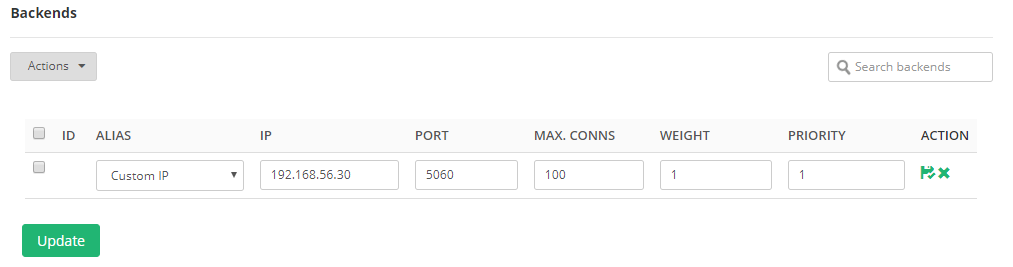
Add as many SIP servers you require to scale your service. You can now use the Virtual IP as the SIP virtual service in your softphones and clients in a highly available, reliable and scalable manner.
Advanced SIP Health Checks
In latest Zevenet releases, you can use an advanced health check specifically for SIP services where the load balancer performs dummy SIP calls to every SIP servers that are configured as backends in order to ensure the SIP read services are up and running properly.
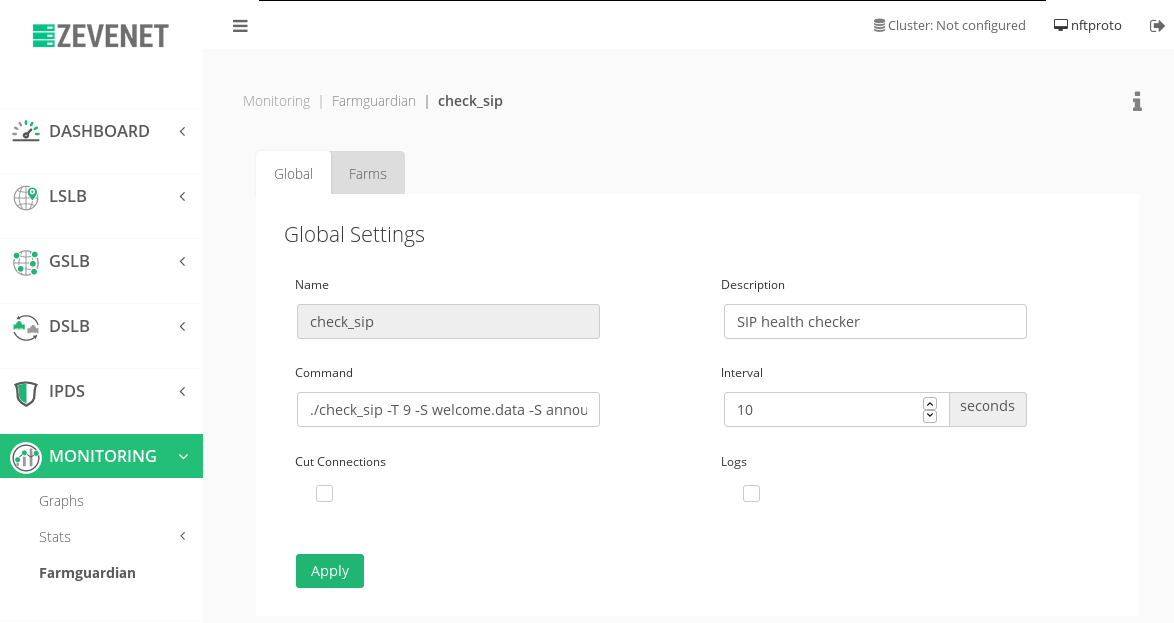
In case there is no already created a check_sip Farm Guardian command, then create it in the Monitoring > Farmguardian section as it’s shown below.
In order to understand better the options included in the check_sip command, please refer to the help of the health checker.
usage: ./check_sip [ options ] FROM TO
Makes SIP call from FROM to TO, sends voice from multiple
files to peer. Content in files need to be PCMU/8000 and
could be recorded with samples/invite_and_recv.pl

Options:
  -d|--debug                   Enable debugging
  -h|--help                    Help (this info)
  -P|--proxy host[:port]       use outgoing proxy, register there unless registrar given
  -R|--registrar host[:port]   register at given address
  -S|--send filename           send content of file, can be given multiple times
  -L|--leg ip[:port]           use given local ip[:port] for outgoing leg
  -T|--timeout T               timeout and cancel invite after T seconds, default 30
  --username name              username for authorization
  --password pass              password for authorization

Examples:
  ./check_sip -T 10 -S welcome.data -S announce.data sip:30@192.168.178.4 sip:31@192.168.178.1
  ./check_sip --username 30 --password secret --proxy=192.168.178.3
     -S holy.data sip:30@example.com 31
Given our example, we can define our health checker in the Farm Guardian section as it’s shown below.
./check_sip -T 9 -S welcome.data -S announce.data sip:Bonnie@192.168.56.201 sip:Clyde@HOST
Note that the token HOST will be changed in runtime with every SIP backend configured in the farm.
SIP Application Delivery Clustering
Zevenet also provides the ability to set the SIP scalable delivery service in high availability using a clustering service between two redundant units. Please deploy another Zevenet unit and refer to the System > Cluster section in order to configure it in high availability.
Enhancing SIP security
Apply a security layer to a public SIP service is quite easy using the IPDS module which permits blacklisting, real-time blackhole lists and DoS protection among others. Please refer to the IPDS section from the main menu in order to have more details about the protection of a public SIP service.
VoIP phone clients configuration
Once our SIP service is ready to scale, setup high availability and with enhanced security, it’s time to configure the new service in the softphones and clients. In this case, we recommend to setup a DNS entry resolving to the VIP address or a public IP address for the virtual service. Such DNS or FQDN name for our virtual SIP service will be the one to be used in the client side, instead of having a real SIP IP address configured. This configuration provides the flexibility to load balance the clients easily and automatically.
On the other hand, we recommend to configure a lower keep-alive timeout in the clients side in order to force the registration more usually, as in case that any SIP server is detected as down, the client notice that and retry to reconnect quickly to another one.
Now, just enjoy of your SIP scalable service!