Contents
Overview
Redis is an open-source in-memory data structure store that can be used as a message broker, cache, and key-value database. It supports several data structures: hashes, lists, sets, sorted sets, bitmaps, geospatial indexes, hyperloglogs, etc.
What makes Redis unique is that it can be considered both a store and a cache. It is designed in a way where data is modified and/or read from the main computer memory.
Among other features, Redis provides high availability, via Redis Sentinel, and automatic partitioning, via Redis Cluster. In addition, Redis has a replication mechanism that allows slave instances to be exact copies of master instances. The slave will automatically reconnect to the master every time the link breaks, and will its goal is to be an exact copy of it.
As Redis Sentinel provides high availability for Redis, it can handle failures automatically without any human intervention in many cases but also provides other tasks such as monitoring, notifications, and acts as a configuration provider for clients.
But, what happens when Sentinel detects a Redis server as down? We’ll discover in this article how to create a complete highly available virtual service for Redis.
Please take into consideration that this configuration also can be done even if your Redis server is not using Sentinel for monitoring.
Redis load balancing environment
The scenario that we want to achieve in this article is shown in the diagram below.
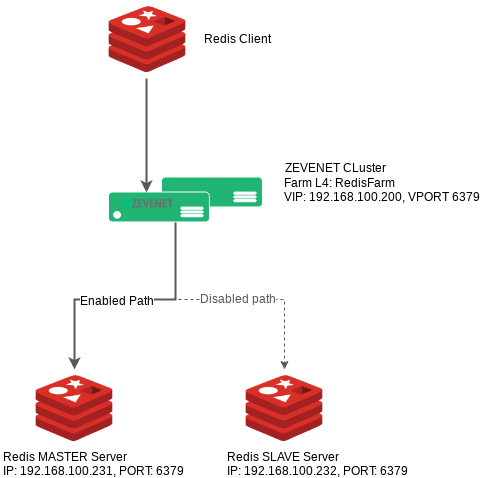
Redis Sentinel checks the state of all Redis nodes and changes the role of the Redis server once an error is detected.
The load balancer checks the state as well, but it does it periodically every some seconds. There could be cases in which Sentinel detects the problem but the load balancer could take up to a few seconds to realize. This could lead up to the balancer sending requests to the wrong master which is the one that has just failed but has been switched by Sentinel.
Zevenet offers a way to solve this issue, the L4 farm performs checks periodically. On the other hand, there’s also the flow passed to the backend that contains no previous check. When the farm guardian realizes that backend is not responsive, then it raises the alarm, indicating that the flow shouldn’t go this way.
Taking this into account, we have on the one hand the checks and on the other the requests. If the check fails, then the flow is sent immediately to another node. Even the ongoing petitions are redirected to another online node. This will be explained in further detail in the configuration.
Redis load balancing configuration
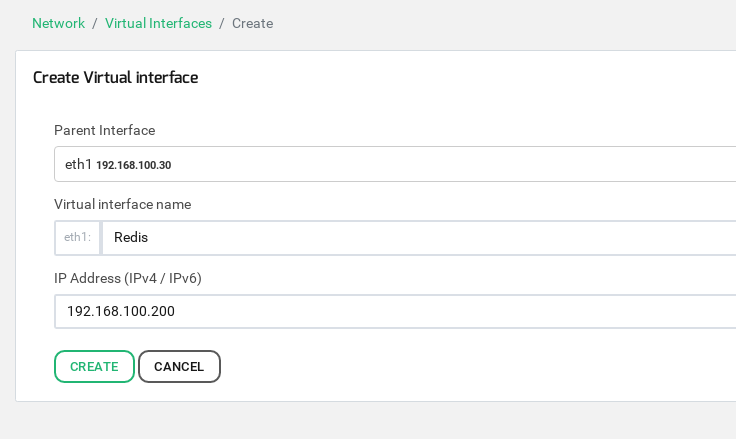
Before setting up the farm, we need to have a virtual IP. To achieve that, go to Network > Virtual Interfaces. Then click on Action > Create Virtual Interface. Next, select Parent Interface, Virtual Interface Name and its IP address:
Then, for Redis virtual server we need to create an L4xNAT farm. For that, go to LSLB > Farms, and then click on Action and Create Farm.

Once the initial parameters are set, click on Create. Next, go to the Advanced tab and make sure the protocol type is TCP.
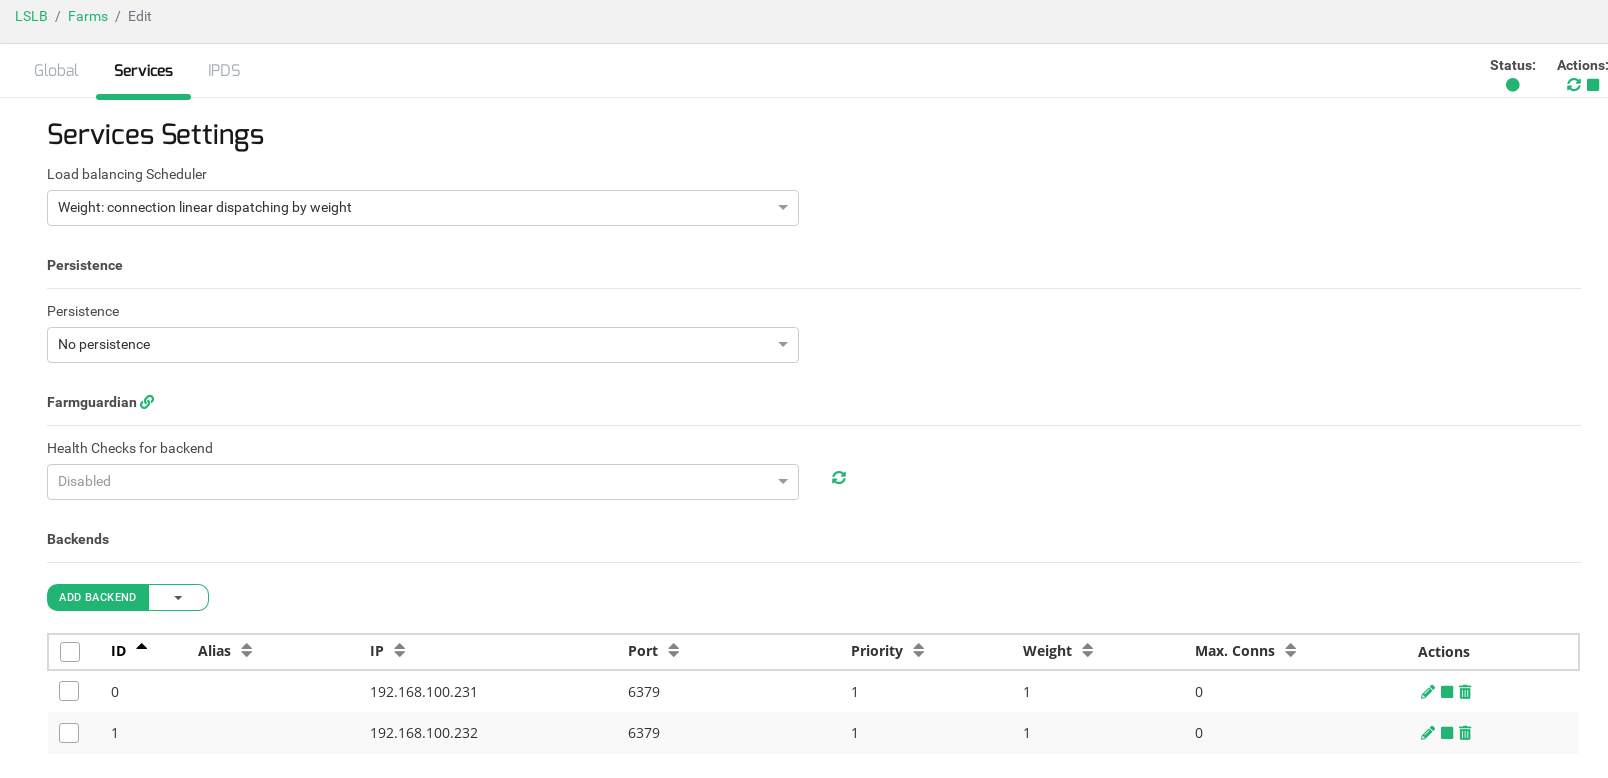
Next, go to Services. Backends and Farm Guardian will be setup here for advanced health checking. First find the Backends section, and click on Actions > Add backend like it’s shown below:
Redis monitoring and advanced health checking
Finally, the Farm Guardian checks are required to make sure we are always using the online node, as explained the case before. For that, we need to configure the following as the Farm Guardian command:
check_tcp -E -H HOST -p PORT -s 'info replication\r\n' -e role:master -t 3
Where HOST and PORT will be replaced by each backend’s Redis server IP address and port. The command info replication will get the information from the Redis server in order to verify which master is alive, connections only will be redirected to the server if the role master is presented, as soon as Sentinel changes the role then the load balancer will detect the change and the Redis server will be marked as down. The flag -t is the number of seconds that Farm Guardian will wait for a Redis server response and then if the timeout is reached without respond, the Redis server will be marked as down. On the other hand, once the Redis server health is restored then it will become as up again.
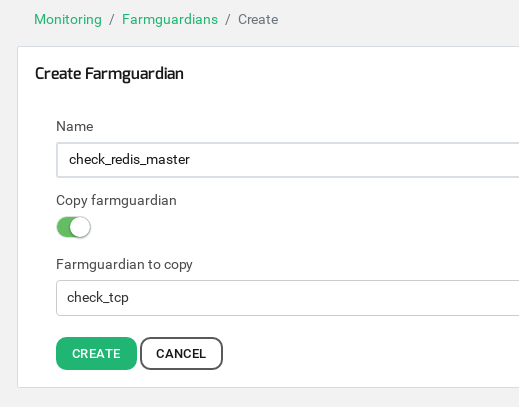
But before modifying the Farm Guardian for this particular farm, go to Monitoring > Farmguardian and then click on Action > Create Farmguardian.
Choose a descriptive name for your new Redis Sentinel health checker, for example, check_redis_master as in the example, now choose check_tcp in the filed Farmguardian to copy and click on Create as shown below.
Finally, copy the above mentioned command in the Command parameter and do the configuration as shown below.
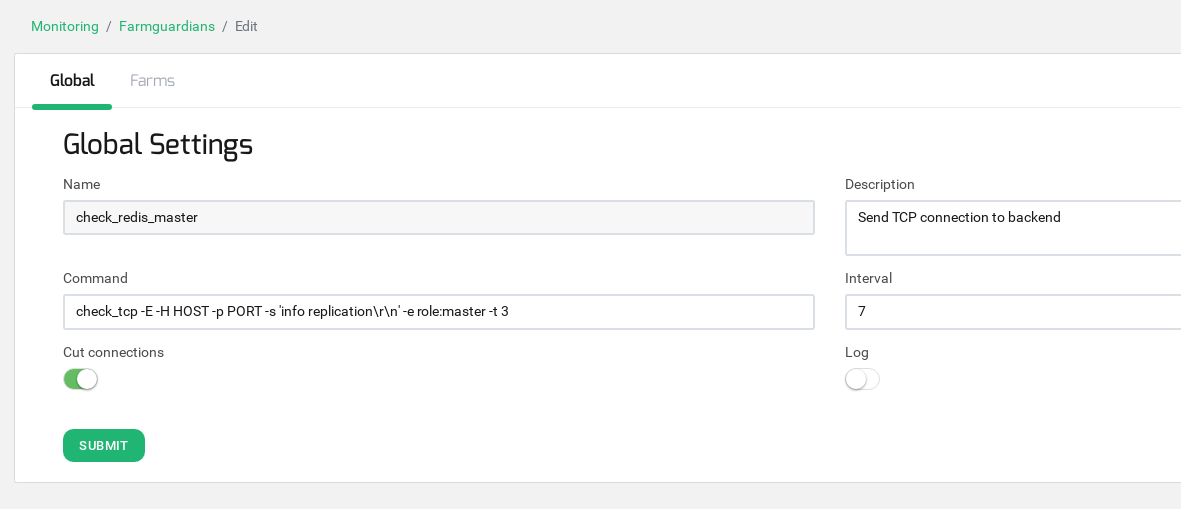
Click on Submit.
Now, select this new Farm Guardian advanced health check in the Redis virtual service. Go back to LSLB > Farms, to the farm created with name RedisFarm, Services tab. Finally, select the check_redis_master command just created under Health Checks for backend.
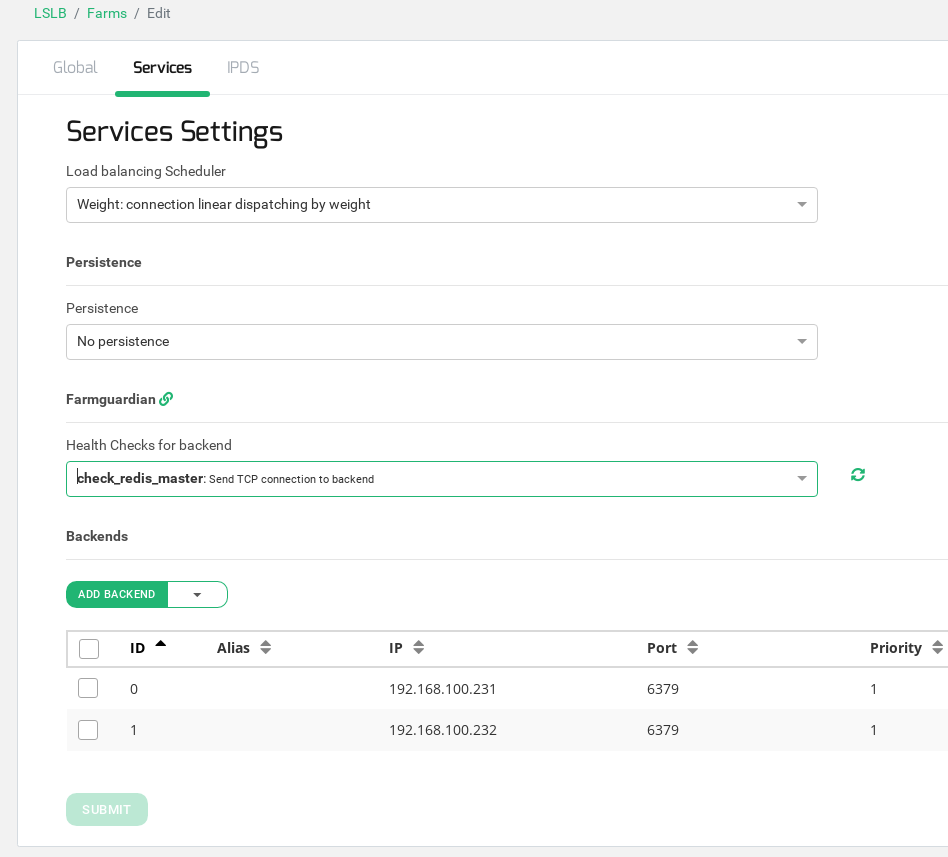
Click on Update the farm and now Redis will be fully highly available.
References
https://redis.io/topics/sentinel
https://redis.io/topics/cluster-tutorial