Contents
- 1 Introduction
- 2 AWS and ZEVENET Infrastructure
- 3 Deploying two ZEVENET Instances in AWS Marketplace
- 4 Configuring the network for the ZEVENET EC2 Instances
- 5 Enabling ZEVENET EC2 instances with temporal licenses
- 6 Configuring the Virtual IP for Load Balancing
- 7 Configuring the ZEVENET Cluster service in Amazon Web Services
- 8 Configuring a simple L4 Load balancing for web services
- 9 Adding new interfaces to the Load Balancer
Introduction
The following article describes how to set up advanced load balancing services with ZEVENET Load Balancer for high availability in Amazon Web Services EC2 infrastructure. We will describe the procedure to configure a ZEVENET Cluster and configure a TCP load balance profile for load balance HTTP services with 3 web backend servers.
AWS and ZEVENET Infrastructure
The following diagram describes the architecture we want to implement web load balancing with ZEVENET Application Delivery Controller in AWS.

It is required to deploy two ZEVENET Application Delivery Controllers, this template is available in Amazon Web Services marketplace, and each ZEVENET Application Delivery Controller is configured in the same VPC than the web backend servers as its shown in the diagram above with the subnet 17.32.16.0./20.
Each ZEVENET ADC instance is configured with one Interface eth0, and each instance is assigned to one Elastic IP, also one additional elastic IP is assigned to one additional IP through eth0 in the ZLB1-prod instance which will be used for load balancing purposes, as described below:
ZLB1-prod is assigned to 172.31.20.89 in eth0, this instance will be accessed directly by one Elastic IP 34.225.30.206
ZLB2-prod is assigned to 172.31.26.237 in eth0, this instance will be accessed directly by one Elastic IP 54.161.240.226
One additional IP is assigned to ZLB1-prod and configured in the load balancer with name eth0:vip1 and IP 172.31.26.47, this IP is used to configure over here one Load Balancing Service and be part of the cluster service, so this IP will work only in one of the ZEVENET instances at a time, which manages the ACTIVE role in the cluster. This internal IP is assigned to one Elastic IP, which is accessed by clients to connect to the published real web service.
Finally backend01, backend02 and backend03 are the EC2 instances with Linux-based web servers, those instances are part of the load-balanced service where the client connects when its requested http://54.144.190.17/.
Deploying two ZEVENET Instances in AWS Marketplace
Let’s deploy two ZEVENET Load Balancers and configure them as described previously.
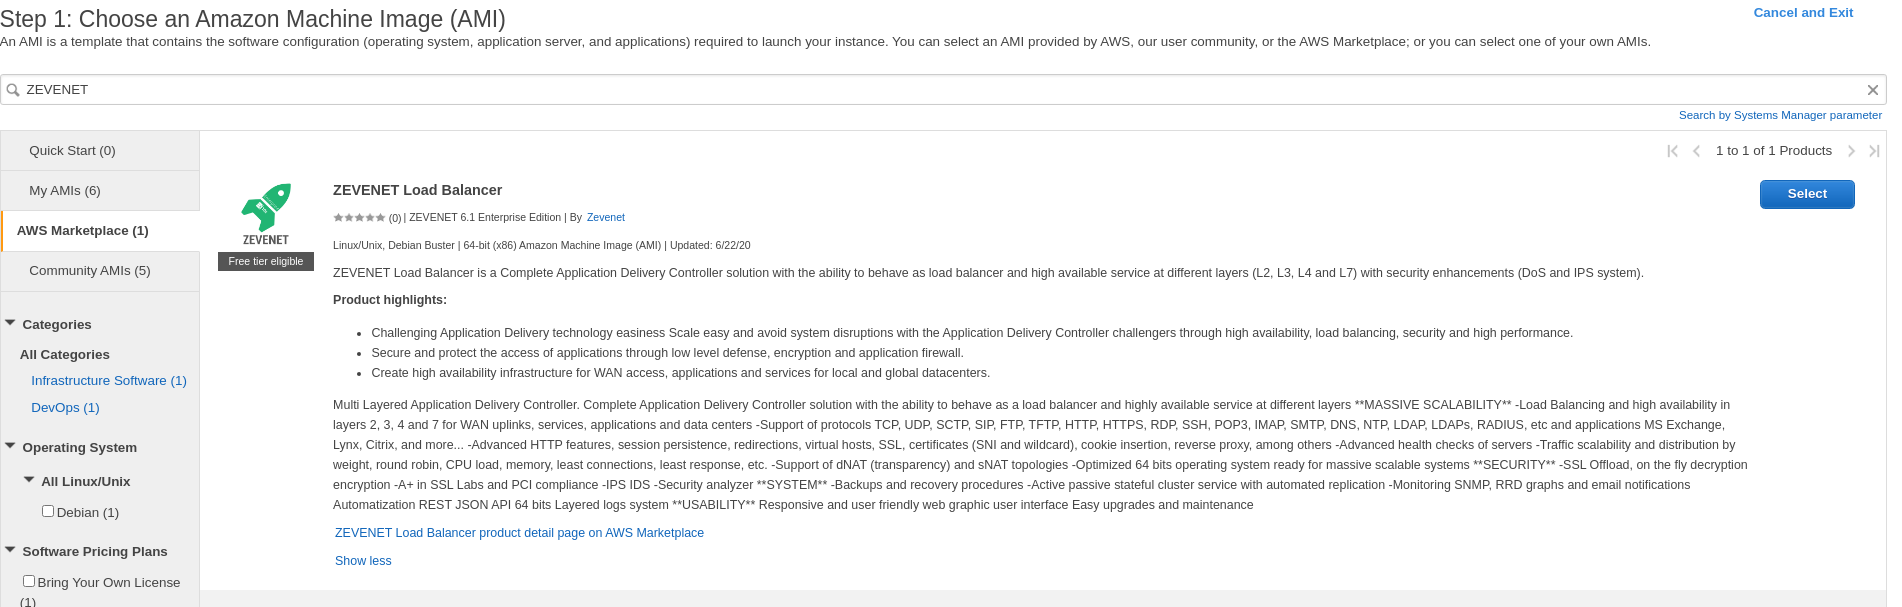
Go to the EC2 instances section and press in Launch instance.
1. Search for the required ZEVENET Load Balancer Enterprise Edition AMI. This AMI is based on a BYOL license model. The evaluation phase is free of charge and assistance during one month is included, after this period of time a definitive license is required to work.
2. Choose an Instance Type. Select here the needed instance based on the resources you want to load balance. A single t2.small instance is good to start working with L4 profiles, but if you want to use HTTP profiles then we would recommend at least a t2.medium instance. But, a t2.micro instance is good enough for testing purposes.
3. Configure Instance Details. Select here the VPC that runs the new ZEVENET instances, in this configuration example we will introduce the ZEVENET EC2 instances in the same VPC as the real web backends servers already configured.
4. Add Storage. By default ZEVENET EC2 instance requires at least 12Gb of Storage, if you want to activate logs by default then we would recommend increasing this size at least to 20Gb. ZEVENET doesn’t require access to Disk, just to save logs, so the Volume Type for general purposes is a good choice.
5. Add Tags. Configure here some description tags if desired.
6. Configure Security Group. ZEVENET by default uses the TCP port 444 for HTTPS web GUI management purposes, 9999 for Sessions synchronization daemon, and the TCP port 22 in SSH for command-line management and clustering purposes. In addition, each Virtual Port used in the load balancer virtual services will be required to be included in your security group. We have configured a security group which is used for those ZEVENET EC2 instances in a less restrictive mode as follow:
TYPE = All traffic
Protocol = ALL
Port Range = All
Source = 0.0.0.0/0
Description = Allow all from all to all
This security group is created for testing purposes, you can choose to block all ports and allow only the use for load balancing and management.
Once the configuration assistant comes back to the EC2 Instance List, the new appliance will start to be deployed and the Initiating state will be shown. Then, configure now a descriptive name in the field Name, in our case, our deployed load balancers in EC2 are named ZLB1-prod and ZLB2-prod.
Configuring the network for the ZEVENET EC2 Instances
Once the ZEVENET virtual appliances have been deployed and the Instance States are showing Running mode we can proceed to configure the network.
Click the right button over the ZLB1-prod appliance and choose Networking > Manage IP Addresses, in the Manage IP Addresses pop-up window press in Assign new IP and press the button Yes, Update, the system will assign a new IP for eth0 in the same VPC. Remember this new IP, in our example, this new IP will be 172.31.26.47. The system assigned a new IP that will be used for load-balancing purposes in the future clustering service.
Go to section Elastic IPs and assign to each ZEVENET instance a new Elastic IP. Those will be used for management purposes, not for load balancing.
In the same Elastic IP section, assign a new IP to ZLB1-prod, but in this case, choose the Private IP address 172.31.26.47. After this configuration ZLB1-prod will be accessible through web and ssh with the IP 34.225.30.206, but ZLB2-prod is accessible through the same services with the IP 54.161.240.226 and Elastic IP 54.144.190.17 assigned to the IP 172.31.26.47.
Enabling ZEVENET EC2 instances with temporal licenses
Once the Elastic IPs have been configured the virtual Load Balancers will be accessible as follow:
ZLB1-prod will be accessible through https://34.225.30.206:444 user root and password the instance id.
ZLB1-prod will be accessible through ssh in IP 34.225.30.226 with user admin and private certificate file, this is configured at EC2 deployment time.
ZLB2-prod will be accessible through https://54.161.240.226:444 user root and password the instance id.
ZLB2-prod will be accessible through ssh in IP 54.161.240.226 with user admin and private certificate file, this is configured at EC2 deployment time.
If you consider changing the hostname before to continue, if so, please reboot the EC2 instance to apply changes.
Once the access to the web GUI is done successfully you will see two important values, the hostname, and the Certificate Key, both information are unique per Load Balancer and are related to the Activation license, use this information in the following URL as described: https://www.zevenet.com/activate-enterprise-edition-cloud-evaluation/
Once the form is filled the system sends automatically the license to the indicated email. Please upload the received PEM activation license through the web GUI in each load balancer, once this is done the web GUI is unlocked and all the features are totally enabled and operational.
Do the same activation procedure in both nodes ZLB1-prod and ZLB2-prod.
Configuring the Virtual IP for Load Balancing
In the previous point, we already assigned an additional IP to eth0 172.31.26.47 in the instance ZLB1-pro, and this IP has been assigned to one Elastic IP 54.144.190.17, now it is pending doing this configuration in the ZBL1-pro load balancer.
Go to the ZLB1-pro load balancer through the web interface using its Elastic IP https://34.225.30.206:444, once you are logged in please go to navigation menu Network > Virtual Interfaces > Create Virtual Interface, and do the following configuration:
Parent Interface = eth0 172.31.26.47
*As the EC2 instances don’t know anything about Elastic IPs, we need to configure here the physical IP of the EC2 instance linked to the public Elastic IP used for load balance purpose 54.144.190.17
Virtual Interface name = vip1
IP Address = 172.31.26.47
Press Create button to apply the configuration.
Now a new IP 172.31.26.47 with name eth0:vip1 has been configured in the ZLB1-pro EC2 ZEVENET Load Balancer and can be pinged from any EC2 instance in this VPC.
Configuring the ZEVENET Cluster service in Amazon Web Services
ZEVENET Load Balancer cluster works in stateful active-passive mode, it means that the cluster resources are configured in both nodes but only available in the ACTIVE node. When a such node fails and this role is started in the other member the cluster resources need to be accessed again. As the Virtual IPs are cluster resources too, Amazon Web Service needs to be announced in some way that the Virtual IP configured for load balancing 172.31.26.47 will be working now via ZLB2-prod.
For this, the ZEVENET Cluster service uses the AWS client that needs to be configured with permissions in the EC2 module for managing Interfaces, so before starting the ZEVENET Cluster service we need to prepare it. So lets to configure an AWS KEY in your account with permissions to manage IPs in EC2 for being used in the AWS command-line interface.
Go to Amazon console https://console.aws.amazon.com/iam/ , then on the navigation menu choose User. Click on the button Add user.
Configure a descriptive User name = aws-for-zlb
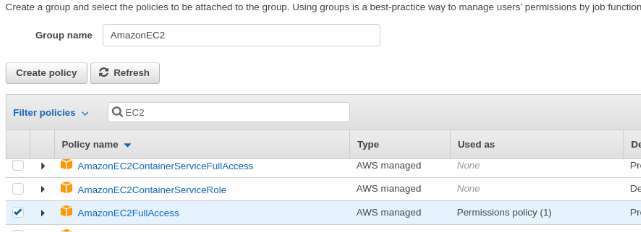
In Select AWS access type choose Programmatic access and press the button Next: Permissions. Now in the Set permissions section press in Create group and then in the new window fill in the field Group name with a descriptive name, for example, AmazonEC2, and finally, in the field Filter policies search and select the policy named AmazonEC2FullAccess which gives permissions to change the assigned IPs between EC2 instances among others.
Press in Next: tags and Next: Review. Finally, press in Create user, and the final window will show you the Access key ID and the Secret access key for this user, please save them for future usage.
Now we are ready to configure the ZEVENET Cluster service, so go to the web panel in ZLB1-pro through the assigned public IP https://34.225.30.206:444, section System > Cluster and fill the form following the example:
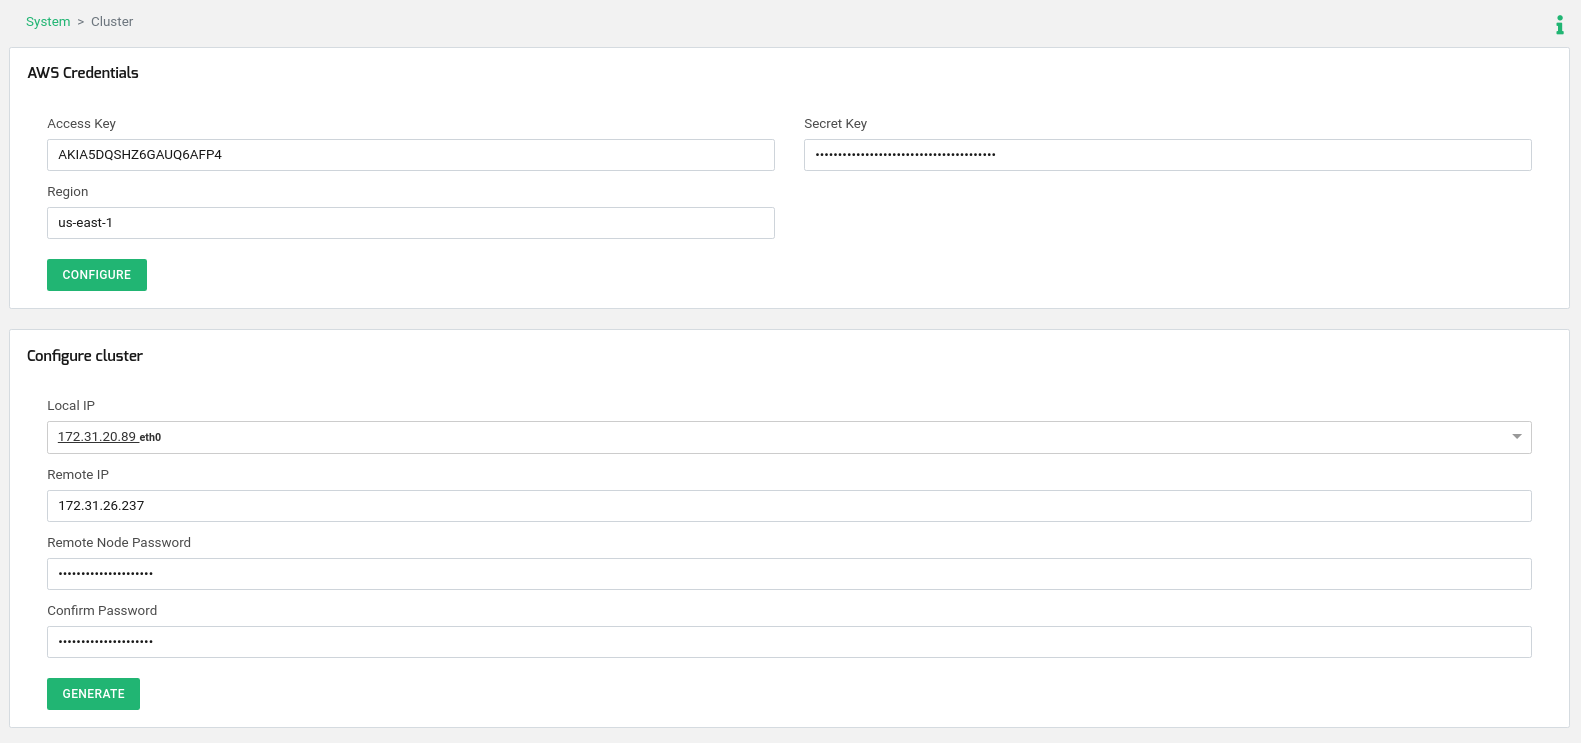
AWS Credentials: The access Key and Secret key are the already generated values in previous lines. The region, select here the region where your ZEVENET Application Delivery controller is deployed.
Configure cluster:
Local IP: select the IP and NIC of eth0.
Remote IP: enter here the IP of eth0 in node ZLB2-pro.
Remote Node Password and Confirm Password: enter here the root password for ssh in the other node, by default the instance ID of ZLB2-pro.
Click on Generate button and wait a few seconds meanwhile, the node where you run the configuration is going to take the ACTIVE role (ZLB1-pro) and the other (ZLB2-pro) is going to take the PASSIVE role.
At this point, ZEVENET Cluster has been configured in AWS and it is ready to work, let’s configure our first clustered load-balanced service.
Configuring a simple L4 Load balancing for web services
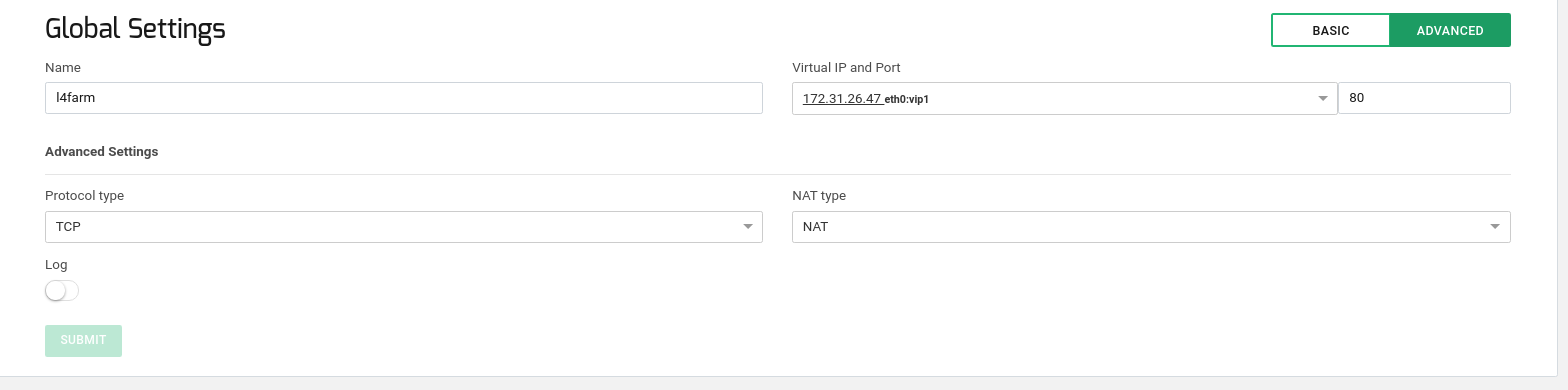
Go to LSLB > Farms > Create Farm with the following parameters.

Take into consideration that the used Virtual IP 172.31.26.47 is the Virtual IP configured previously and a resource of the cluster which will be reachable always from the ACTIVE node. Press Create and continue.
Now in the new window configure the Global section as shown below:
And finally, configure the section Services as described:
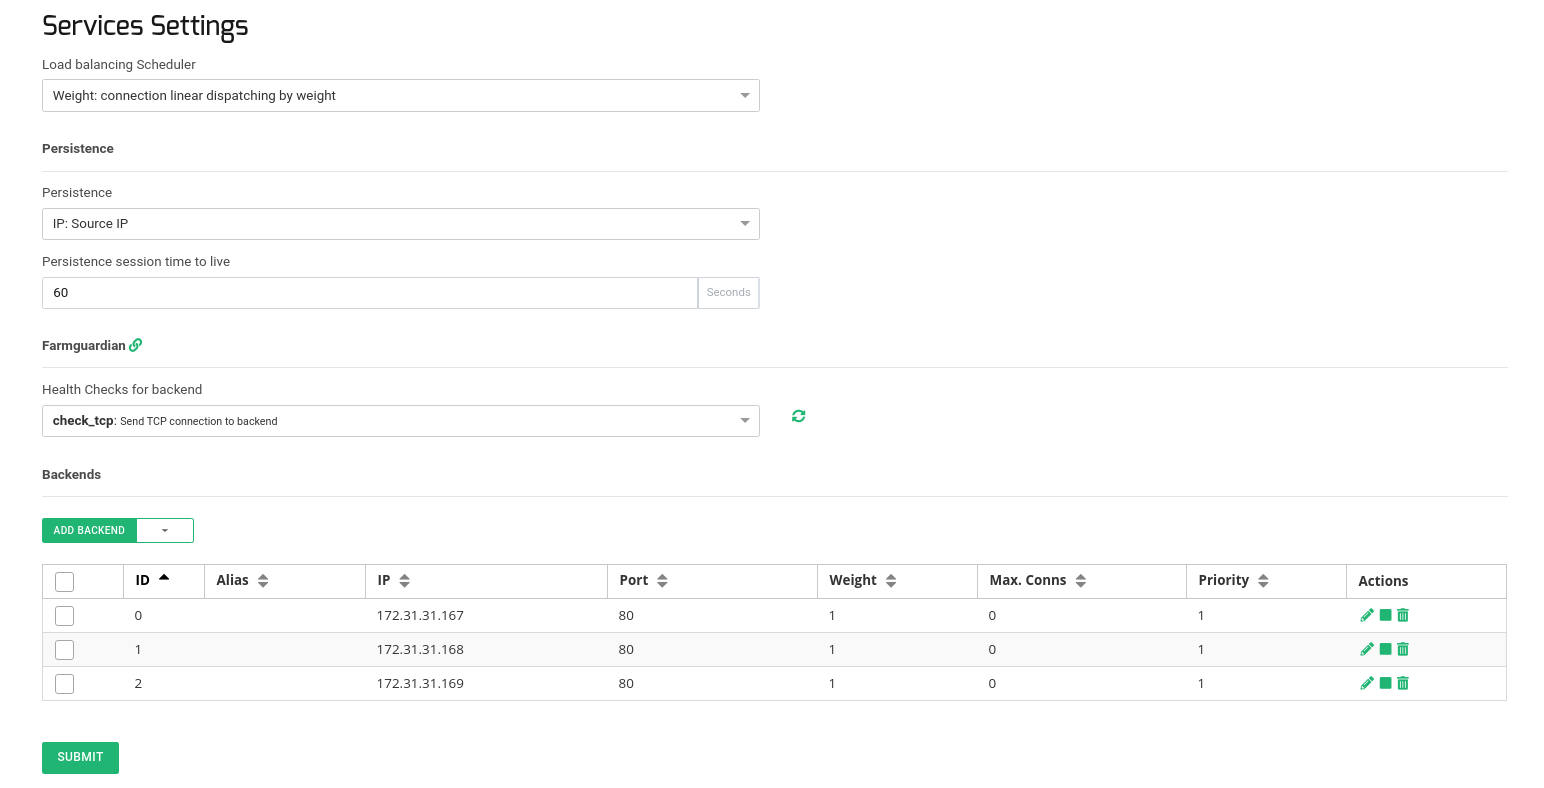
Use IP persistence with a timeout of 60 seconds just in case you need to guarantee that the same client IP will be connected to the same backend along a certain period of time. Configure the advanced health checks with FarmGuardian. Use check_tcp as a simple health check to verify that the TCP backend port 80 is opened in each backend. And then, add the backend servers internal IPs and ports where the real web services are running.
Now test the connection to the Elastic IP http://54.144.190.17/ assigned to the internal IP 172.31.26.47, the connection will pass through the load balancer using the eth0:vip1 and forwarded to one of the available backends.
Now a force to change the ACTIVE role in the cluster, for example, reboot the node with this role and after a few seconds, the other will take the virtual service and connect again to the public IP. The current and new client connections will be established against the same backend but this time through the new ACTIVE node without any client disruptions.
Adding new interfaces to the Load Balancer
For balancing purposes or for whatever you need, it is possible to configure more interfaces to the load balancer. To do this, it is as simple as following the steps outlined by AWS to add new interfaces to an EC2 instance. Please take a look at the article that AWS provides to better understand the best practices for this. https://docs.aws.amazon.com/AWSEC2/latest/WindowsGuide/best-practices-for-configuring-network-interfaces.html. When adding new interfaces to the EC2 instance, ZEVENET will detect these new interfaces automatically, so you can now use it to configure it as you wish.
Enjoy advanced load balancing and clustering in AWS with ZEVENET!