Contents
We have made a mayor rebuild of the Zevenet Cluster looking into the future of seamless load balancing. With the release of Zevenet 5 we are presenting this new cluster, including stateful failover capability for LSLB farms in Layer 4 (aka L4xNAT farms).
To better understand the new capabilities of the cluster lets have a look to the most characteristic features of the previous cluster system:
Legacy Zen Load Balancer Cluster
Network Interfaces
All the network interfaces will be available in the active node of the cluster (master role), while the passive node of the cluster (slave or backup role) will only have available the cluster interface and the management interface, if there is any configured.
So only the cluster interface and the management interface will have unique IP addresses to each node.
Failover
When the backup node detects a problem with the master node and takes over the master role all moving interfaces and farms are started.
New Zevenet Cluster
Network Interfaces
With the new Zevenet Cluster every NIC, VLAN and Bonding interface has a unique IP address, if configured, and only Virtual Interfaces will be available on the active node.
This means the IP addresses of Virtual Interfaces will be configured and up on both nodes but only available on the active node, so farms must use this Virtual Interfaces as VIP (Virtual IP) to be available on the active node at any time.
Failover
Before the failover process happens the backup node has all the network interfaces and farms up and running, but all ARP advertisement packets for Virtual Interfaces are blocked, so there won’t be duplicated IPs with those in the master node. Also FarmGuardian is only running in the master node.
During the failover process the backup node detects a problem with the master node, then removes ARP blockages for Virtual Interfaces, advertise them to the network and also starts FarmGuardian checks. Once finished this process, the backup has taken over the active role and becomes the master node.
This way greatly improves the time it takes the failover process and achieves seamless cluster switching using the stateful capability.
Services
Three services compose this new cluster system.
- A new healthcheck service (VRRP).
- An improved synchronization system.
- A new service to synchronize the state of the connections to enable the stateful capability.
- A new service to synchronize the state of the sassions to enable the stateful capability.
Stateful
The new cluster system also includes stateful capability on LSLB module, also known as L4xNAT and HTTP(S) farms.
- How? To make use of the stateful capabilities of the cluster you only need to configure the VIP of your farm as a Floating IP.
- What is a Floating IP? It is setting a Virtual Interface IP address as the source address of a NIC, VLAN or Bonding interface.
- Why? Setting a Floating IP gives to the cluster a common source IP address to the backends, independently of the node. Without Floating IPs the route from the backend to the load balancer would change when the node with the active role changes.
Migrating to Zevenet Cluster
- The first step is disabling the previous cluster. The master node will keep running the services and the backup node will stop all the farms and the interfaces with addresses running in the master node.
- On the running node stop all the farms running on non-virtual interfaces (ie. NIC, VLAN and Bonding interfaces). These interfaces won’t run on the active node anymore.
- Set Virtual Interfaces as VIP of the stopped farms. Please make sure you don’t duplicate IPs in this process.
- Start all the stopped farms.
- On the backup node make sure you have IPs configured on the same subnets of every NIC, VLAN and Bonding interface you want high availability on.
Now the nodes are ready to setup the new Zevenet Cluster.
Setting up Zevenet Cluster
We have made the setup process as simple as possible:
When configuring a new Cluster ensure that both nodes are using the same kernel version (ie. same model of appliance).
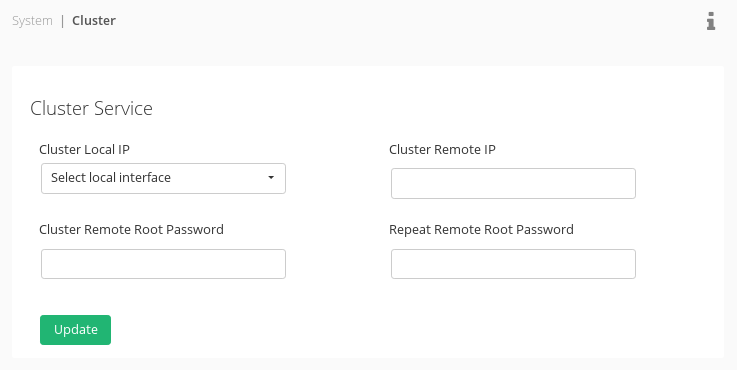
- Go to System > Cluster
- Select a cluster local IP: Only NIC, VLAN or Bonding interfaces can be selected (lets choose for example eth1).
- Fill the cluster remote IP: Using the IP address of the interface with the same name (in our example would be eth1) on the remote node.
- Type the remote node root password and confirm it typing it again.
- Click Update to apply the configuration and enable the cluster.
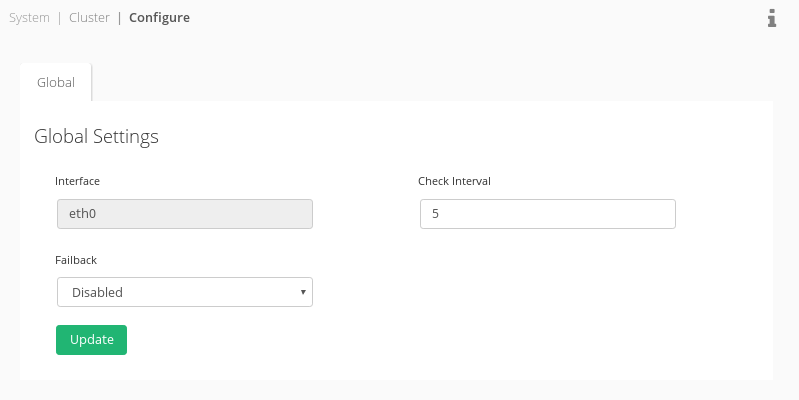
Once the cluster is setup click on the cog icon to change any cluster settings:
- Check interval: Time in seconds between node health checks.
- Failback: Set the preferred failback node (No preferred failback node is set by default).
Monitoring Zevenet Cluster
With the cluster ready we can monitor the cluster nodes clicking on the eye icon:
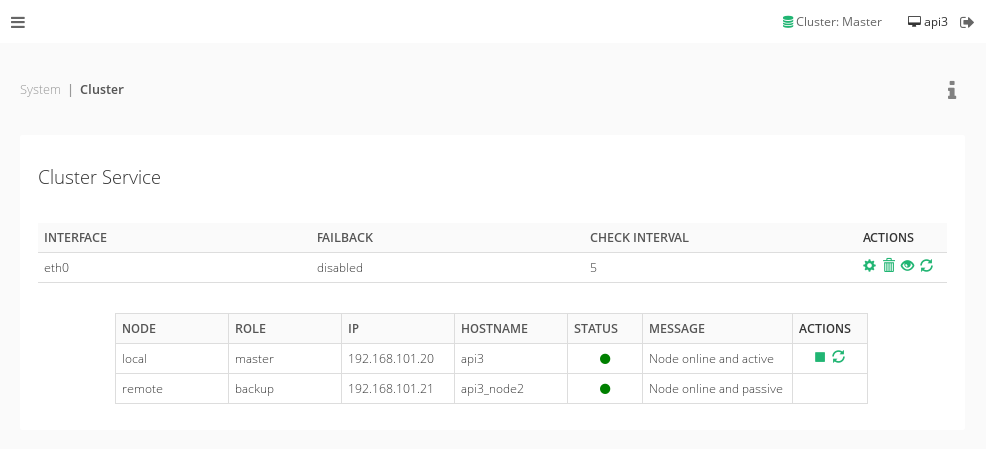
The nodes information will refresh every 30 seconds automatically. Also the node status showing on the top of the GUI interface will refresh automatically every minute.
The possible node status are:
- Online and active: for the master node.
- Online an passive: for the backup node.
- Maintenance: when the maintenance mode is enabled for such node.
- Unreachable: when the remote node is offline (down or there is a network problem)
From this panel the local node can be put in maintenance mode clicking on the squared icon next to the node. Enabling this mode makes the other node take the active role.